Accounts Payable / Receivable Procedures
Logging Order Acknowledgements
Following Up On Overdue Invoices
M & J Tooling offers NET-30 credit terms to eligible customers, meaning that rather than paying up front when an order is placed, they have 30 days to pay via check or ACH transfer once the order has been shipped. The NET-30 AR procedure consists of three main parts:
1. The order is placed, and an acknowledgement is sent to the customer once the sales team has processed the order.
2. The order ships, and an invoice is sent to the customer. This starts the 30-day payment window.
3. The customer pays for the order, either by mailing a physical check or via an ACH bank transfer.
Each step is explained in greater detail in the sections below.
Logging Order Acknowledgements
The salesperson who processes a NET-30 order will print a copy of the order acknowledgement, which will be brought to the AP/AR person at the end of the day. Each order will then be logged on the Net-30 Customer Information spreadsheet:
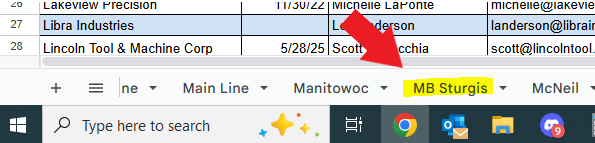
1. Find the company name in the "Ship To" address on the acknowledgement, and navigate to the corresponding tab on the spreadsheet. (Note: If the company name does not match any of our NET30 customers, check the "Bill To" address instead - customers will occasionally have an order shipped to another company that they work with)

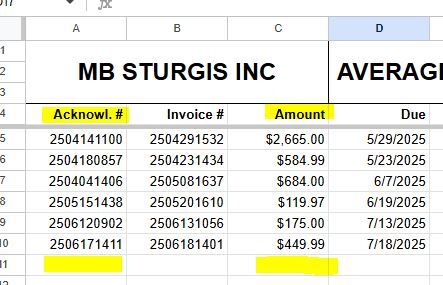
2. Scroll down to the first empty row and enter the Acknowledgement Order # in the "Acknowl. #" column and the Total Price in the "Amount" column. The other columns will be left blank for now.

3. Next, navigate to the Orders Need Invoiced tab and enter the following information in a new row:
The Order # from our acknowledgement
Company Name (from the "Ship To" or "Bill To" address)
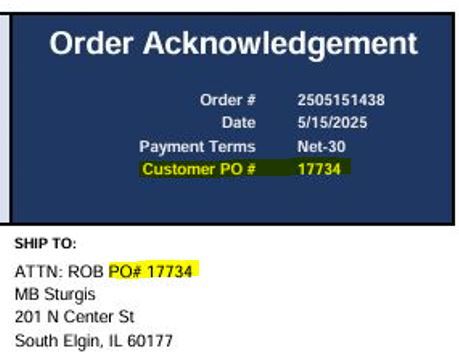
The Customer's PO#, which will be noted at the top of the acknowledgement, and is usually also in the Ship To address
The Total Amount for the order
The Source of the items on the order - AKA, whether it's shipping from our stock here or from a manufacturer.
If any of the following are true, it is from our stock:
- Lead time says "Stock"
- Description says "Refurbished"
- Item price ends in .99 cents
In this case, simply enter "Stock" into this cell.
If all of the following are true, it is from a manufacturer:
- Lead time does not say "Stock"
- Description says "New"
- Item price ends in .00 cents
In this case, we will need to find which manufacturer it is coming from:
1. Copy the customer PO# and search it in the Outlook "Sent" folder. You should find a sent email with a subject line that is an M& J PO# (such as "PO# MJ1336SA"), which will have a PO pdf attached. Open the pdf file and note the company name shown under "VENDOR":

2. Enter the vendor name along with our PO# (the one in the subject line of the email you found) in the Source / PO# column. The company name can be abbreviated such as PMC for PMC Lonestar, VTG for Vermont Gage, GA for Gage Assembly, etc.
Finally, the Expected Ship Date:
If the source is stock, this will simply be the date the order was placed plus any lead time mentioned (keeping in mind that lead times are business days only - meaning, for example, an order placed on Friday with a 2-day lead time would not be expected to ship until the following Tuesday).
If the source is a manufacturer:
Search our PO# for this order in Outlook and look for an order acknowledgement from the manufacturer (not the acknowlegement we sent to our customer). If you find an acknowledgement, note the acknowledged due date and enter this date into the Expected Ship Date column. If we have not received an acknowledgement from the manufacturer yet, leave this cell blank for now, and it will be added once the order has been acknowledged.
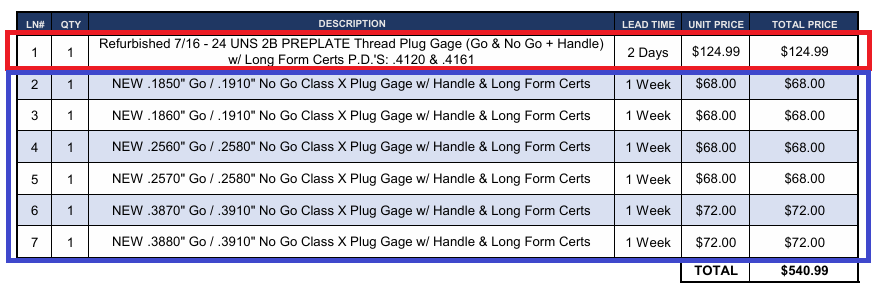
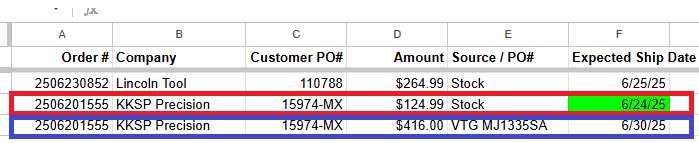
***If the order includes multiple lines from different sources and / or with different lead times, they will need to be entered as separate lines, since we will invoice items as they ship rather than waiting for the entire order to be complete. See the example below - Line 1 is from our stock, and lines 2-7 are from a manufacturer:
Once per day, the "Orders Need Invoiced" tab should be checked for any NET-30 orders that are (theoretically) ready to be invoiced. Any order that was expected to ship prior to today will have the date highlighted in green. For each of these orders:
1. Confirm that the order has been shipped:
Stock Orders: Find the order in ShipStation by searching the customer PO# and verify that the status is Shipped and there is an active tracking number. If the order has not been shipped yet, skip this order and move on to the next one.
Orders from Manufacturers: Search our PO# in Outlook and look for an invoice from the manufacturer. The invoice should specify the ship date and the tracking number (if the tracking # is missing, we will need to reach out to the manufacturer for that information before proceeding). If we have not received an invoice yet, skip this order and move on to the next one.
2. Pull the corresponding acknowledgement from the physical "Acknowledgement Awaiting Invoice" folder.
3. Open the Entered Orders Google Drive and search the Acknowledgement Order # (from the first column of the "Orders Need Invoiced" sheet). It should bring back an Excel sheet that matches the customer name & order #. Download and open this file.
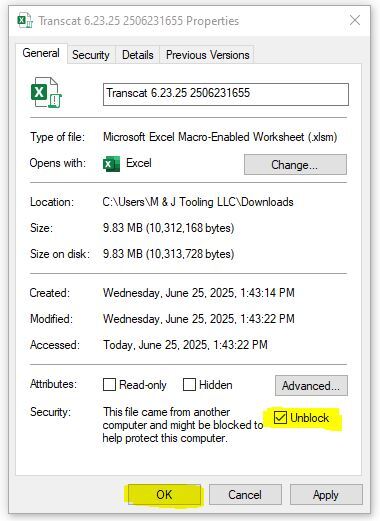
***You will need to unblock macros in order for the next steps to work properly. To do so, right-click on the Excel file and select "Properties", then check the "Unblock" box at the bottom of the window and click "OK"
4. Open the Excel file:
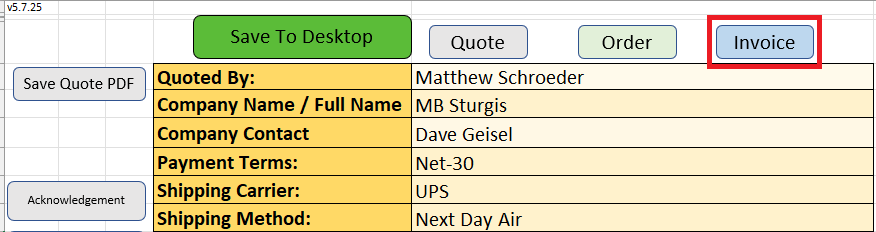
a. Click the "Invoice" button at the top of the sheet.
b. Verify that all of the customer information matches the acknowledgement and make any necessary changes (it should be very rare that you need to change anything, but always be sure to check). One of the most important things to check is the Payments Terms, which should be set to Net-30 - as this will cause issues on the invoice if the payment terms are set to any other option.
c. If we are not invoicing all lines on the order, check the box on the left next to each line that is being invoiced, and then click "Finished Selecting Lines" at the bottom.

d. Enter the ship date for each line in the "Shipped" column (which will previously have been the lead time).

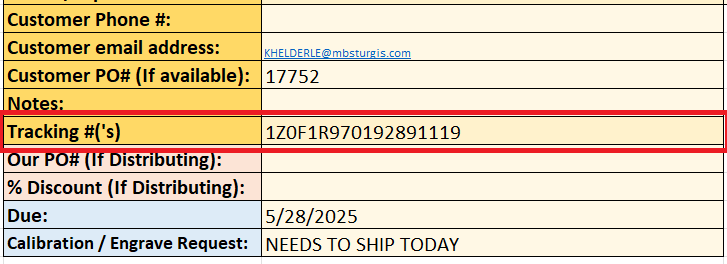
e. Enter the tracking number(s) in the corresponding cell at the bottom of the customer information. If there are multiple tracking numbers, separate each one with a comma.
f. Click "Save Invoice PDF" on the left-hand side of the sheet to generate the invoice. Check the invoice one more time to make sure there are no errors, then print a physical copy of the invoice.
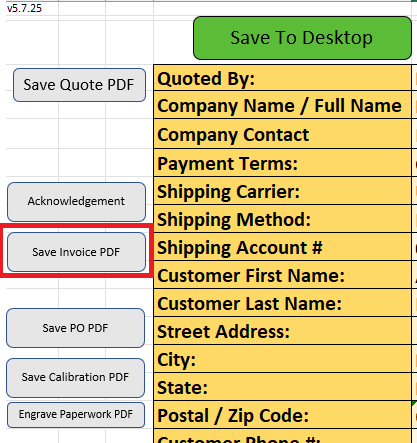
g. At this point, it is recommended to save the changes to the Excel file and keep it in a folder on your desktop (named "Invoiced Orders" or something similar). This way, if there are additional items which will need invoiced at a later date, or if you discover a mistake that needs to be fixed, you will not have to re-enter all of the information you added above.
5. Go to the "Overview" tab on the Net 30 Customer Information spreadsheet and find the Invoicing Email Address for the company you are invoicing.
6. Send an email to this address with the invoice PDF attached. The subject line should be "Invoice # [enter invoice # here]" and you can use the message below for the body of the email:
Good [Morning / Afternoon],
Please see the attached invoice for your recent order. Let us know if you have any questions, and we appreciate your business!
Regards,
[signature]
7. Back on the "Orders Need Invoiced" tab of the NET30 spreadsheet, delete the line for this order ***UNLESS THERE ARE STILL ITEMS THAT HAVE NOT BEEN INVOICED YET - This should not happen often but may be the case if, for example, a manufacturer offered a partial shipment on an order in which another item had been delayed. In these cases, edit the Amount and Expected Ship Date to reflect the remaining items that have not been invoiced yet.
8. If the order has now been fully invoiced, staple the invoice to the order acknowledgement, with the invoice on top. If there are still items on the acknowledgement that have not been invoiced:
a. Do not staple the invoice to the acknowledgement.
b. On the acknowledgement, write the line number(s) that have now been invoiced, along with today's date and the invoice #. For example: Lines 2 & 3 invoiced 6/18/25 #2506180837
9. Navigate to the tab for this customer on the NET30 spreadsheet and find the line with the corresponding acknowledgement # for this order.
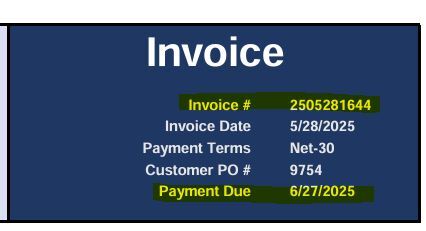
If the order has been fully invoiced: Enter the Invoice # and Due Date (which will be in the top-right corner of the invoice, as shown below)
If the order still has items waiting to be invoiced:
1. Change the Amount on this line to the total that is still waiting to be invoiced (for example: if the amount says $500.00 and we have just invoiced $300.00, the amount should be changed to $200.00).
2. In a new line, copy the Acknowledgement # and then enter the Invoice #, Amount (that we have just invoiced - using the previous example, this would be $300.00), and Due Date (which will be in the top-right corner of the invoice as in the image above).
10. Place the physical copy of the invoice in the "Open Invoices" folder.
There are two types of payments you will receive:
Company checks, which arrive in the mail and are received by Chandler, who will bring you the check stub.
When you receive a check stub, write "Received" and today's date on the stub and staple it to the corresponding invoice(s) from your "Open Invoices" folder.
Note: Some customers may pay with a personal check, which will not have a stub. In these cases, Chandler will bring you the check which you should not write on or staple to the invoice. Instead, simply write "Check Received (No Stub)" and today's date on the invoice, and return the check to Chandler once you are finished logging invoices.
ACH transfers, which we will be notified of via email.
ACH payments always need to be confirmed by Chandler. When we receive a remittance email, send Chandler a Discord message including the company name, amount, and date of payment.
Note: Sometimes the remittance email will be sent before payment, and may say something like "payment will be delivered on (date)" - in these cases, you can wait to ask Chandler for confirmation until that date.
Once he confirms receipt, write "ACH Received" and and the date that the bank received the transfer on the corresponding invoice(s) from your "Open Invoices" folder. You can find the receipt date by referencing the screenshot Chandler sends you, since most transactions will show the date received in YYYYMMDD format (i.e., 20250618 = June 18, 2025).
The Net-30 Customer Information spreadsheet will also be updated whenever we receive payments. To do so:
1. Navigate to the customer's tab and find the line with the corresponding invoice number(s).
2. Enter the date we received payment (the date that you wrote on either the chuck stub or invoice) in the Paid column. The "Over/Under" and "Total Days from Invoice Date" columns will be calculated automatically.
3. Put the invoice in your "Paid Invoices" folder.
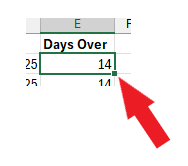
Each Monday, you will generate a list of unpaid invoices which are past their due date. This should include the company name, invoice #, amount due, invoice due date, and the number of days past due. See below for an example of what this should look like:

You can use the following formula to automatically calculate the days over:
=DAYS(TODAY(),D2)
Copy + paste this formula into cell E2 (the cell directly under "Days Over"), then click the small green square in the bottom-right corner of the cell (see picture below - your cursor should change into a black '+' sign when you hover over it) and drag down to the end of your list. This will calculate the days over for each line.
When finished, save the filename as "NET30 Overdue Invoices as of [today's date]" and send it to the sales manager via Discord, who will then follow up with the customer(s).
Following Up On Past Due Invoices
Once an invoice reaches 10 days past the due date (40 days total since the invoice date):
1. Search the invoice number in the sales inbox to find our original invoice email and verify that it was sent to the correct email address that we have on file.
2. Select "Reply All" to reply to the customer in this email chain. Add ***FIRST NOTICE*** to the beginning of the subject line, and use the following message for the body of the email:
***FIRST NOTICE***
Hello,
We are following up on this invoice as it is now 10 days overdue, which has resulted in your account being placed on credit hold. Please advise on status or if there is anything else you need from us to assist with payment.
Regards,
3. In the "notes" section of the Overdue Invoices spreadsheet, enter "1st notice sent [today's date]".
4. We will continue to follow up every day until we receive a response. This should be done by replying to the previous follow-up so that all correspondence is documented in the same email chain. The "FIRST NOTICE" in the subject line should be changed to "SECOND NOTICE" (and then "THIRD NOTICE", etc), and the email will always begin with the number of follow-ups that have occurred so far, as shown below:
***SECOND NOTICE***
Hello,
This invoice is now 11 days overdue. Your account will remain on credit hold until all outstanding invoices have been paid. Please advise on status or if there is anything else you need from us to assist with payment.
Regards,
Starting with the second notice, you should also CC any other email addresses we have on file for this company in order to increase the likelihood of it being seen and acknowledged. After each followup, update the note on the spreadsheet accordingly ("2nd notice sent [today's date", "3rd notice sent [today's date]", etc.).
5. Once we have any sort of response (which can be anything from "we are mailing a check today", "payment is scheduled for [date]", "I have brought this to the attention of our accounting department and they will get back to you shortly", etc.), add a brief description of the response to the notes in the spreadsheet and pause followups for 5 business days. If we still have not received payment after this 5 day period, we will begin daily followups again asking for an update on the payment status as we still have not received payment.
6. If after 5 followups we still have not received a response, you will call the company and try to get ahold of the AP person directly. Typically you should be able to find a phone number by searching the company online, or we may have one on file.
a. Some companies may have a direct number posted for their AP / accounting department, but for others you will have to just call the main line and ask to be transferred to the person in charge of accounts payable (if needed, tell them that you are calling about an overdue invoice that we are looking for an update on).
b. Once you have the AP person on the line, you will let them know that we are following up on an overdue invoice and give them the invoice number. You should also confirm whether the email address we have on file is correct, as we have sent 5+ emails and not receivied any response.
c. Typically the answer will be something along the lines of "I have payment scheduled for [date]" or "a check was mailed on [date]". This should be noted on the overdue invoices spreadsheet.
i. If they ask to pay for the invoice by credit card over the phone - take down the credit card number (including expiration date and security code) and confirm the email address that they would like a receipt to be mailed to. This information should then be brought to the sales department to process. Once payment has been processed, the invoice will be considered closed.
6. If you are not able to get ahold of anyone, continue to call each day until we are able to get an answer.
7. Once you have gotten an answer, treat this the same way as having received an email response - note the response on the spreadsheet and pause followups for 5 business days.
When a customer reaches out about going on terms, the sales team will determine if they are elligible and, if so, provide the customer with a credit application. Once the customer returns the completed appliation, it will be passed on to the AP/AR person to perform the following steps:
1. Reach out to the company's credit references.
a. These will be found in the bottom section of the application, or the customer may choose to attach a separate list. If the customer has not provided at least 3 different references, we will need to reply asking for additional references before we can continue.
b. We will contact each reference company via email. If an email address has not been provided, call the reference company and ask for an email address that we can send a credit inquiry to.
c. For the email, use the subject line "Credit Inquiry" and use the following message template:
Good [Morning / Afternoon],
We are looking to go on terms with [Company] and they have listed you as a credit reference. I'd like to ask a few questions:
Is this company currently in good standing?
Is this company currently on or have they been on credit hold within the last 6 months?
What is the (approximate) average number of days it will take for them to pay an invoice?
What is current credit limit with this company?
What is your current balance with this company?
Thank you for your time.
[signature]
2. Add the company to the "Open Applications" tab of the Net-30 Customer Information spreadsheet.
a. For each reference: enter the email address, enter "N" in the "Response?" column (which should turn the cell red), and enter "1 - [today's date]" in the "# of Reachouts" column.
b. As inquiry responses are received, you will change the "Response?" column to "Y" (which should turn the cell green) and then you can delete the information in the "# of reachouts" column for that reference.
3. Follow up on unresponsive references once per day.
a. Find the credit inquiry email by searching the reference's email address in Outlook's "Sent" folder
b. Click "Reply All"
c. This email can simply be:
Good [Morning / Afternoon],
Following up on this request. Thank you!
[signature]
d. Whenever a followup is sent, update the "# of Reachouts & Date of Most Recent" with the current number and today's date.
e. If we have sent two followups (meaning three emails total) with no response:
i. Call the reference company and confirm that we have the correct email address for credit inquiries.
1. If they confirm that we have the correct address:
a. Let them know that we have sent 3 emails and not recieved any response, and ask if they can help us to notify the appropriate person that we are awaiting their response.
b. If there is still no response the next day, we will reach out to the customer asking for an additional reference to use instead.
2. If they give you a different address:
a. Forward the original credit inquiry email to this address
b. Update the Open Applications spreadsheet with the new email address
c. Increase the # of reachouts (should now be 4) and put today's date
d. Follow up via email the following day if we have not gotten a response. If after this 5th reachout we still do not receive a response, we will reach out to the customer asking for an addiitonal reference to use instead.
3. If we need additional references:
a. You can reply directly to the email in which they sent us the completed application. See below for an example of how this can be worded:
Good [Morning / Afternoon],
We have been unable to get a response from one of your references, [company name]. Is there an additional reference we could reach out to?
[signature]
4. Once we have received at least 3 credit inquiry responses:
a. Print a physical copy of the customer's credit application, along with any other paperwork they may have included such as a tax exempt form.
b. Print each of the credit inquiry responses, which can be done by opening the email and clicking file -> print.
c. Staple all of the printed paperwork together, with the application on top.
d. Calculate the total $ amount in sales that we have done with this customer in the last 12 months:
i. Search the customer's street address in ShipStation - we want to use this instead of the company name, since we will include any orders that have been placed through eBay / Amazon / our website, which may not have included the company name.
ii. Add up the total amount, going back one year from today's date, and make a note of this number.
iii. Next, we need to look for any distributing (direct-from-manufacturer) orders that this company has placed, which will not be in ShipStation. To do so:
1. Open your Google drive (any folder).
2. Type the company name into the search bar
3. Click the Advanced Search button on the right side of the search bar:

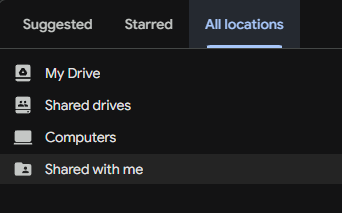
4. Click the dropdown for Location and select "More locations..."
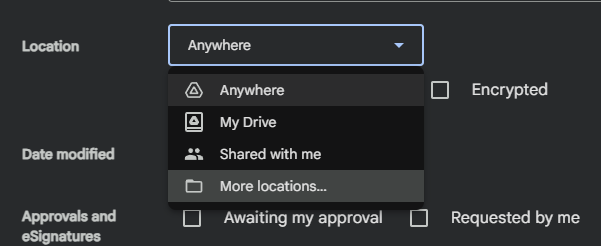
5. In the new window that pops up, click All locations at the top and then select Shared with me.
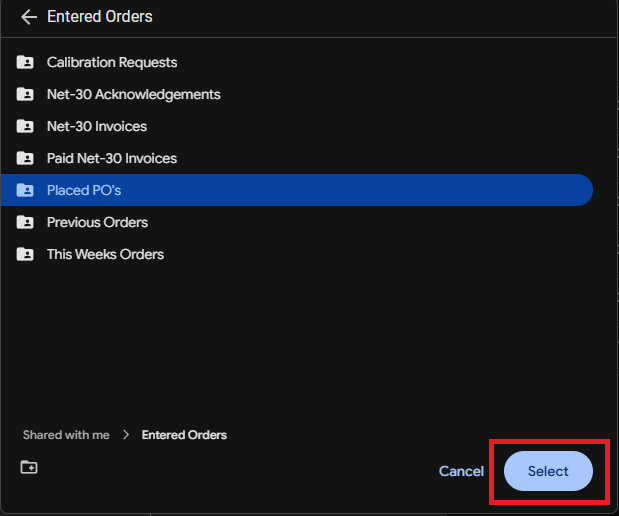
6. Select Entered Orders and then Placed PO's, then click the Select button in the bottom-right corner.
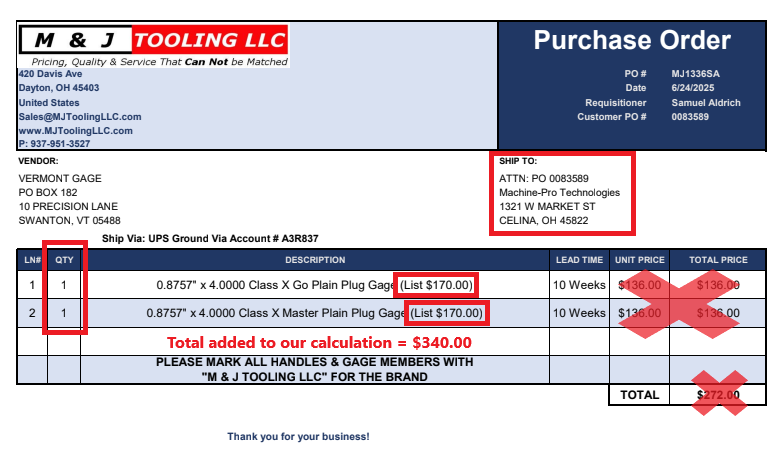
7. If there are any results from the last 12 months (check the "Last Modified" column to confirm), check each one to confirm that it is the correct company in the "Ship To" address, and add the list price amount to the total you calculated from ShipStation.
a. The list price will be noted at the end of each line's description in parentheses - this is the amount the customer actually paid and should be used instead of the unit price, which will be our discounted price from the manufacturer.
b. Be sure to check the QTY for each line and multiply accordingly.
iv. Once you have calculated the total amount paid, write this number at the top of the printed application as "[$X.XX] in last 12 months".
a. If we have less than 12 months of business history, amend this to state the date of the customer's first order. For example: "[$X.XX] since 4/11/25"
v. Bring the paperwork to the management team for a final decision to be made.
5. Once a decision has been made:
a. If we decide not to offer terms, we will email the customer letting them know and explaining why their application was rejected. The management team will help you to draft this message.
b. If we decide to offer terms, we will email the customer using the message template below. The starting credit limit will be provided to you by management, and the banking information which should be attached to this email can be downloaded here (pdf file titled "M & J Tooling Banking Info")
We are accepting Net-30 terms with your company. Once we receive an order, we will provide an order acknowledgement containing order information and expected ship date. Once this ships, we will provide an invoice with tracking to be paid within 30 days from the invoice date.
Payments can be made via ACH using the attached banking information, or via company check mailed to the address below:
ATTN: Accounts Receivable
M & J Tooling LLC
420 Davis Ave
Dayton, OH 45403
To start out, we will have a [$X] credit limit, which may be subject to change. Please let us know if you have any questions!
6. The new customer will need to be added to the Net-30 spreadsheet - currently this is done by Matthew so bring him the approved application once everything else is finished
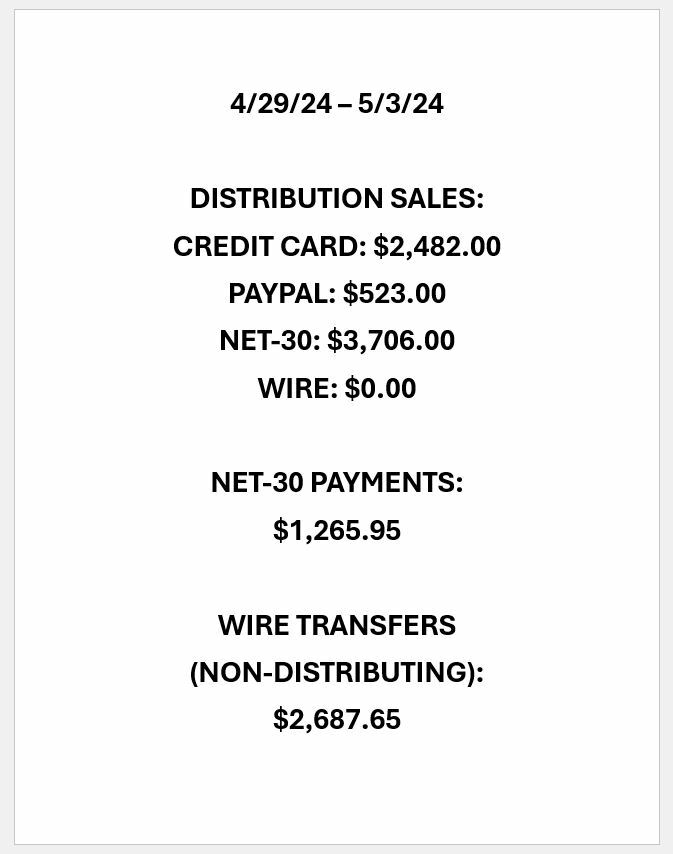
The following numbers are included in the sales report:
- Distributing Orders Placed
- Net-30 Payments Received
- Wire Transfers Received
These numbers are tracked on a Weekly Sales spreadsheet. Example shown below:

Distributing Orders
1. Open the Distributing Orders spreadsheet. On a separate tab, open the Placed PO's Google Drive folder.
2. On the Distributing Orders sheet: For each order that was placed during the week the sales report is being generated for:
***Skip any order with M & J Tooling listed as the customer, these are stocking orders which are not included***
2a. Find the corresponding MJ PO# in the Placed PO's folder and open the PO pdf.
2b. Copy the number in the "Our Ack. #" column of the Distributing Orders sheet and search it in Outlook's "Sent Items" folder. This should bring back the order acknowledgement we sent to our customer for the order.
2c. Check the Payment Terms in the top right corner of the acknowledgement to see if this was a credit card, PayPal, Net-30, or wire transfer order.
2d. Compare with the PO pdf you opened in the Placed PO's tab to identify which line items from the acknowledgement are distributing. Often it will be the entire order, but it is not uncommon for an order to include both stock and distributing items.
2e. For each distributing line item, enter the total amount for that line on the acknowledgement in the appropriate column of the Weekly Sales spreadsheet - either "CREDIT CARD DIST.", "PAYPAL DIST.", "NET-30 DIST.", or "WIRE DIST.", according to the payment terms identified in step 2c. This number will not necessarily be the same as the the list price on our PO, so always use the price on the acknowledgement so that it is accurate to the actual sale price. Any shipping costs paid on the order will not be included in the Weekly Sales sheet.
2f. If there is a ship date in the "Acknowledged Due Date" column as in the image below, delete the entire row once you are finished logging the order.
Net-30 Payments
1. Get the "Paid Net-30 Invoices" file from the filing cabinet
2. Each paid invoice will have the date received written on either the invoice itself or the attached check stub. For each payment that was received during the week the sales report is being generated for:
2a. Identify if any line items on the invoice were distributing. These should always be NEW and have a price that ends with 0 cents. If you are not sure, find the original order file in the Entered Orders Google Drive to confirm.
2b. Enter each payment amount minus any line items which were distributing in the "NET-30 PAID" column of the Weekly Sales sheet.
2c. Customers may pay multiple invoices with one check / ACH transfer, so make sure to check for any additional invoices that may be stapled together (don't just assume the one on top is the only invoice)
2d. One customer, Machine-Pro Technologies, is on 2%/10 NET-30 terms, which means that if they pay an invoice within 10 days of receipt, they get a 2% discount on the total price. This will be reflected on the check stub, and in these cases we want to always enter the price they actually sent us a check for on the spreadsheet, rather than the total shown on the invoice.
Wire Transfers
1. Get the "Wire Transfers" file from the filing cabinet
2. The order acknowledgements in this file will be dated with the date we confirmed receipt of the wire transfer. For each wire transfer that was received during the week the sales report is being generated for:
2a. Identify if any line items on the order were distributing, using the same method described in the "Net-30 Payments" section above.
2b. Enter each wire transfer amount minus any line items which were distributing in the "WIRE (NON-DIST.)" column of the Weekly Sales sheet. The amount entered should also include any shipping costs or transfer fees that were paid by the customer.
Formatting the Report:
1. Total each column in the Weekly Sales sheet. This can be done quickly using Excel's SUM function - for example if you want to add together the values in cells C5 through C9, simply enter the following into a blank cell (without quotes): "=SUM(C1:C5)"
2. Open Word and enter the sales report information as shown in the example below. Adjust the font size as needed to keep everything on one page (this example uses font size 28). Once completed, save the file (filename can be something like "Sales Report 4.29.25 to 5.3.24") and send to Chandler via Discord.
Twice per month (on or around the 1st and the 15th), invoices from our vendors will be audited and submitted for payment.
Procedure:
1. Create / Print account statements:
a. Check outlook for any recent account statements (since the previous audit) that have been sent to us by our vendors, and print a physical copy.
i. If there is more than one statement from the same vendor in this time period, print only the most recent one as it will contain all of the invoices listed on the older statement.
b. Open the Distributing Orders Google sheet. Check each of the invoice tabs and, for any vendor with open invoices that we do not have an emailed statement for:
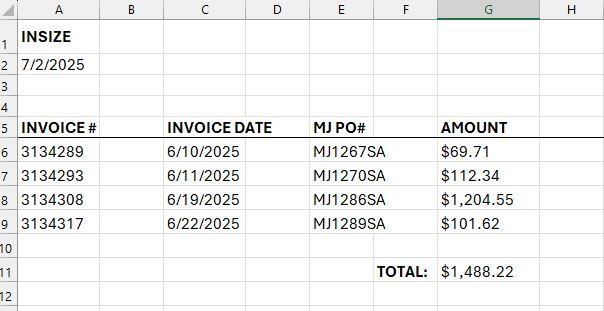
i. Open the MFG Payments Excel sheet and navigate to the "Custom Statement" tab.
ii. Change the vendor name in the top-left corner to match whichever vendor you are creating a statement for.
iii. Copy the Invoice #, Invoice Date, MJ PO#, and Amount from the Distributing Orders sheet for each open invoice for this vendor.
iv. Add up the total using the SUM function.
v. File -> Print
vi. Repeat for all vendors with open invoices that we do not already have an account statement for. See below for an example statement:
2. Audit the amounts due on each statement:
a. Open the Placed PO's Google drive folder.
b. For each invoice on the statement:
i. Search the MJ PO# in the Placed PO's drive and open the PO PDF file.
ii. Check if the total shown on the placed PO matches the amount that was invoiced, and:
1. If they match:
2. If they do not match:
Placeholder text
Placeholder text
Placeholder text
Placeholder text