Transferring Pictures & Using the Batch Tool
Finding Locations, Printing Labels, & Stocking Items
Transferring Pictures & Using the Batch Tool
1. Remove the SD card from your camera and insert it into a USB adapter. Insert the adapter into any open USB port on your computer.
2. File Explorer should automatically open to the files on the SD card - if it does not, open it manually by clicking the folder icon in the toolbar at the bottom of the screen and then navigating to the USB drive in the menu on the left-hand side. It will be followed by a drive name such as (D:), (E:), or (F:).

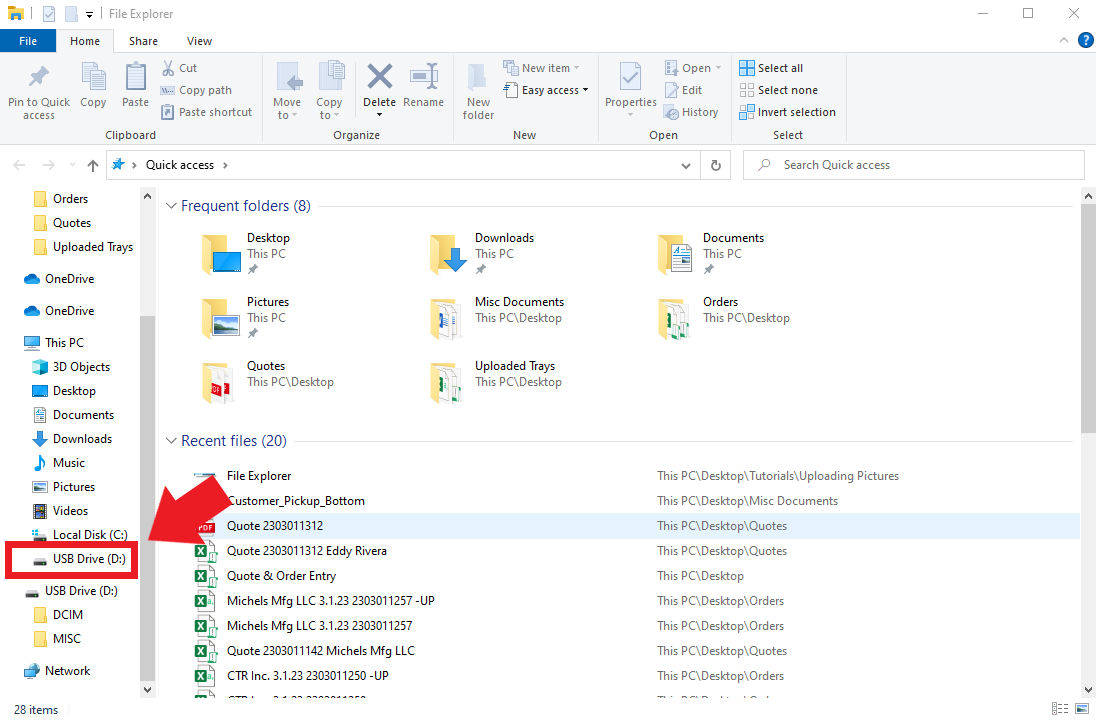
3. The USB Drive should contain two folders: DCIM and MISC. Open DCIM, and then the 100NIKON folder it contains. Here you will find all of the pictures you've taken.
4. Select all of the pictures by clicking any one of them and then pressing Control + A on your keyboard.
5. Cut the files by pressing Control + X.
6. You should have a folder called "Listing Pictures" on your desktop - if not, you can create this folder by right-clicking on the desktop and then clicking New -> Folder and naming it appropriately (in order for the next step to work properly, the folder with your pictures MUST be called "Listing Pictures", without the quotes). Open this folder and then press Control + V to paste the pictures into this folder. You can now close out of this folder, and the USB drive folder if you have not already.
7. Quickly review your pictures to make sure they look good - none are blurry, no major dirt / rust spots that you missed, etc. If you need to re-do any pictures:
a. Put the SD card back in the camera, take the new picture, and transfer to the PC like in steps 1 through 3.
b. Before moving the picture to the Listing Pictures folder, rename the file to the exact same name as the picture you are replacing in "Listing Pictures".
c. Cut & paste the new picture into Listing Pictures like in steps 5 & 6, selecting "Replace the file name in the destination" when it lets you know that the photo name already exists.
8. If you notice that a black picture is missing between slots when reviewing photos, such as seen here:

a. Copy & paste a black photo (I recommend keeping one saved on your desktop) and renaming it to match the last picture for the slot (DSCN9689-0013 in this example), followed by the letter "a". This will allow the black photo to be slotted in between the two slots when moved into Listing Pictures, as shown below:

9. If you need to add an additional picture, this can be done the same way as adding a black photo (changing the name to match the previous picture and adding a, and then b, c, etc. if there is more than one picture being added to the slot).
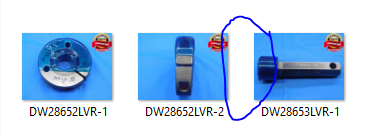
If the pictures have already been run through the batch tool (explained in the next section), all you need to do is add the next sequential number to the end of the filename. So in the example below, if we wanted to add another image to DW28652LVR, you'd just take the additional picture, rename it as DW28652LVR-3, and move it to the Listing Pictures folder.
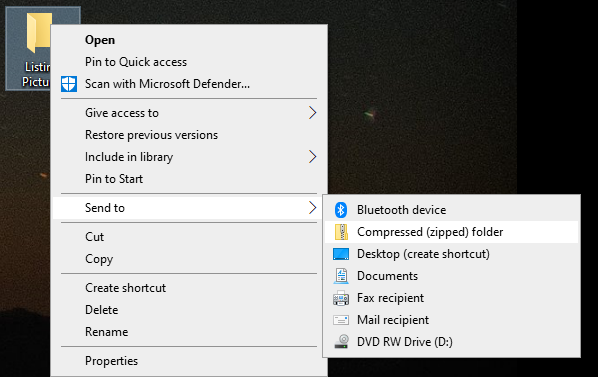
You'll also need to zip the folder again if it has already been processed through the batch image tool. In order to do so, right-click the folder, go to "Send to", and then select "Compressed (zipped) folder"
1. Open the Batch Image Tool, which should be located somewhere on your desktop. The icon looks like this:

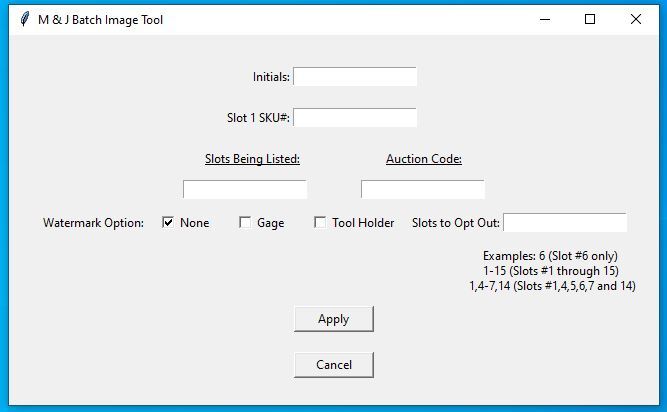
2. You will see this screen:
In addition, a copy of your Listing Pictures folder will be created on your desktop. This is just a backup in case something were to go wrong with the batching (such as accidentally putting watermarks on items that should not have them).
Fill out the following information in the batch tool:
a. Initials: These are the initials that you use for your listing SKU's. Typically this is just your first and last initials, but you may be assigned a different set of initials by your trainer if yours have already been used by a previous employee.
b. Slot 1 SKU#: If this is your first tray, this number will be 1. Otherwise, it will be the next sequential number from wherever your previous tray left off. So if your previous tray ended at SKU# 20, your Slot 1 SKU# for this tray will be 21. If your previous tray ended at 115, this one will start with 116; if previous tray ended at 4567 this one will start with 4568, etc.
c. Slots Being Listed: This is the total number of slots in the tray you are listing. In most cases this will be 20, but sometimes you will list trays that have more or less than 20 items.
d. Auction Code: This is the code that will go at the end of the SKU which is used for tracking inventory as it sells. The auction code should always be noted somewhere for each tray (typically on a slip of paper either in the first slot or the pocket on the side of the tray). If there is no auction code provided, contact your trainer before continuing with the batch tool.
e. Watermark Option: Gages (both Plain and Threaded) and Taper Shank Tool Holders have watermarks which are added to the pictures. All other item types should not receive a watermark.
i. Slots to Opt Out: If some of your items need a watermark but others do not, list all of the slots which should not be watermarked in this box. Refer to the examples in the batch tool for how this should be formatted.
f. Once all information has been entered, click "Apply". The process will take approximately 20-30 seconds.
i. There will be a popup message letting you know when the process is complete. It will also give you a warning if the number of slots it detects (based on your black pictures which separate the slots) does not match the number of slots you entered. If this is the case:
1. Add the missing black photo(s) to the Listing Pictures Backup using the procedure explained here
2. Delete all of the pictures in the original Listing Pictures folder
3. Move all pictures from Listing Pictures Backup to the original Listing Pictures folder (you can delete the empty Backup folder after this)
4. Run the Batch Image Tool again..
g. Once the batch tool finishes with no errors, you are ready to begin filling out the Excel template.
Finding Locations, Printing Labels, & Stocking Items
1. When you enter the dimensions for a slot in the Excel template, it will suggest bin sizes that the item should be stocked in. You should have one of each size bin in your office to use as reference if you need to confirm that the item will fit in the suggested bin size. Note: The sheet does not take stock into account. If you have a large number of individual stock for a listing, you may need to use a bin size that is larger than suggested in order to fit them all together in one location.
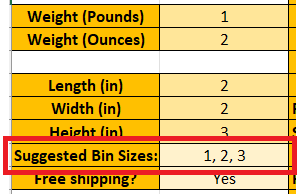
2. Once you have identified the number and size of bins that you will need for your items, you will look for locations in those sizes with available space. You can use the Available Locations spreadsheet to search for specific bin sizes. Below is a list of where you will find each bin size:
Size 1: East Bay
Size 2: East Bay, Northwest Room
Size 3: Front Room, East Bay, West Bay, Northwest Room
Size 4: West Bay
Size 5: West Bay, Northwest Room
3. Take a paper & pen to the locations you want to use and confirm that there is sufficient space available. Do not assume that the space available shown on the spreadsheet is 100% accurate. If there is not enough space, look at the surrounding locations for other options that you can use. Write down all of the locations you will be using along with approximately how much space is available in each one (50%, 25%, etc.) so that you can make sure to put the appropriate number of items in each one.
4. On the Available Locations spreadsheet navigate to the correct warehouse location using the tabs at the bottom, then use Control+F to search for the first location you are using. If there is someone's name in the "Claimed By" column, that means another employee is already using that location and you will have to find a different one to use instead. If it says "Unclaimed", select your name from this dropdown menu to claim the location. Repeat this process for each of the locations you are using.
5. Enter the location for each slot in the Excel template.
1. Once all information has been entered, first click the "Check for Missing Info" button at the bottom of the sheet.

This will check the sheet for any cells that were left empty. If no missing information is found, you will see a popup notification that says "No Missing Information".
If empty cells are found, the popup will tell you how many cells are missing information. These empty cells will now be highlighted in red.
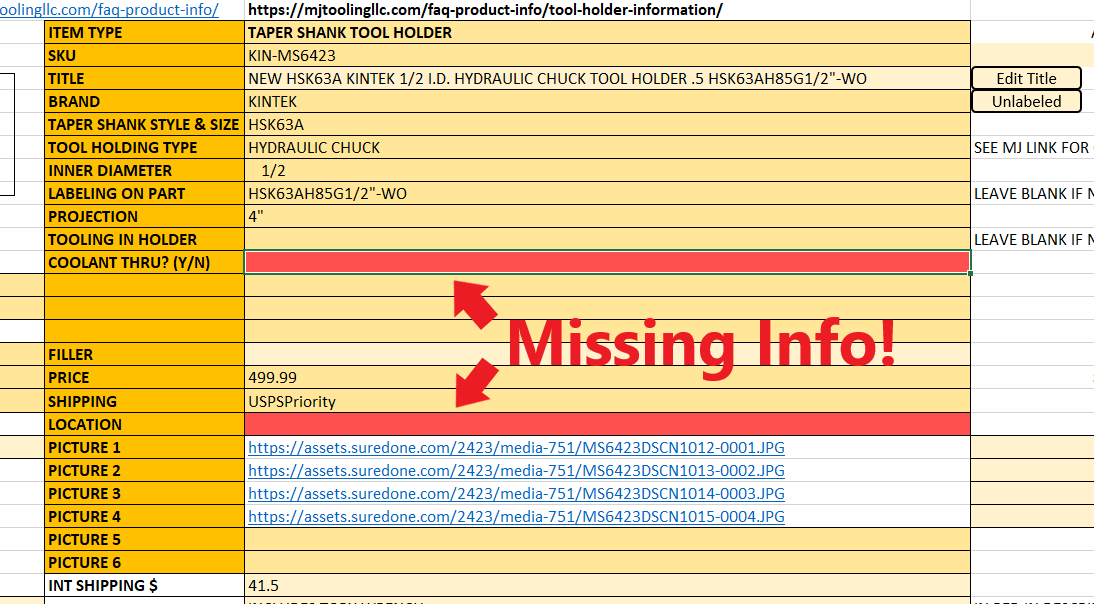
Any missing info should be entered at this time. There may be situations where there is no information to be entered in a "missing info" cell - in these cases, it's okay to leave the cell empty, but check with your supervisor if you are not sure.
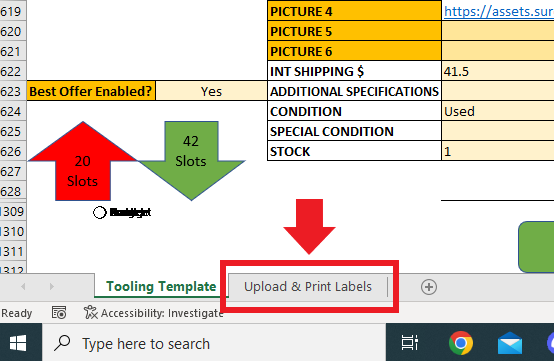
2. Once there is no more missing info, click on the "Upload & Print Labels" tab at the bottom of the Excel window.
3. Click the large button in the middle of the screen that says "Preview Labels".
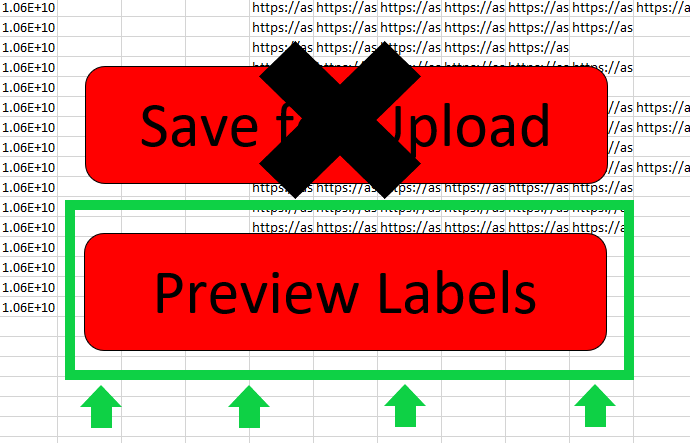
This will take you to the Print screen, where you will see a preview of your labels. These labels include various information including the SKU, title, and location.
4. Make sure the settings match the image below. The exact name of your printer might be different - but it should start with "Zebra":
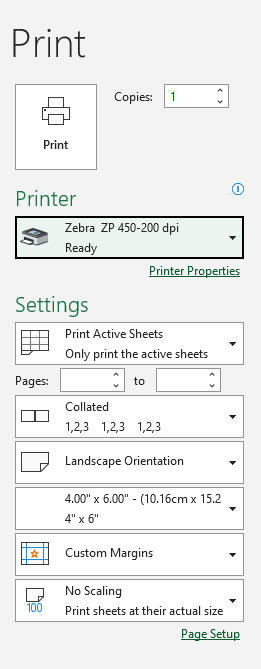
5. Click the "Print" button to print your labels.
6. Match the labels to your items. The labels will print in order starting from slot 1, with additional labels for multi-stock listings appearing at the end after the last slot (if your tray has 20 items, the additional labels will be "slot 21" "slot 22" and so on. Use the SKU to make sure these labels are matched to the correct item).
7. Place each item in a plastic bag along with its label. *Make sure the label is in front of the item so that it is readable! Multi-stock items will go in separate bags with separate labels. If multiple items are being sold together as one listing (for example, a 6-piece set of taps), they will all go together in one bag with one label. Once all items are bagged, you are ready to stock.
The most important thing to keep in mind when stocking is Do Not Overfill Locations! If there is not enough room in a location for the item(s) you are trying to stock, they should be relocated to a different location which does have enough room. Set the items aside and continue stocking, then contact your supervisor for further instruction on relocating if needed.
The second most import thing to keep in mind when stocking is Always Put the Location Bins 100% Back Into Place! Bins that are hanging partway off the shelf can be a serious safety hazard to anyone walking down the aisle. If a bin is difficult to push back into place due to being filled with heavy items, try lifting it from underneath.
Once stocking is complete, always be sure to update the Available Locations spreadsheet. Change the "Claimed By" column for all of your locations back to "Unclaimed", and use the dropdown in the "Space Available" column to update the amount of space remaining.
Once your tray is fully stocked and any necessary relocations have been updated in the Excel template, you will upload both the Excel file and the zipped picture folder to the Completed Trays Google drive. You should also keep a copy of the Excel file on your desktop as a backup, such as in a folder called "Finished Trays". With this the listing process is finished, and you can move on to your next tray.
***The following steps are to be taken only by employees approved to upload listings to SureDone***
Checking Trays:
1. Download the Excel file & zipped picture folder and then move the file from "Completed Trays" to "Original Copies (UNEDITED)". The zipped folder can be deleted from the drive, as these file sizes are too large for us to want to keep backups of
2. Unzip the picture folder so you can check pictures
3. Make any necessary changes / corrections / pricing to the copy on your desktop
a. If any slots need to be removed, you will also need to delete the pictures for that slot from the picture folder, then re-zip the pictures when you are finished. You will also need to make sure that the "mediacount" (column Z on the upload tab) for that slot is made blank.
4. Go to the "Upload & Print Labels" tab
a. Make sure all slots are present - if any are missing, check the brands and shipping weights for those slots, as one or the other is likely missing
b. Make sure each slot has a number in the "mediacount" column (column Z) - if any are set to 0 something must have gone wrong with the batching and we will need to fix
5. Click "Save for Upload" to generate the .csv file
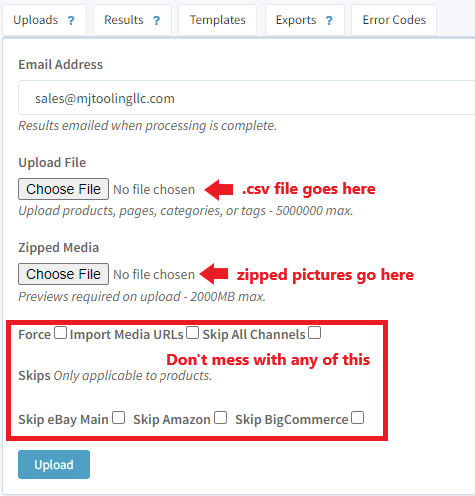
6. SureDone --> Bulk Uploads
7. 
8. Once you click upload it can take several seconds to process. You should eventually be taken to the Results tab.
a. If the page reloads onto the upload tab instead of the results tab, the upload did not go through and you will have to upload it again.
9. Refresh the results tab (or click onto one of the other tabs and then back to Results) and you should see a "Preview" option at the top of the results. If it does not appear, you may have to wait a minute or two and then refresh the page again.

10. Click "View Preview". On this page, confirm that the pictures line up correctly with each slot - if they do not, you can adjust the number of pictures in the "#" column for each slot.

11. Once everything is correct, click "Commit" at the bottom of the page.
12. Check All Products after a few minutes to make sure the listings have all uploaded properly. If any do not have an eBay Item ID (meaning there is a 0 in that column instead of a link), open the product details page by clicking on the SKU at the left end of the row and then click "Relist / Publish Item" in the bottom-right corner of the page, which should fix it.
13. Upload the both the main Excel file and the .csv file to the Uploaded Trays folder in the Google drive
14. Add the tray to the Daily Listings upload log & update the "Last Up SKU" for that lister
Bulk Relocation Using the Item Relocation Spreadsheet
The relocation spreadsheet is ideal for relocating a large number of items. If you only need to relocate a few items, refer to this section on relocating directly via SureDone, as that method will likely be faster.
1. Update the Inventory:
a. Go to SureDone. You will need to go to the "Export" page, which can be done one of two ways:
- From the dashboard (1st picture below), click "Bulk" at the left side of the page and then "Export"
- From a product page (2nd picture below), click "Products" at the top of the page and then "Export"
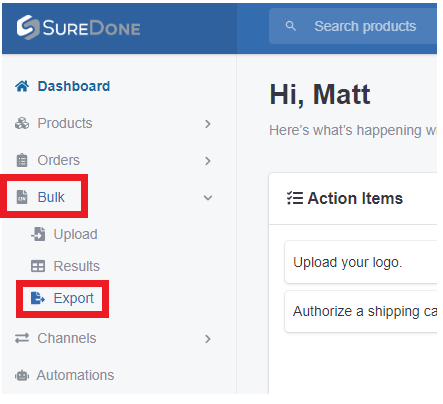
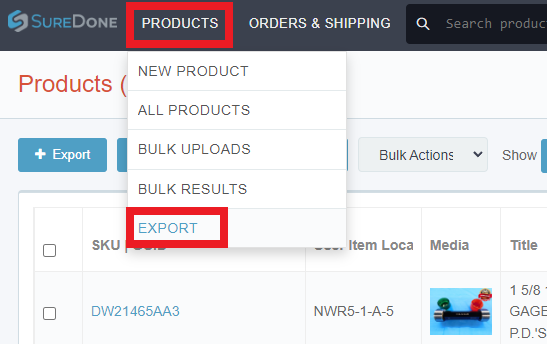
b. Under "Add Export Fields", select sku, stock, longdescription, and itemlocation (you will have to scroll down a bit to find all of them) and then click Add.
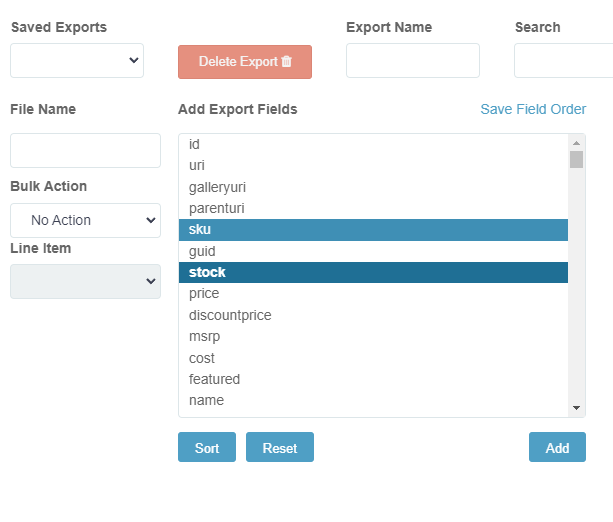
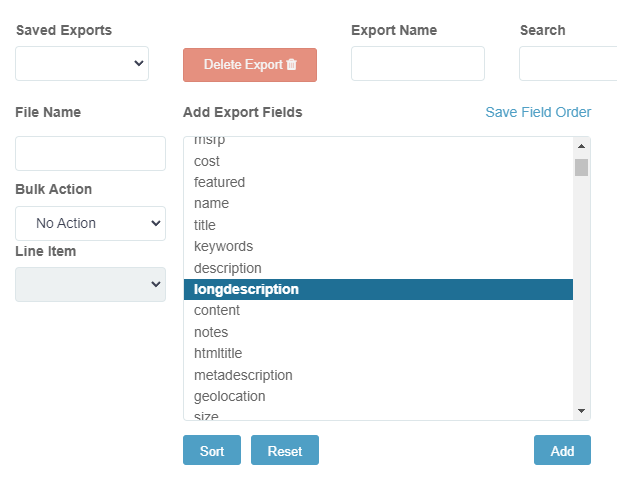
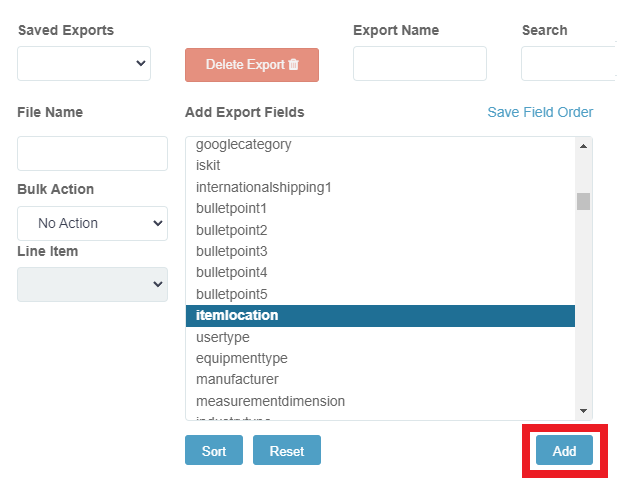
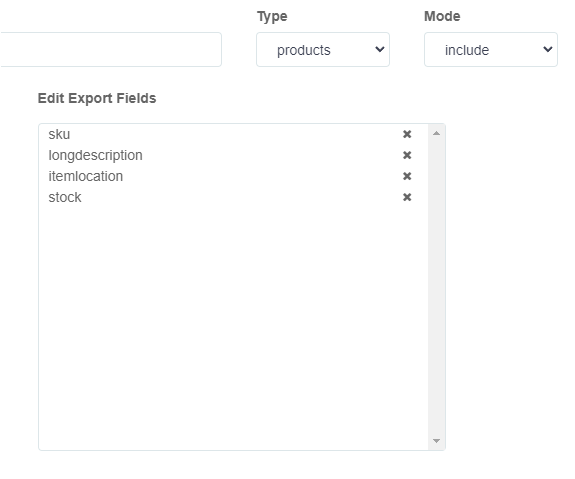
c. The four export fields will appear under "Edit Export Fields". Click and drag to arrange them in the following order: sku, longdescription, itemlocation, stock.
d. Click Export.
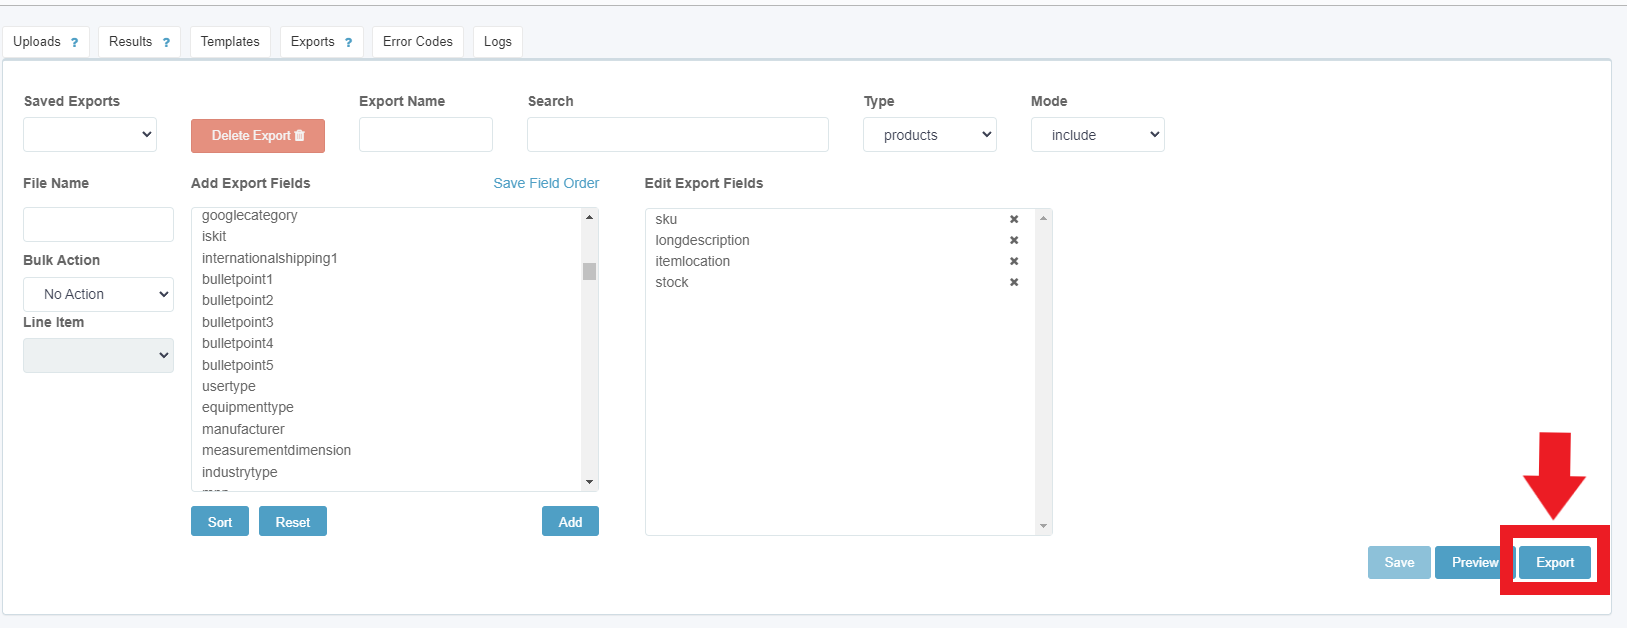
e. It may take up to a few minutes for SureDone to generate the export file. Refresh the page and scroll down to the bottom where you will see Recent Exports. If there are multiple items here, the one at the top of the list will be your file. If it says "Pending", wait another minute or two and refresh the page again. If it says "Download", click to download the file.


f. Open the export file once it has finished downloading (it's a large file, so it may take a moment). Press Control + A to highlight all of the information in this sheet, and then Control + C or Right Click -> Copy to copy all of the text to the clipboard.
g. Open the Item Relocation sheet and click on the SD Data tab at the bottom.
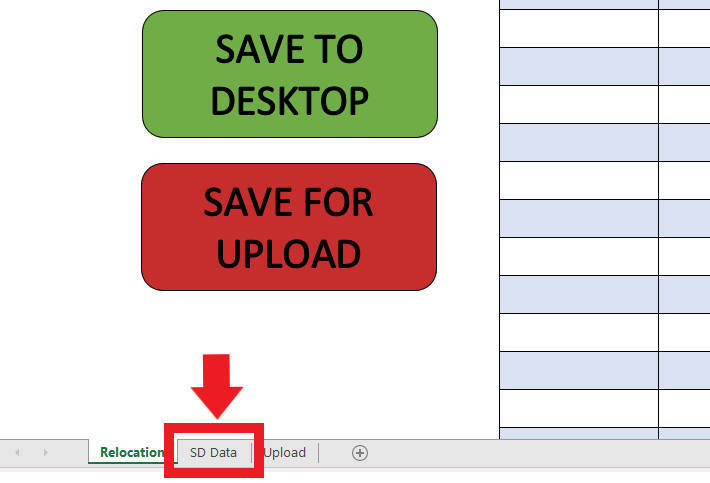
h. Click on the top-leftmost cell (it should say "sku") and press Control + V or Right Click -> Paste to paste the export data that we just copied.
g. SAVE the relocation sheet! The inventory will now be up to date.
2. For each item that you are relocating, enter the SKU and the New Location that the item is being moved to. When you enter the SKU, the Quantity should automatically appear under "QTY". If it instead says "SKU NOT FOUND", verify that you have entered the SKU correctly, and if you have, set the item aside and let your supervisor know so that additional steps can be taken.
NOTE: If an item has multiple quantity, make sure ALL items are moved to the new location!
NOTE 2: The sheet can only relocate up to 100 items at a time. If you need to relocate more, you will need to use multiple sheets.
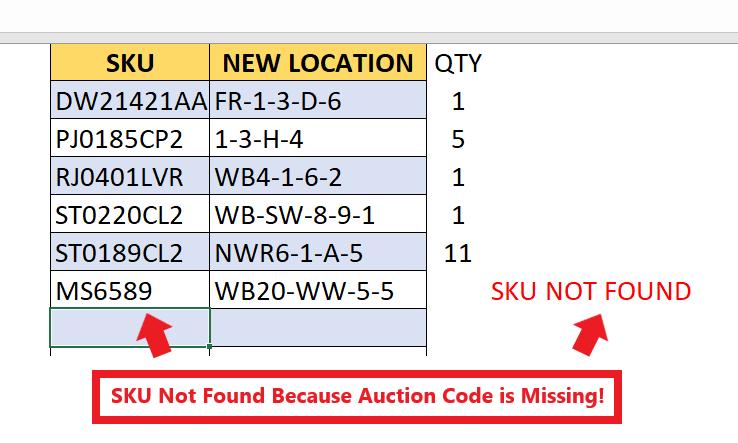
3. Once you have entered all SKUs and new locations, click the big green SAVE TO DESKTOP button to create a copy of this sheet for documentation purposes, and then click the big red SAVE FOR UPLOAD button to generate the .csv file which will be uploaded to SureDone.
Single-Item Relocation Directly in SureDone
1. Search the SKU in SureDone and click on the blue link under "SKU | GUID" to go to the product details page.

2. There are two places on this page that the location needs to be changed:
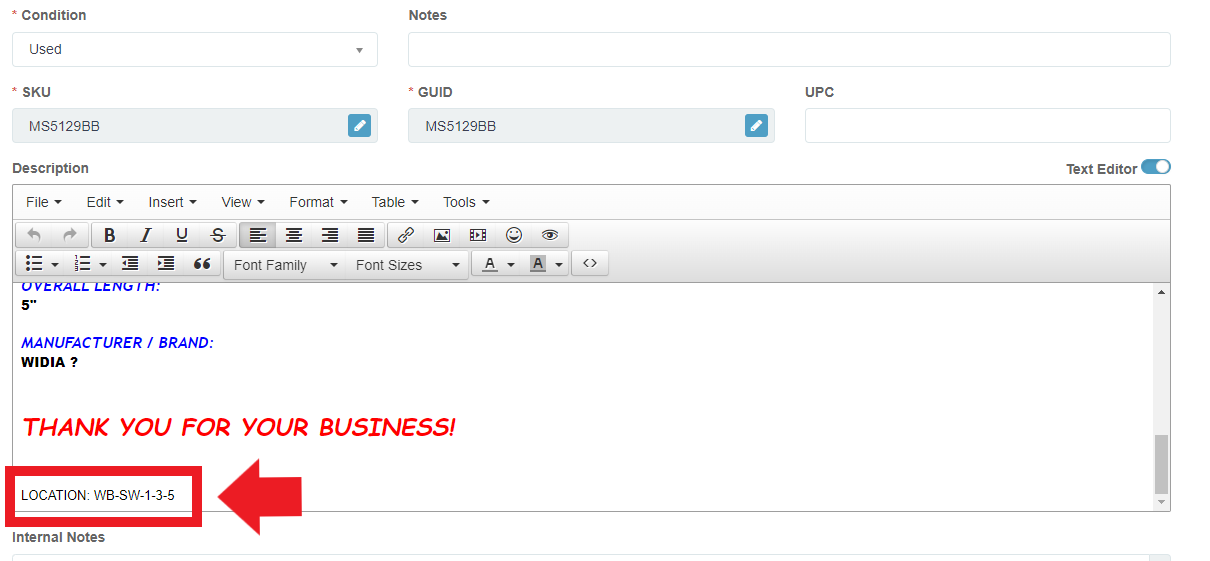
a. In the Description, just at the bottom of the "General" section. Click the toggle next to "Text Editor", then scroll to the bottom of the Description window and replace the location with the new location it is being moved to.
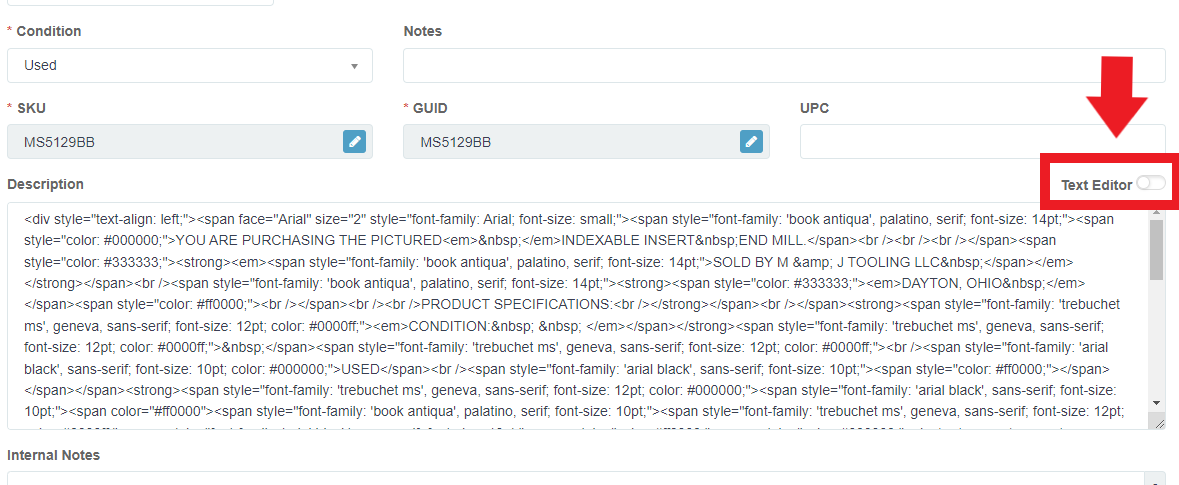
b. In the "Custom Fields" section (you can jump there by clicking the link on the left side of the page), change the Item Location to the new location.

3. Once both locations have been changed, click Update in the bottom-right corner of the page.

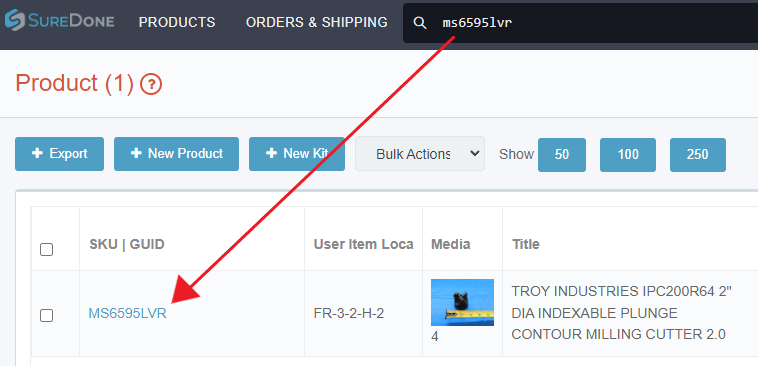
1. Search the SKU in SureDone, then click the link under "SKU | GUID"
2. Things you may need to edit:
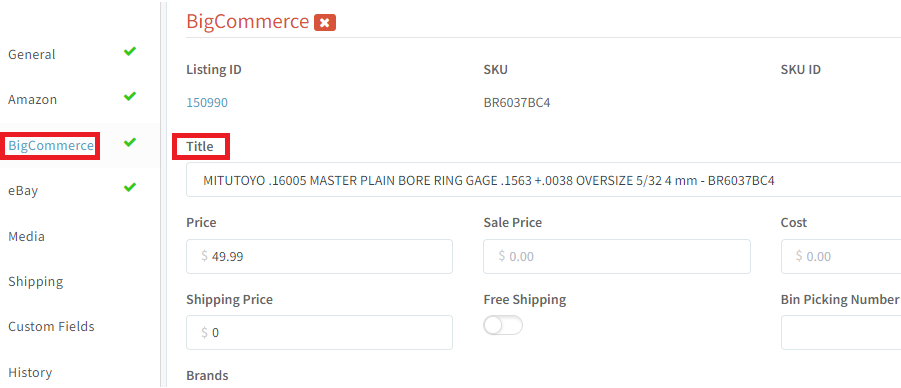
a. Title - The title must be updated in three different sections: General, Amazon, and BigCommerce. On some older listings, the Amazon an BigCommerce titles will update automatically when the General title is edited. Keep in mind that that there is an 80 character limit for the General title - the number of characters is shown at the right end of the title box. The Amazon and BigCommerce titles should also have the SKU listed at the end of the title, and it is okay if these two titles go over 80 characters.


b. Description ("General" Section) - Click the "Text Editor" toggle to convert the html to plain text and make whatever changes are needed.

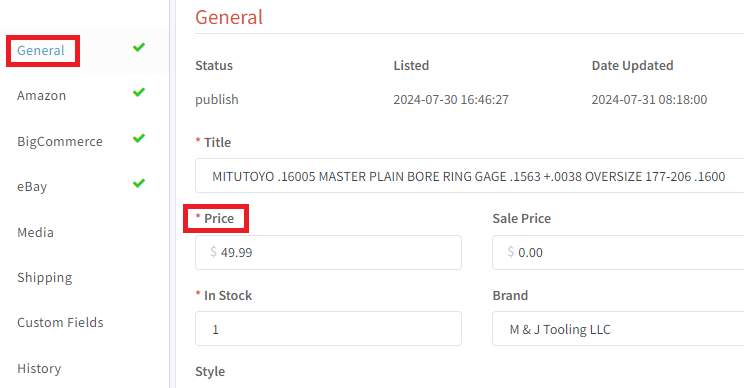
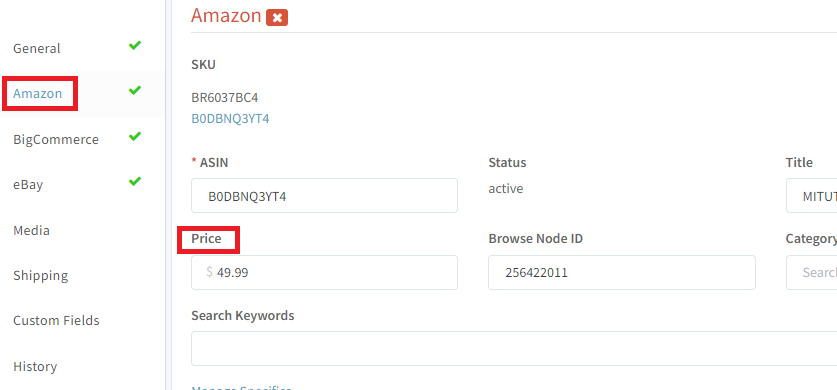
c. Price - Like the title, this must be updated in all three of the General, Amazon, and BigCommerce sections.

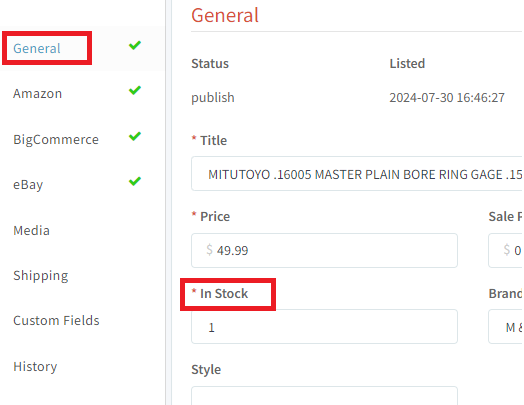
d. Stock - This only needs to be updated in the General section, directly below the price.
e. Location - Refer to the Relocation procedure
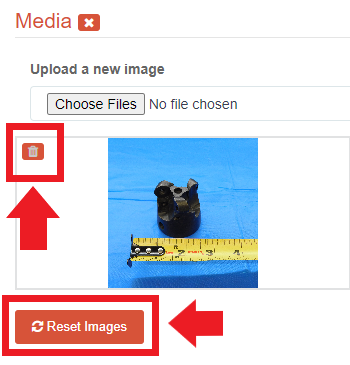
i. Go to the "Media" section

ii. To remove a picture: Click on the trashcan icon in the upper-left corner of the image. If you need to remove all pictures, click the "Reset Images" button below the first picture.
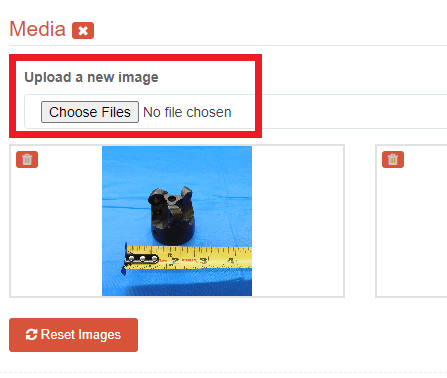
iii. To add a picture: You can either click "Choose Files" to select the files manually from their current location on your computer, OR you can simply click+drag the file(s) from your desktop directly into the internet browser and SureDone will automatically import them. Pictures can be re-ordered if needed by clicking and dragging them into the correct order.
3. Once all necessary changes have been made, click the blue "Update" button in the bottom-right corner of the page to save your changes to the listing.
