
***ALL REAMERS MUST BE MEASURED BY AN APPROVED EMPLOYEE BEFORE BEING LISTED***
Things to look out for when sorting reamers:
Damage to Cutting Edges
Major Damage: Large chips in a cutting edge will disqualify a reamer from being listed in most cases. An especially large reamer (>1.5" diameter) might still be listed with edge damage, since repairing / regrinding a damaged tool might be a better option for some customers than buying an expensive new one, but this should be confirmed by your trainer. See below for examples of reamers that are too damaged to list:


Minor Damage: Small chips or ground down edges toward the bottom of the flutes will typically be okay to list as they should not have a major impact on the use of the tool. Similarly, damage to the inside of the flutes which does not touch any cutting edge is also okay. This damage must always be clearly pictured though, and should also be taken into consideration when choosing the condition of your listing. See below for examples of reamers that are okay to list:


Adjustable Expansion Reamers: Damaged / Missing Adjustment Screws
Cracked, broken, or missing adjustment screws typically disqualify a reamer from being listed, as they cannot be adjusted / dialed properly. An especially large reamer (>1.5" O.D.) might still be listed in this state, but this should be confirmed by your trainer. See below for examples of expansion / adjustable reamers that should not be listed:
Damaged screws:


Missing screws:


Adjustable Blade Reamers: Missing Blades, Damaged Threads
Missing Blades: Reamers with missing blades should not be listed. See below for examples:


Damaged Threads: Reamers with damaged threads are okay typically okay to list if the damage is at the very bottom threads, such as in the picture below. If the threads are damaged at the top or around the midsection of the blades, the reamer will not be able to be adjusted properly, but we might still list it if it is otherwise in good condition but the damage must be clearly pictured and this should be taken into consideration when choosing the condition of the listing.

Shell Reamers: Damaged Keyways
Damaged keyways can prevent a shell reamer from seating properly on an arbor. We might still list these if the damage is not extreme (such as the example below, which would be okay to list), but this must be clearly pictured and should be taken into consideration when choosing the condition of the listing.

Morse Taper Shanks
Always inspect the tang (the flat section at the end of the taper) for damage. On smaller reamers, major damage to the tang will almost always disqualify it from being listed. Larger reamers (>1.5" O.D.) might still be listed in this condition, but this should be confirmed by your trainer. See below for examples of badly damaged tangs:


Another thing to look for are tangs that have been twisted, like the ones shown below. When inspecting tangs, you should view them from the side in order to see this most easily. These should also be treated as major damage:


Tangs with small chips or minor wear are generally okay to list. See below for examples of tangs that are okay to list (assuming the rest of the reamer is in acceptable condition):


Use WD-40 and a scotch-brite pad to remove any rust or residue, being careful not to smudge or remove any labeling. Wipe down with a dry rag before picturing to remove any excess WD-40.
Click here for info on how to upload pictures
1st Picture: A three-quarters (or "3D") angle of the reamer, with the working end toward the camera. If there is any packaging, it should be included in this picture.
2nd Picture: A side view of the reamer, with a tape measure at the bottom of the frame to provide size reference. If there is labeling on the reamer, it should be visible and readable (i.e., right-side up) in this picture if possible. Make sure there is sufficient space between the reamer and the tape measure so that the tape measure is not covering up any part of the reamer. Any packaging should be included in this picture as well.
3rd Picture: A close-up, head-on shot of the working end.
4th Picture: A close-up shot of the labeling. Depending on the size of the reamer and where the labeling is located, this may require more than one picture, such as in the 3rd set of example pictures below. If there is no labeling present, or if it is too faded to show up in a picture, skip this picture, such as in the 2nd set of example pictures below.
5th & 6th Pictures (Morse Taper Shank Only): A close-up shot of the tang at the end of the shank (both sides). Refer to "Picture 5" and "Picture 6" in the second set of example pictures below.
Additional Pictures: Any damage or modification to the cutting edges or shank must be clearly pictured. Use a pen to point to the damaged / modified area. If you believe additional pictures are needed for any other reason, contact your trainer to verify if it is necessary. Refer to the 2nd set of pictures below for an example.
Refer to the examples below:


If the brand is not labeled, click the "Unlabeled" button to the right of the brand cell. Make sure this cell is not left blank, or the listing will not upload properly. Note: Items are often labeled with the country of origin (USA, China, Japan, Poland, etc). This should NOT be entered as the brand, and furthermore should not be included in the listing at all EXCEPT for USA which can be used as a filler.
By far the most common material for reamers is HSS (High Speed Steel). This can also be notated as HS on the reamers. Other options include Cobalt and Solid Carbide, although more often they are Carbide Tipped.
To identify between these, one of these three options will either be labeled or you can identify by weight & color. HSS is the lightest, with Cobalt being about 13% heavier and they may have a dull gold color which can be hard to identify. Solid carbide is nearly twice as heavy and will be darker than HSS or cobalt.
Cobalt will often be denoted in labeling as "M-42", which is an HSS-Cobalt alloy but can simply be described as Cobalt or M-42 Cobalt.
Some reamers may have a solid carbide head with an HSS shank. In this case, the material can be entered as "Carbide Head", and "HSS Shank" can be included as a filler if there is room in the title.
Carbide Tipped & Coolant Thru:


Carbide tipped reamers will appear to have two different colors on each flute, the darker and less shiny material being toward the cutting edge. There should be a distinct separation between the tips and the rest of the reamer, and they may or may not go all the way down the length of the flute. This can sometimes be difficult to identify, especially with older reamers and is more common as the reaming diameter increases.
Note: Solid carbide reamers (or HSS reamers with solid carbide heads), should not be considered carbide-tipped, as this description is meant specifically for reamers in which only the cutting edges are carbide.
***Reamers may sometimes be tipped with a material other than carbide. This is uncommon, but if a reamer has distinct tips but they do not appear to have a distinct color or luster from the rest of the tool, it may be tipped with HSS or another type of steel. Ask your trainer if you are not sure.
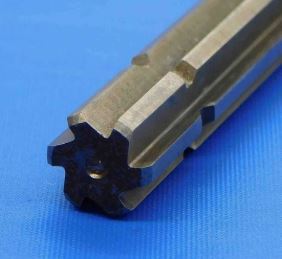
Coolant thru reamers will have holes leading to a central hole that should be seen in the back of the reamer shank and allows for coolant to pass through the reamer as it works on a part. The hole at the front of the reamer (perpendicular to the flutes) does not count as a coolant through hole, this is used to manufacture the reamer.
(Click on an icon below to jump to that section):
![]()
![]()
![]()
![]()
![]()
![]()
![]()
![]()
![]()
![]()


Chucking reamers are the most common type, containing a short chamfer, non tapered cutting diameter, and may never be a morse taper shank. They are referred to as Chucking for their ability to be placed in a drill chuck, jaw chuck, or other sorts of chuck.


Shell Reamers are comprised almost entirely of the cutting portion and are often a larger diameter. They are attached to a shank / arbor with a corresponding diameter and key width, so including the inner diameter & key width in the listing is a necessity.
Shell reamers can sometimes be easily confused with other cutting tools such as shell end mills. An important thing to remember is that a reamer should always have an angled chamfer at the tips of the cutting edges as shown in the diagram at the top of this page. If an item you believe to be a reamer does not have this chamfer, it likely is not a reamer but rather an end mill or some other tool.
They may be sold as an assembly with the arbor, such as in the third picture above, but this should look distinctly different from a single part reamer. If the reamer is sold with the arbor & inner diameter and key width cannot be measured, this may be left blank. It should be attempted to separate the reamer from the arbor, which can often be done with an Allen wrench.
The arbor's shank diameter / Morse taper size should always be included in the "Shank Size (If Present)" section that appears when you enter "Shell" as the type. For more information on this measurement, refer to the "Shank Size / MT #" section further down this page.
Shell reamers will often come in standardized sizes - refer to the chart below for more information on common dimensions such as flute lengths and arbor sizes:


Pipe reamers, also referred to as pipe tap reamers, have tapered flutes and have a square end portion of the shank. This shank can be used for turning by adjustable / tap wrench and can also be found on the taps which are used after pipe reaming.
When measuring a pipe reamer, you will find that the cutting diameter is larger than the labeling suggests. This is normal - refer to the chart below for the (approximate) diameters a pipe reamer should measure at the small and large ends:


Expansion reamers are made with an adjustment screw / mechanism at the tip of the reamer perpendicular to the flutes for small adjustments to the reaming / cutting size. These are not meant to be adjustable for the sake of changing reaming size, but for allowing for multiple regrinds and maximizing the tool's life span. Of the two expansion reamers shown above, the one on the left (which looks similar to a chucking reamer) is considered a "Machine Expansion Reamer", while the one on the right is a "Hand Expansion Reamer".


Similar to expansion reamers, adjustable reamers are designed with blades that are separate from the reamer body and are fitted into ramped grooves in the body. By tightening and loosening the nuts at both ends, the blades slide along these grooves, changing the reaming diameter. These reamers are mostly used for repair work, and are not intended for high-production machining. Adjustable reamers will typically be labeled with the full size range they can be adjusted to, or a letter size which corresponds to a specific range in the chart below. Both the letter size and adjustable range should be included in the listing whenever possible.
Note that this list is not all-inclusive, and some manufacturers may have their own set of sizes that do not correlate with those shown below. Metric adjustable reamers in particular can have quite a bit of variance to them. Always go with the information that is labeled on the reamer itself if it contradicts the data in this chart.


Hand reamers, as the name implies, are reamers designed to be used by hand. They have a square at the end of the shank like a pipe reamer which fits into a standard tap or hand wrench. They also commonly feature an extended taper at the cutting tip / end of flutes which helps the user push the tool into the workpiece. This means that the O.D. at the tip will measure undersize, so when measuring a hand reamer it's best to take your measurement toward the bottom end of the flutes in order to get the most accurate size reading.


Bridge reamers are tapered throughout a long length of cut, coming to a point at the tip. They are designed to enlarge holes, primarily dealing with I-beam construction, and the shanks may appear quite a bit different to other reamers as they are used in electric drills, drill presses, and square-drive impact wrench sockets.


Taper pin reamers have long, tapered flutes similar to bridge reamers, but unlike bridge reamers they will not come to a point at the tip. These reamers are used to cut holes with specific tapers correlating to number sizes. These sizes will often be labeled, but if not they can be determined by measuring at the small or large end and comparing to the chart below:


Very similar to taper pin reamers, Morse Taper reamers will cut a particular size Morse Taper inner diameter, such as MT1, MT2, MT3, etc. The taper size will often be labeled, but if not it can be measured according to the chart above by measuring at either the large or small end of the taper. NOTE: Morse Taper reamers are oversized compared to the standard Morse Tapers you will see on other tools. Be sure to use the chart above and NOT the standard MT size chart!
Please note that a "Morse Taper Reamer" is not the same as "a reamer with a Morse Taper shank". "Morse Taper" should only be entered as the reamer type if the reamer cuts a Morse Taper.


Brown & Sharpe Tapers are another set of standardized tapers very similar to Morse Taper. The taper size will often be labeled (frequently with "B&S" such as "B&S 9"), but if not it can be measured at the small or large end and compared to the chart below:
NOTE: Brown & Sharpe Taper reamers are oversized compared to the standard Brown & Sharpe Tapers you will see on other tools. Be sure to use the chart below and NOT the standard B&S size chart!

***If a reamer is unlabeled, OR if it has been found to measure a different size from what is labeled, you MUST include the following note in "Additional Specifications": THIS WAS MEASURED USING A CALIBRATED MICROMETER. WE BELIEVE THE LISTED SIZE TO BE ACCURATE WITHIN .0003".
Because reamers become worn down from use, all used reamers are measured in-house by a trained employee to confirm the cutting diameter. If a reamer is accompanied by a ticket with a size written on it, that size is what you will enter as the cutting diameter, even if it is different from the size labeled on the reamer itself. If you receive an unlabeled reamer with no size ticket, contact your trainer - do not attempt to measure the reamer yourself unless you have been trained on measuring reamers using a micrometer, as reamers are very precise and it can be difficult to get an accurate size reading.
If a reamer is labeled with a seemingly non-standard size, it might actually be a letter or number size (for example, .1935" corresponds to #10, .2770" corresponds to Letter J). In these cases, you should enter the size as a decimal, and then the template will automatically add the letter / number size to the title. A full list of these sizes can be found here: https://www.custompartnet.com/drill-size-chart
If a reamer's size is labeled in both inches and millimeters, enter the inch size - the sheet will automatically include the metric conversion as well.
Note: When entering a whole-number inch size, always include the " sign. The " sign should not be included for any size including a fraction or decimal. So, for example: If a reamer's cutting diameter is exactly one inch, it should be entered as 1" and not just 1. If the cutting diameter is one and a half inches, it should be entered as 1 1/2 or 1.5 and not 1 1/2" or 1.5".
Metric size measurements should be entered with a lowercase "mm" (ex.: 16mm, 40mm).
If your reamer is unlabeled and an expansion type, you may measure with a pair of calipers and mention that this is how the reamer currently measures with calipers in the special specifications section.
Some reamers have a Pilot, which is a section at the tip that has a smaller diameter than the rest of the cutting length (see picture below). This is used to help guide the reamer into the hole. The larger diameter is what you will enter into the Cutting Diameter, and the pilot diameter can be included in the "Filler" section, or in the "Additional Specifications" at the bottom of the slot if there is not enough room in the title. This can simply be formatted as the size followed by the word PILOT (or, optionally if there is space: PILOT DIAMETER, PILOT DIA, PILOT O.D., etc.).

The reamer above on the left has a straight shank, while the reamer on the right has a Morse Taper shank. Male Morse Tapers can be identified by their taper as well as the distinctive end which has two flat sections (called "tangs") seen in the picture above.
Straight shanks do not need to be measured or included in the listing, unless it is a shell reamer arbor in which case it can be measured with calipers. Arbor shanks will typically be common sizes, but this is a precise measurement and should not be rounded if it is more than .005" off from a fractional size.
Morse Taper sizes are measured on the large end (the largest diameter on the portion of shank that tapers) with calipers or labeled, corresponding with the chart below:

***Always check for tang damage on Morse Taper shanks! Any damage must always be pictured. See below for examples of what tang damage looks like:


The flute type of the above left reamer is Straight, while the above right reamer is Spiral. Straight flute reamers are the most common, while spiral flute allows for improved chip clearance. Spiral flutes can be either right or left hand, with right hand being when it spirals toward the right as you go to the cutting end of the reamer, while left hand is spiraling to the left. The hand direction can be included whenever there is room in the title, but is not strictly necessary.
The number of flutes is almost always even, and can simply be counted. More flutes will mean a stronger tool but allow less room for chips.
The "Filler" section is used to add other relevant information to the title which is not covered by the other sections. Fillers can be a good way to increase a listing's visibility - we always want to include as much information as possible that we think a customer might be searching for in order to make sure that our listing is coming up in their search results.
There is not necessarily one right answer when it comes to fillers, and often it will be up to you to decide what should and should not be added as filler. Reamers often have plenty of extra space for fillers, so here are some suggestions for what can be included:
-Secondary labeling or branding / product names
-"USA" or "USA Made" for any US Manufacturers (you may need quickly research a brand if you are not sure since this will not always be specifically labeled)
-If a reamer is especially long, "Extra Length" or "Extended Reach" can be added as filler along with the reamer's OAL
Note: Keep in mind that titles have a maximum limit of 80 characters.
Additional Specifications & Special Condition
The Additional Specifications section should be used for any secondary labeling or additional measurements that do not fit in the other sections of the listing. There is no character limit here so any relevant information that is not already covered should be included (within reason - we don't want to overload the listing with unnecessary information, so ask your trainer if you are not sure whether or not to include something in this section).
The Special Condition section should be used for any special notes about the item's condition such as damage or modification. Try to be specific when describing the condition, and reference pictures that point out the damage / modification if applicable. For example, "One of the cutting edges is chipped - see picture #5 for details." General wear and tear does not need to be mentioned, but anything that will affect the tool's usage should be included here.
Once all information is entered, click here for the next steps.