Start by searching the SKU of the item in ShipStation to see previous purchase history.
If there is no purchase history (meaning no search results):
*If it is a Certified Set Plug (SKU ends in TLC): Check True Line. Otherwise:
1. Search the original location on the pick list again.
- Smaller items: Look behind and underneath the location, as it could have fallen out
2. Search the locations directly to the left, right, above, and below the original location.
3. Search in locations that are one row over in either direction. For example, if the item was located in FR-1-1-A-1, search in FR1-2-A-1. A common mistake is confusing 1's and 3's for the row / shelf, so you may want to search FR-1-3-A-1 in this case as well.
4. Search in "dyslexic" locations. If your location is WB4-3-4-4 for example, you may want to search in WB4-4-3-4. Do not get too carried away with mixing numbers around though, as at this point it is unlikely to be found using standard methods.
5. Search the SKU in SureDone without the last digit. For example, if the SKU of your NF item is DW0024RN, you would search "DW002", which will bring back DW0023, DW0025, etc. Record any other locations you see for these SKUs on the pick list and search those locations for the NF item. You can also check the surrounding locations as described in steps 2-4 for these additional locations.
If there is purchase history:
If the previous order has the exact same picture as the current order:
1. Bring up the SKU in SureDone and find the date listed (at the end of the row)

2. Go to SureDone's Bulk Results tab for that date and try to find the original upload file for that tray. You are looking for a file with the same starting initials (MS in this case) and a nearby SKU # (the same or lower than the one you're trying to find). Once you find it, download and open the Uploaded File.

3. Find the SKU in column B and then check the stock in column D.

4. If the original stock is greater than or equal to the total number sold (including the current order), continue with the NF procedure as though you did not find purchase history. You should also check the item's location in this upload file, which you can find in column AU - if it is different from the one on the pick list, check this location for the item as well.
5. If the original stock is less than the total number sold:
6. Search the SKU in the Money Credited spreadsheet to see if it was returned. If there is no return, it was likely a stock error and you can stop searching for the item. If there is a return, continue with the NF procedure as though you did not find any purchase history.
If the previous order has a different picture from the current order:
1. Write down the date of the previous order
2. Bring up the eBay listing for the SKU (via SureDone; it won't come back in search results on eBay if it's out of stock)
3. Scroll down to Item Specifics and right above it you should see a link that says "View all revisions"

4. You should find a revision from sometime after the date you wrote down in step 1 which says in the description "PictureURL: Pictures Added/Deleted". Note the date of this revision.

5. In SureDone's Bulk Results Tab, search for results on the date you found in step 4. Look for any upload that includes "rsl" (there may be more than one). Download the Uploaded File for each of these.

6. Open the file(s) and look for your SKU in column B.

7. Scroll over to column AA and you will find the original location that the item was stocked in. If it is different from the location on the pick list, check this location. Otherwise, proceed with the NF procedure as though you had not found any sold history.
If the item is still not found after all of these steps:
Ask Josh :)
Our Central Transport Rep: Alex Vulcu (586) 939-7000 x2696 avulcu@centraltransport.com
1. Preparing the Correct Skid
a. Measure the length and width of the item(s) - if stacking multiple large items together for shipment (for example, cabinets, tool holder carts, etc.), use the item with the largest set of these dimensions
b. Find a skid that will extend beyond the sides of the freight by at least an inch
c. Inspect the skid to ensure that all planks are present and intact - if the skid needs to be repaired, and there are not any other appropriately-sized skids available, contact your trainer
2. Loading the Item(s) onto the Skid
a. Depending on the weight of the item(s), you will either need to:
- Get someone to help you lift it onto the pallet, or
- Use the forklift. If you have not been trained, certified, and given approval to use the forklift, contact your trainer at this point
b. If shipping only one item: Center the item on the skid
c. If shipping more than one item on the same skid, and...
- The items will fit side by side on the skid:
1. Place the items side by side, separating them with cardboard
2. Wrap the items together with plastic wrap and treat them as one item moving forward
- The items will NOT fit side by side on the skid:
1. Center the item with the largest dimensions on the skid
2. Place cardboard on top of this first item to protect & separate the items
3. Place the second item on top, centered to the first item
4. Repeat as necessary for all items being shipped
3. Plastic Wrap
a. You will need to secure the end of the plastic wrap to the item / skid to be able to wrap the items. You can do this by:
- Tying the plastic wrap through a handle or hole
- Tying the plastic wrap around a plank of the skid
- Tying a knot in the plastic and slipping that knot in between the item and skid
b. Beginning at the bottom of the item, go around the base three full times
c. After 3 full passes at the bottom, begin moving up the item, making sure that each pass overlaps with the top half of the previous pass. Make three full passes at the middle and top of the item like you did at the base.
- If shipping more than one item on the same skid, do three full passes at the base of the bottom item, three full passes at each point where two items meet, and three full passes at the top of the final item
d. After your final pass at the top of the item(s), you can simply use your hand to poke through the plastic wrap and smooth it down onto itself
4. Securing with Straps
a. You will need the bander wheel cart, metal clips, banding cutter, a tensioner, and a crimper/sealer
b. Things to keep in mind while strapping:
- Straps cannot go through the skid where forks may hit them; they must be tight onto or in line with either the top of bottom planks - if you do not understand what is meant by this, please contact your trainer before securing any straps
- To tighten and seal the straps you will need a flat surface. In most cases you will use the top of the item as this flat surface. If the top of the item is not flat, or if it is too high for you to reach safely, contact your trainer for assistance
- Use cardboard on the corners of the item where the strap will be resting to prevent the straps from damaging the item
- Each side of the item should have a minimum of three straps in order to secure the item properly
c. Put your first strap as close to an edge as possible & crimp with a metal clip
d. Going the same direction, put your second strap on the opposite edge
e. Strap every 12" between the two edge straps
f. Repeat this process running straps the other direction of the item
5. Attaching the BOL & Address Label
a. Using clear tape, secure the BOL to the plastic wrap
- Be sure to cover the entire sheet of paper with tape (this helps to waterproof it)
- Be sure that the BOL is right-side-up
b. Keeping the address label as close to the BOL as possible (but without either one overlapping the other), secure it to the plastic wrap just like you did the BOL - again, be sure that the label is right-side-up
c. For information about how to create a BOL shipment, refer to the following section
Creating a BOL for Freight Shipments
1. Go to https://www.centraltransport.com/
2. Click on "Shipping"

3. Click on "Create BOL"

4. For shipments that are going from M & J Tooling to another company:
![]()
a. Customer #: 45403291220
b. "Shipper" Section
i. Click where it says "Select Shipper" and select M & J Tooling LLC
ii. Everything should prefill, but glance over it to make sure the information is correct:

c. "Consignee" Section
i. Enter the name of the company receiving the shipment
ii. Enter the street address and zip code - the state and city should prefill, however sometimes multiple cities will be available to select; make sure the city selected matches the address it is going to
iii. Enter the contact person's name, email address, and phone number
d. Skip over the sections titled "Third Party" and "COD - Remit C.O.C. To"; do not enter any information in these fields
e. Where it says "Freight Charges" select "Prepaid"
i. Check the "Schedule Pickup Now" button
1. Select today's date
2. Ready Time is always 1:00PM
3. Dock Close Time is always 4:00PM
4. Under "Who should we contact regarding this shipment?" select "Shipper"
f. "Shipment Specifics" Section
i. Units: Each skid is entered separately so always enter 1 even when shipping multiple skids
ii. Weight: Total weight of the prepared skid
iii. Is Haz. Mat.?: NO
iv. Type: will usually be SKID, but we sometimes ship in crates or other methods so make sure this is accurate to the shipment
v. "NMFC#" and "Sub": Leave these blank
vi. Class
1. Click on "Density Calculator" (right above "Is Haz. Mat.?")
2. Enter the Length, Width, and Height of the prepared skid
3. Enter the Weight of the prepared skid
4. Enter 1 in the "Units" box
5. Click the "Get Class" button
6. Note the number where it says "Density Class", select this number for the Class back on the BOL page
vii. "Kind of packaging, description of articles (...)": Enter in a short description like "industrial tooling" or "tooling cart" or "tooling cabinet" etc.
g. Click the "Add" button
h. Repeat steps f through g as necessary for additional skids
i. Click the "Submit" button
j. Once the BOL is created, click to view and then print one copy for each skid, plus two extra copies
k. Proceed to step 6
5. For shipments that are coming from another company to M & J Tooling:

a. Customer #: 45403291220
b. "Shipper" Section
i. Enter the name of the company sending the shipment
ii. Enter the street address and zip code - the state and city should prefill, however sometimes multiple cities will be available to select; make sure the city selected matches the address it is going to
iii. Enter the contact person's name, email address, and phone number
c. "Consignee" Section
i. Click where it says "Select Consignee" and select M & J Tooling LLC
ii. Everything should prefill, but glance over it to make sure the information is correct:
d. Skip over the sections titled "Third Party" and "COD - Remit C.O.C. To"; do not enter any information in these fields
e. Where it says "Freight Charges" select "Collect"
f. "Shipment Specifics" Section
i. Units: Each skid is entered separately so always enter 1 even when shipping multiple skids
ii. Weight: Total weight of the prepared skid
iii. Is Haz. Mat.?: NO
iv. Type: will usually be SKID, but we sometimes receive shipments in crates or other methods so make sure this is accurate to the shipment
v. "NMFC#" and "Sub": Leave these blank
vi. Class
1. Click on "Density Calculator" (right above "Is Haz. Mat.?")
2. Enter the Length, Width, and Height of the prepared skid
3. Enter the Weight of the prepared skid
4. Enter 1 in the "Units" box
5. Click the "Get Class" button
6. Note the number where it says "Density Class", select this number for the Class back on the BOL page
vii. "Kind of packaging, description of articles (...)": Enter in a short description like "industrial tooling" or "tooling cart" or "tooling cabinet" etc.
g. Click the "Add" button
h. Repeat steps f through g as necessary for additional skids
i. Click the "Submit" button
j. Once the BOL is created, click to view and then save a PDF copy which will be sent to the shipper
k. Proceed to step 6
6. Creating the To/From Label
a. If M & J Tooling is sending the shipment:
i. Open the "To From Label" file which can be downloaded from this Google Drive
ii. Edit the "To:" information to match the Consignee information on the BOL
iii. Print two copies for each skid being shipped
iv. Tape one copy to the top and one to the side that the forks do not go through
b. If M & J Tooling is receiving the shipment:
i. Open the file "To M&J Label # 45403291220"
ii. Edit the "From:" information to match the Shipper information on the BOL
iii. Save a PDF copy to send to the shipper
Email format:
Please see the attached BOL / To From Label.
Please print 3 copies of the BOL and 1 copy of the to / from label. 1 copy of each gets taped to the skid. 1 copy of the BOL goes to the LTL driver that accepts the skid, and the other is for your own records.
1. https://www.centraltransport.com/shipment/pickup
2. "Shipper Information" section:
If shipping from M & J Tooling:

If shipping from a different location, enter the relevant information as provided by the shipper.
3. "Contact Information" section: Leave blank
4. "Pickup Information" section:
a. Enter the BOL number which you should have created according to the steps here
b. Pickup Date: Whatever date we are scheduling the pickup for (typically the same day, or the next day)
c. Ready Time & Dock Close Time:
If shipping from M & J Tooling: Ready 1:00 PM, Close 4:00 PM
If shipping from another location: Availability must be confirmed with the shipper before continuing
d. Destination Information: Enter the name & full address for the receiver. Contact Person Name and Phone Number are not required.
5. Shipment Details:
a. Enter the TOTAL PALLETS and TOTAL WEIGHT in the respective fields
b. Description and/or Special Instructions: Leave blank unless instructed otherwise
c. Additional Services Required at Pickup: None
d. Copy Recipients: Leave blank
6. Click "Schedule Pickup" at the bottom of the page
Change Credit Card in ShipStation for Stamps Funding


1. Safety Precautions
a. Operators must be trained before using the machine.
b. Ensure proper maintenance and safe handling of the equipment.
c. Report any malfunctions or safety concerns immediately to the supervisor.
d. Always wear appropriate PPE (gloves, safety glasses, and steel-toe boots).
e. Keep hands clear of the banding area while the machine is operating.
f. Do not operate the machine with wet or greasy hands.
g. Ensure the work area is clean and free from obstacles.
2. Pre-Operation Inspection
a. Check the machine for any visible damage or wear.
b. Wnsure the banding material (plastic or metal) is properly loaded.
c. Verify that all controls and safety features are functioning.
3. Machine Startup
a. Turn on the power switch and allow the machine to warm up.
b. Adjust tension settings according to the type and size of the package.
4. Banding Process
a. Position the package within the banding area, against the package guide.
b. Feed the banding material around the package and insert it into the sealing slot.
c. Keep hands clear as you wait for the machine to complete the banding process.
d. Remove the secured package and inspect the banding tension and seal quality.
5. Shutdown
a. Turn off the machine when no longer in use.
b. Clean the machine and remove any excess material.
c. Store banding supplies properly for future use.
6. Troubleshooting
a. If the machine fails to band properly, check for material jams and reload if necessary.
b. Ensure the banding material is feeding correctly and not twisted.
c. If the machine overheats of malfunctions, turn it off and report the issue to the supervisor.
1. Verify Shredding is Needed - cardboard shredding should only be performed if the WB ramp sign is pointing to the SHRED direction.
2. Prepare Cardboard for Shredding
a. Break down all boxes completely.
b. Remove staples from heavy-duty boxes
i. If staples are difficult to remove, cut out the stapled sections and dispose of them properly.
c. Cut large pieces into more manageable sizes if needed to fit into the shredder easily.
3. Setting Up the Shredder
a. Plug the power cable into the back of the shredder.
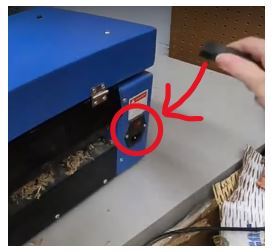
b. Flip the red switch to the ON position (located near the power cable)
4. Shredding Process
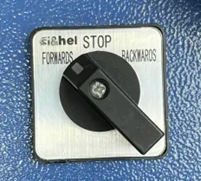
a. When ready to begin, turn the front control knob to the FORWARD position.
b. Only keep the shredder running while actively feeding cardboard.
i. If you need to pause to prepare more cardboard, turn the knob to STOP and switch the shredder OFF until you are ready to resume feeding.
5. Troubleshooting
a. If the shredder becomes jammed:
i. Turn the front knob to the STOP position.
ii. Once the shredder fully stops, turn the knob to the BACKWARDS position to reverse the rollers and free the jammed cardboard.
iii. Once cleared, turn the knob to STOP again before returning to the FORWARDS position to continue shredding.
b. If the steps above do not work:
i. Turn the front knob to the STOP position.
ii. Flip the red power switch to OFF.
iii. Unplug the power cable from the back of the shredder to ensure that there is no way for the shredder to be turned on while performing maintenance.
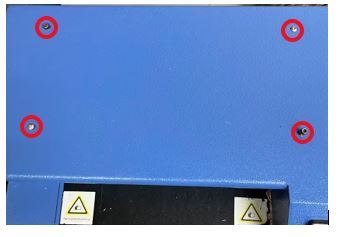
iv. Obtain a 2.5mm and a 3.0mm allen wrench.
v. Remove the four screws on the top of the shredder (be sure to put them somewhere where they will not be lost / knocked onto the floor):
vi. Gently lift the top up once free and rest it on the table. Use care as the top will still be attached by the cables inside (see picture below).
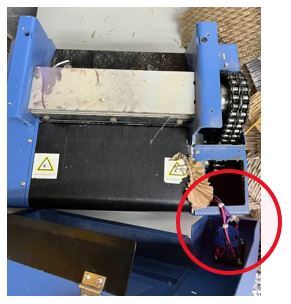
vii. Locate the jam and remove the jammed cardboard, using pliers or another tool if not able to remove by hand.
viii. Once cleared, re-attach the top of the shredder with the four screws removed in step v.
ix. Once re-assembled, plug the power cable back in and flip the red switch to ON.
x. Resume shredding.
6. Shut Down Procedure
a. Turn the front control knob to STOP.
b. Flip the red power switch to OFF.
c. Unplug the power cable from the back of the shredder.
7. Safety Concerns
a. Never reach into the shredder / attempt to remove cardboard while it is running.
b. Do not wear loose / long clothing or jewelry while operating the shredder.
c. Always power off and unplug the shredder before attempting to clear jams or perform maintenance.
d. Wear gloves if handling cardboard with staples or rough edges.
8. Video Tutorial
Inventory Check & Shipping Supplies Order
To be performed every 3 weeks OR weekly/as needed during peak shipping seasons.
Inventory Check Procedure
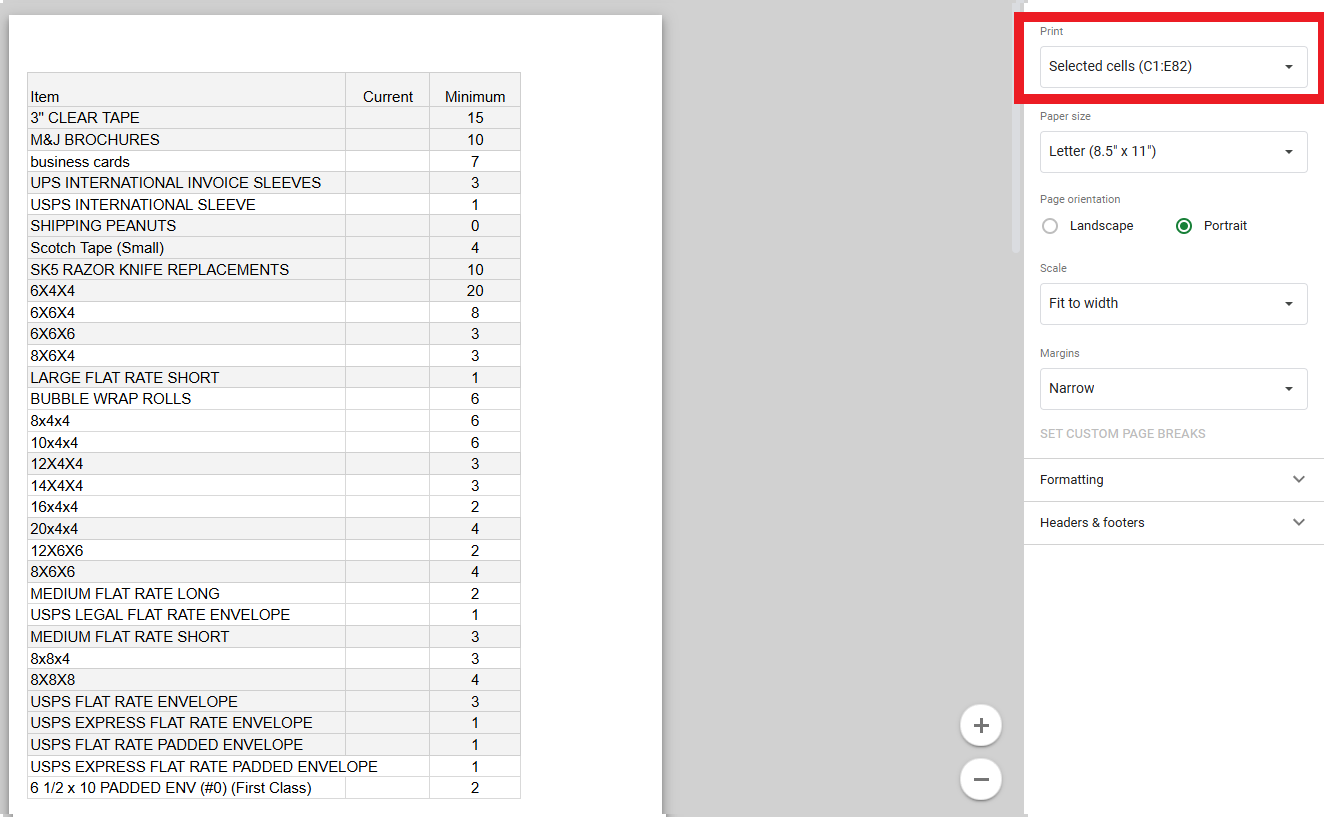
1. Prepare the Checklist
a. Retrieve the latest Inventory Checklist. This is found on the Supplies List Google sheet under the tab labeled "Shipping Supplies". (For a general supplies check, follow this process under the "General Supplies" tab on the same google document)
b. Delete all of the numbers in the Current column.
b. Highlight all of the cells in the Item, Current, Minimum, and Location columns.
c. Select File -> Print and choose "Selected cells", then print the document (it should look like the example below).
2. Count Inventory
a. Verify the designated inventory storage area is accessible and organized.
b. Count each type of supply item on the checklist (e.g., small boxes, bubble mailers, shipping tape, brochures, etc.).
c. Check for any damaged or unusable supplies - these should be set aside and not included in the count
d. Record the current quantity on the physical copy of the Supplies sheet.
e. Once you have finished checking all of the inventory, update the Supplies List sheet with the new current counts.
f. The physical copy of the checklist should be kept on file for at least 6 months.
3. Compare to Par (Minimum) Levels
a. For each item, compare the current stock to the predefined Minimum Stock Level (par level).
b. Mark any items that are at or below par level for reorder by entering ORDER in the first column on the left of the Google sheet.
c. Update the "Last Supply Check" in the top-left cell with today's date and your name.
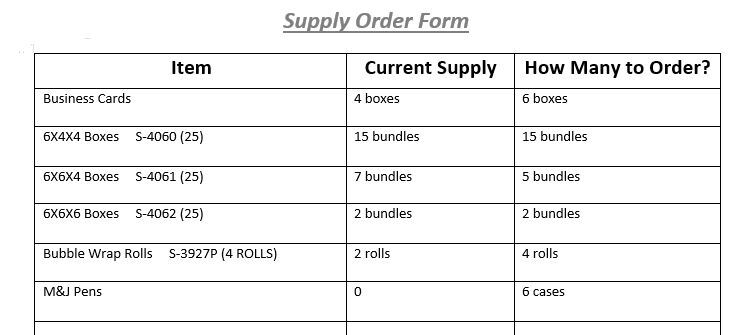
1. Prepare Reorder List
a. Download & open a copy of the Supply Order Form
b. Enter the Item Name, Current Supply, and How Many to Order. If the item has a ULINE Code listed on the Supplies List spreadsheet, include it in the Item Name field. See below for an example.
How Many to Order: We want to order enough to put us at 150% of the minimum stock level - for example, if the minimum is 10 and we currently have 7, we want to order 8 more to put us at 15 (10 x 1.5)
2. Submit for Approval - Email or Discord the reorder list to the purchasing manager for approval.
a. Approved supply order forms should be kept on file for at least 6 months.
3. Place Order
a. Once approved, the purchasing manager will place the order with the each corresponding vendor according to the steps outlined in the sections below.
b. Save a copy of all order confirmations and expected delivery dates.
VistaPrint (Business Cards & Brochures)
1. Log in to vistaprint.com
2. Click on MY ACCOUNT and then ORDER HISTORY & REORDER
3. Find the previous order for the item you need, then click EDIT DESIGN & REORDER
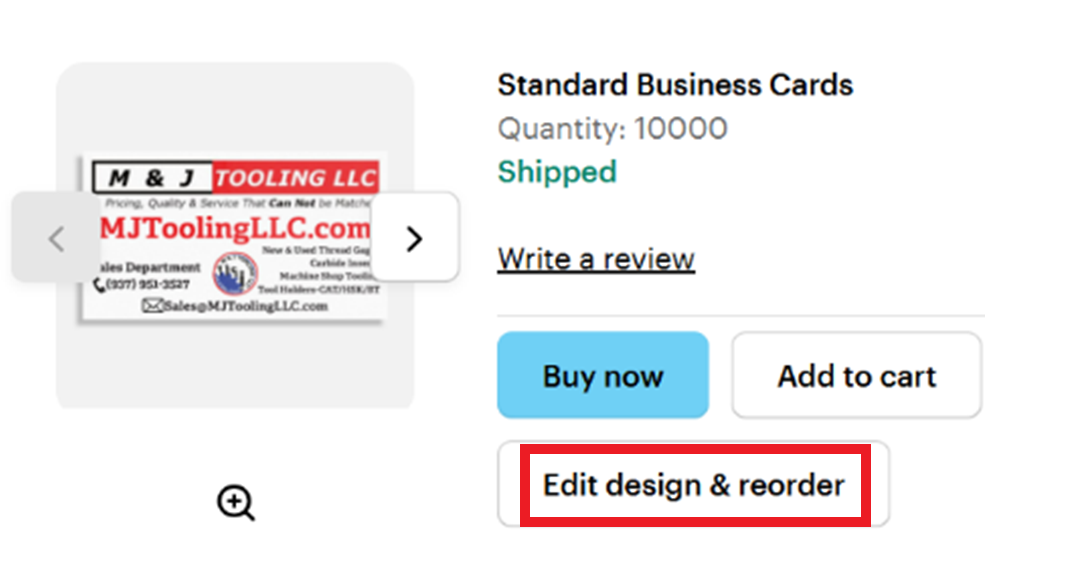
4. Click the "Next" button on the next two pages.
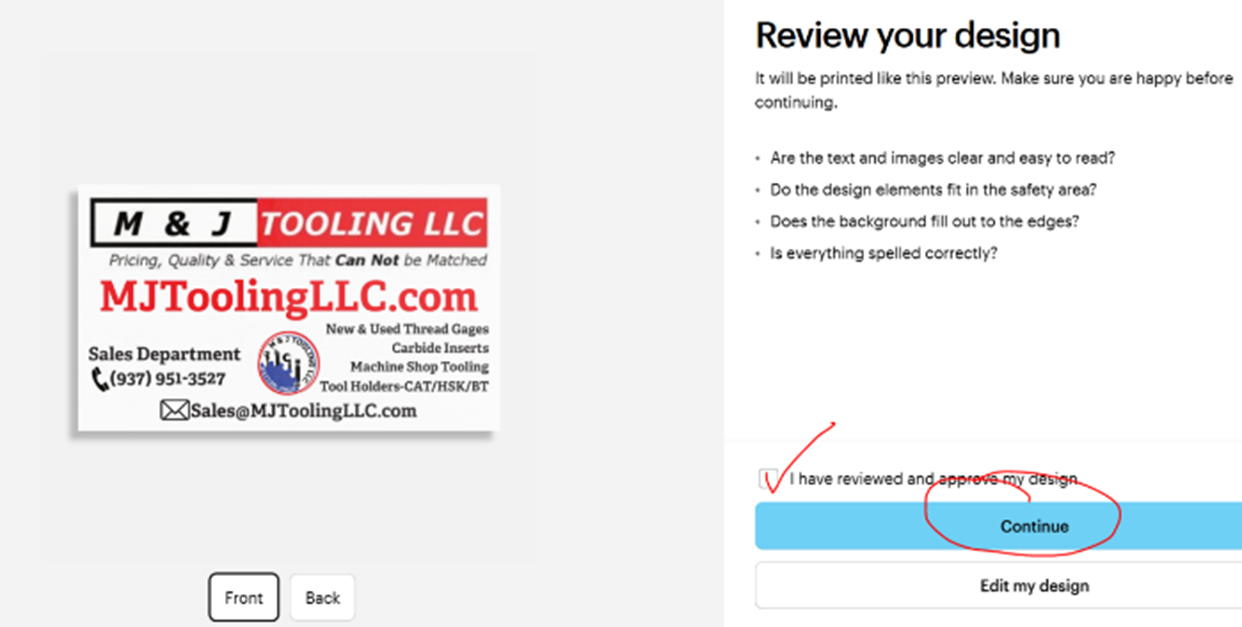
5. On the REVIEW YOUR DESIGN page, check the "I have reviewed and approve my design" box, then click "Continue"
6. On the FINAL STEPS page, ensure that the quantity is correct and the paper thickness is standard.

7. Select ADD TO CART -> CONTINUE -> CONTINUE TO CART
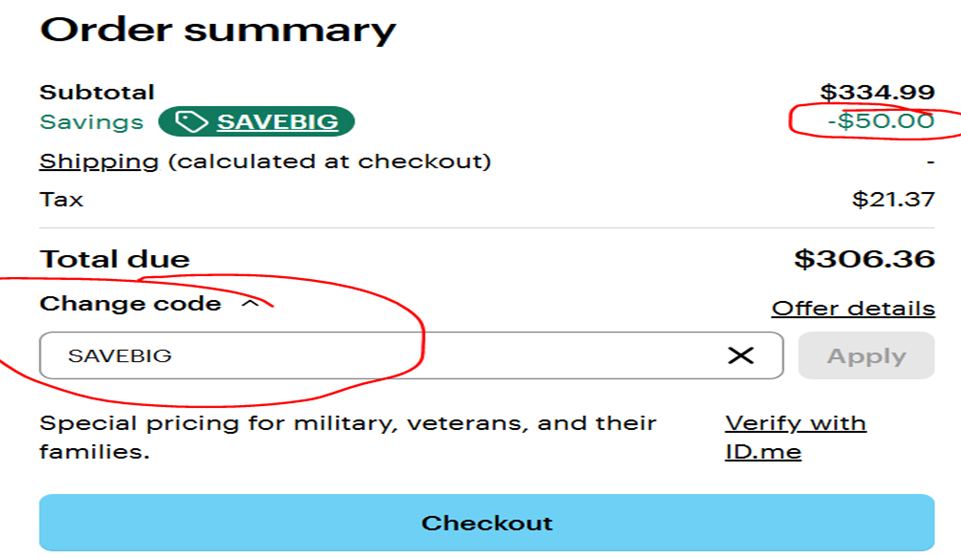
8. In a separate tab, Google the term "VistaPrint coupon codes". Find the result from RETAILMENOT.COM and click this link.
9. Find & copy the code with the best discount.
10. Return to the VistaPrint tab and apply the coupon code to the order, then click the Checkout button.
11. Enter M & J Tooling's shipping information as shown below. Select the ECONOMY shipping option, then click Save Shipping Method.
M & J Tooling LLC
420 Davis Ave
Dayton, OH 45403
937-951-3527
12. Continue to the Payment Method and input the appropriate information.
13. Click PAY & PLACE ORDER.
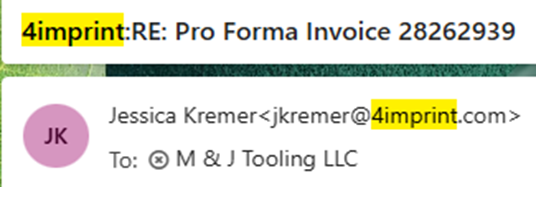
1. Open Outlook, which should be logged in to the sales account (sales@mjtoolingllc.com)
2. Search "4imprint" in the inbox and find the most recent email from a 4imprint sales representative.
3. Click "Reply All" and send an email in this format:
Good [Morning / Afternoon] [Name],
Could we get a fresh invoice for this product please, we need to get more on order.
Thank you!
[email signature with your name]
4. Once we have received a reply, you can place your order for the quantity you select.
a. Price breakdown for M&J Pens:

Thomas Tape (M&J Tape, Kraft Paper, Bubble Wrap, Packing Slips)
FOR WHITE M & J TAPE:
1. Open Outlook, which should be logged in to the sales account (sales@mjtoolingllc.com)
2. Click "New Mail"
3. In the "To:" field, enter josh@thomastape.com
4. In the "CC:" field, enter marksalomon528@woh.rr.com
5. The subject line will be the PO# for the order. This will be your initials followed by a sequential 4-digit number (i.e., if the last order was 0054, this one will be 0055). You can find the previous order by searching "thomastape" in Outlook's "Sent" folder.
6. The body of the email will be formatted as:
Good [Morning / Afternoon] Josh,
Can we get this on order please:
3" X 450' General Purpose White Reinforced WAT
Printed: two colors
10 rolls/case
[X Amount] cases: $158.25/case
[Email Signature]
FOR ALL OTHER ITEMS:
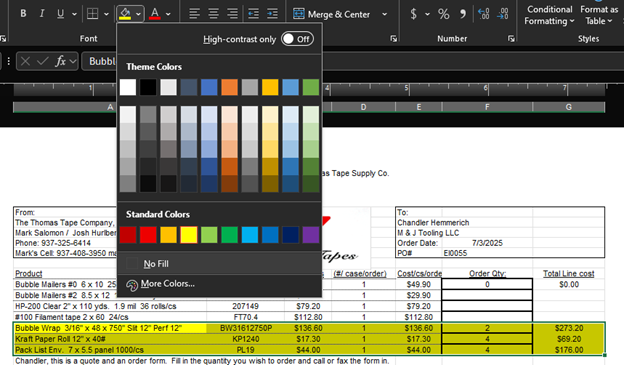
1. Open the Excel file for the most recent Thomas Tape order, which should be saved on your PC (if you do not have this file, contact your supervisor).
2. Some of the cells will be highlighted in yellow as in the picture below. Select all of these cells and reset the fill color by clicking the paint bucket icon and then selecting No Fill.
3. Clear any numbers in the "Order Qty" cells, which should reset the total to $0.00.
4. Enter the quantities for any items that need to be ordered. Be sure to check the total and only proceed with placing an order if it hits the $300 minimum for free shipping (unless instructed otherwise by a supervisor).
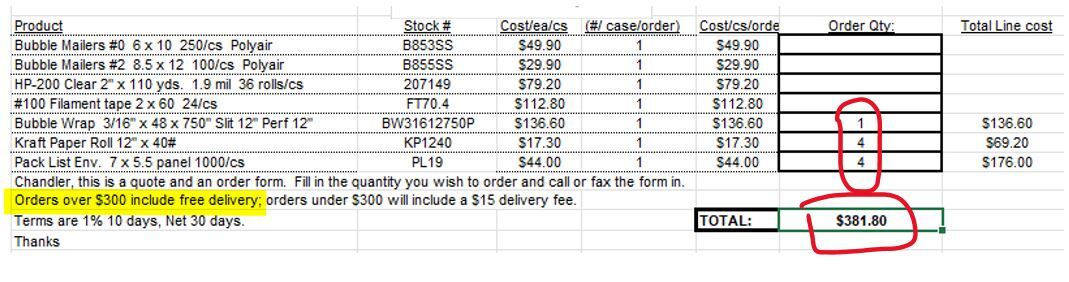
5. Highlight these rows (including the "Total Line cost") in yellow using the same paint bucket icon used in step 2.
6. In the top right corner, adjust the order date to today's date and change the PO#. The PO# will be your initials followed by the next sequential 4-digit number from the previous order (ex: If the last PO placed by John Smith was JS0123, the next one would be JS0124).

7. Review the order to verify everything is correct, then select File -> Save As and save a .pdf copy of this sheet with the PO# as the filename.
8. Open Outlook, which should be logged in to the sales account (sales@mjtoolingllc.com)
a. Click "New Mail"
b. In the "To:" field, enter josh@thomastape.com
c. In the "CC:" field, enter marksalomon528@woh.rr.com
d. The subject line will be the PO# for the order.
e. The body of the email will be formatted as:
Good [Morning / Afternoon] Josh,
Please see the attached PO and let us know if you have any questions. Thank you!
[Email Signature]
f. Attach the PO .pdf file to the email
g. Send.
U-LINE (Boxes, Envelopes, Bubble Wrap, Tape, etc.)
1. Navigate to uline.com
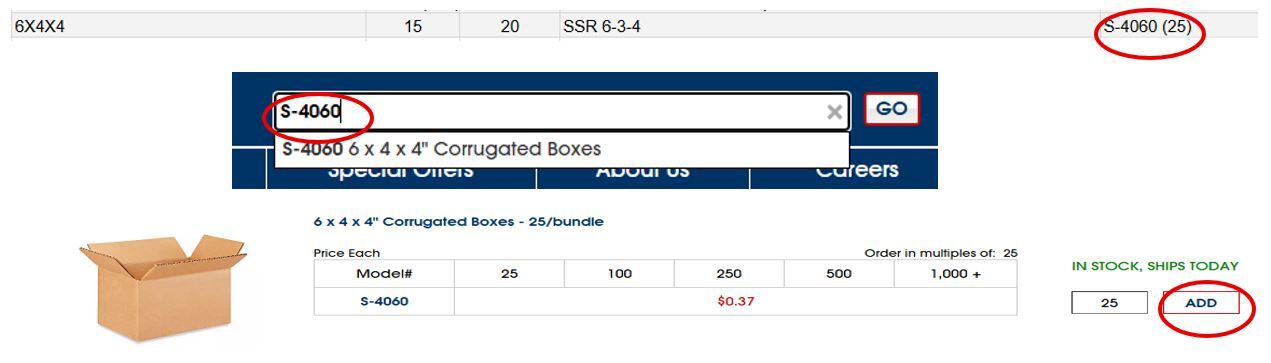
2. Using the ULINE code found on the Shipping Supplies sheet, find each item on the reorder list and add the appropriate quantity to the cart. If a ULINE code is not listed on the supplies sheet, refer to the ULINE website or ask your supervisor for help.
3. Once all items have been added, click on "Cart" in the top right corner of the page.
4. Confirm that the items in the cart are correct and click "Checkout".
5. Log in to M & J Tooling's ULINE account using the email and password provided by your supervisor and finish checking out.
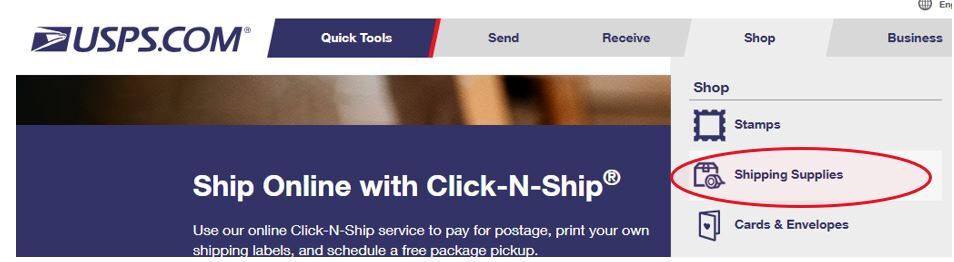
1. Go to usps.com
2. Under the "Shop" tab, select the "Shipping Supplies" option.
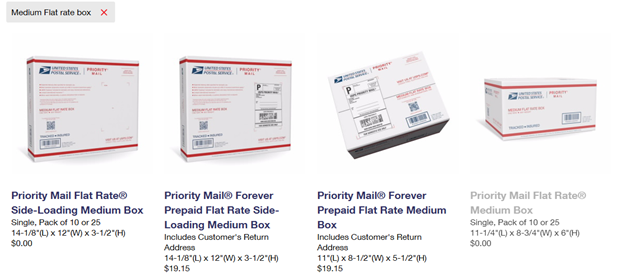
3. Type the item you are looking for in the search bar, for example: MEDIUM FLAT RATE BOX. Select the appropriate item from the results.
4. Verify the quantity being ordered, then add to cart.
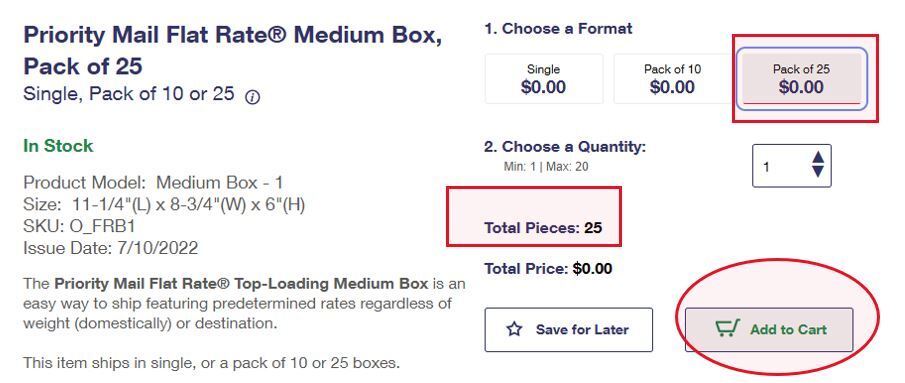
5. From the "...successfully added to your cart" page, click "Check Out Now".
6. This will redirect you to a login page. If you do not already have an account, click Sign Up Now to create an account using an M & J Tooling gmail account (your supervisor can help you set this up if needed)
7. Once logged in you will be returned to the shopping cart - verify the order is correct, then click "Check Out Now".
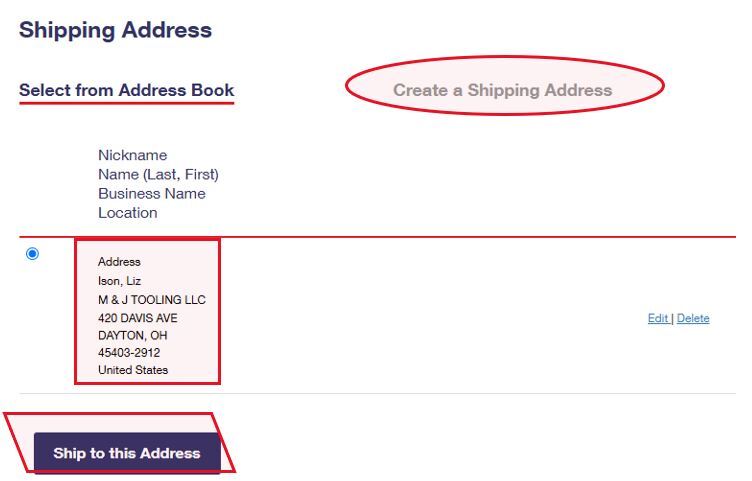
8. Select the address for M & J Tooling - if it is not already in your USPS address book, add it by selecting "Create a Shipping Address". Once added, select "Ship to this Address".
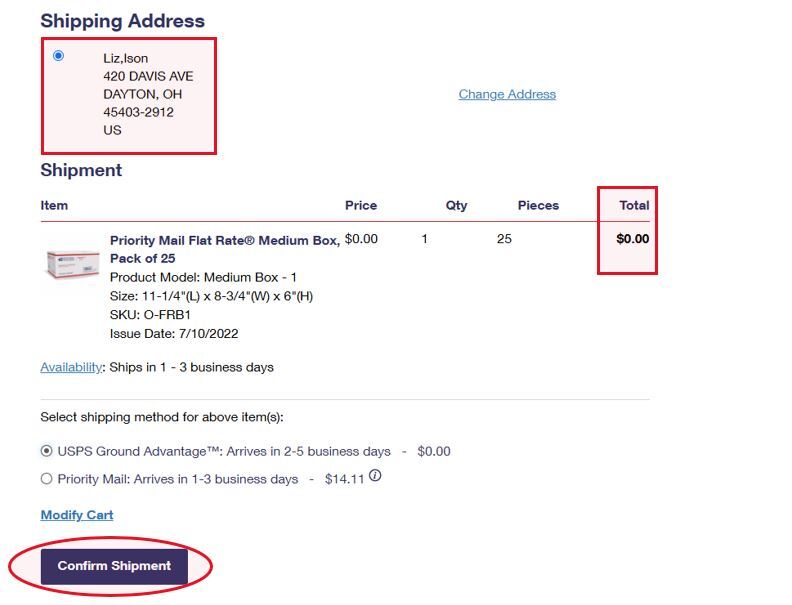
9. Verify that all information on the order summary is correct, including the shipping address and the total (which should be $0.00). Select the USPS Ground Advantage shipping method, then click Confirm Shipment.
4. Receive and Verify Shipment
a. When supplies arrive, verify contents match the packing slip and purchase order.
b. Report discrepancies or damages immediately to the vendor and purchasing manager.
c. Update inventory levels on the Supplies List spreadsheet accordingly.
d. Delivery receipts and packing slips should be kept on file for at least 6 months.
NOTE: Pans do not hve to be spotless once cleaned, but ensure that they are not oily / full of debris. You should take no longer than a couple minutes maximum when cleaning a pan.
1. Locate Dirty Pans - they are stored in West Bay on the shelving units in front of the wax / laser stations.
2. Gather Cleaning Supplies
Ensure you have the following before beginning:
a. Cleaning solution (any degreaser / all-purpose cleaner will suffice)
b. Disposable gloves
c. Heavy-duty wipes
d. At least two clean rags
e. Scrubbing brushes
f. Scotch-Brite pads
3. Prepare for Cleaning
a. Always put on gloves for protection.
b. Apply cleaning solution directly to the brush or Scotch-Brite pad - do not spray directly into the pan.
4. Clean the Inside of the Pan
a. Scrub the inside throughouly using the brush or pad.
b. Once the solution becomes dirty or less effective (i.e., you're scrubbing with tainted liquid), wipe the brush / pad clean using a rag.
c. Reapply cleaning solution as needed and repeat the scrubbing and wiping process until the interior is fully clean.
5. Clean the Outside of the Pan
a. Spray, scrub, and wipe down the outside surface of the pan using the same method as above.
6. Dry the Pan
Either:
a. Turn the pan upside down on the drying cart
Or
b. Manually dry it with a clean rag
7. Restock Clean Pans
a. Once dry, return the pan to the clean pan inventory.
b. Try to match pans by size and brand when stacking to ensure neat organization.
c. Clean pans should be restocked in West Bay in the following locations:
i. White wire hanging racks above Shipping Station 1 and Shipping Station 2
ii. On top of WB-18-3, WB-18-4, and WB-18-5
iii. On top of WB-SW-2 and WB-SW-3
8. Video Tutorial
Waxing Procedure
Most thread gages and (non-indexable) cutting tools will be dipped in wax to help protect the threads / cutting edges from damage during storage and shipping. Thread ring gages will also be sealed with hot glue (green for "Go" rings and red for "No Go" rings), which is used to seal the locking mechanism of the adjustable style rings and will be referred to as edge wax in these instructions.
!!! SAFETY GUIDELINES - YOU MUST READ AND UNDERSTAND THE FOLLOWING BEFORE PROCEEDING !!!
Do NOT touch the wax pot with bare skin. It is extremely hot, even on the outside, and should always be handled with care. This includes the lid, which should ONLY be grabbed by the handle.
IF A TOOL HAS DROPPED INTO THE WAX POT: Contact your trainer immediately for assistance. Do NOT, under any circumstance, reach for the tool with your hands.
When waxing larger tools, be cautious of wax dripping toward your hand. Wearing protective gloves is strongly recommended.
Hot fumes may cause eye irritation - keep face away from open wax pot whenever possible
Molten component of the wax can cause skin burns - use of protective gloves is strongly recommended
The temperature for the wax pot should NOT exceed 350F. Flash point occurs at >410F.
Preparation:
1. Turn on the hanging fan and exhaust fan at the waxing station. The exhaust fan should be at 100 and the hanging fan can be turned to whatever setting is preferred by the user.
2. Turn on the hot glue guns (if necessary for what is being waxed) by pressing the red switch on the guns. The red switches should be lit up after being turned on.
3. Take the lid off the wax melting pot by the handle on top and rest it on the side of the waxing station.
4. Check the wax level in the melting pot. To do this, use the long screwdriver with a red handle and hotch along the shank. Dip straight into the wax pot, tip first.
a. If the wax on the screwdriver does not rise above the notch, the wax pot needs to be refilled.
b. IF REFILLING THE WAX POT:
i. Color ratio: 1 clear cube : 2 blue cubes
ii. Fill until the wax pot is about 1 inch below the rim.
iii. Wait ~30 minutes for the new wax to melt before proceeding.
!!! ONLY WAX ITEMS THAT HAVE A 4" OR SMALLER DIAMETER !!!
Thread Plug Gages
1. Hold the gage by the handle.
2. Dip straight down and wax only the threads.
3. Lift and tilt, letting excess wax drip off the edge of the tool.
4. Twist up to break the wax thread.
5. Hold in front of the fan to cool and dry.
Thread Ring Gages
1. If waxing an adjustable ring gage, check for edge wax before beginning.
2. IF EDGE WAX IS NEEDED:
a. Check whether it is a "Go" ring or a "No Go" ring. This should be labeled (although ring gages might occasionally say "Low" or "Lo" instead of "No Go"), and you can also check by seeing if there is a groove on the side of the ring (shown below). If this groove is present, it is a No Go ring. If not, it is a Go ring.
b. Use green wax for Go rings, and red wax for No Go rings.
c. Fill one of the adjustment screw holes with the appropriate colored wax. Let the ring rest with this adjustment hole facing up on the waxing station until dry.
d. Once wax is dry, repeat for the other adjustment screw hole.
3. Hold the gage by the size marking (for example "1/4 - 28 UNF 3A" - this labeling should always be unwaxed)
4. Dip straight down - avoid twisting or angling to prevent an uneven wax line.
5. Blow out any wax / bubbles from the center hole of the gage.
6. Ensure wax does not cover the size marking.
7. Lift and tilt, letting excess wax drip off the edge of the tool - OR, wipe excess wax from the back of the ring on the inside wax pot edge
8. Twist up to break the wax thread
9. Hold in front of the fan to cool and dry.
Reamers
!!! Do not wax expansion reamers or shell reamers !!!
1. Hold the reamer by the shank.
2. Dip straight down and wax only the cutting edges.
3. Lift and tilt, letting excess wax drip off the edge of the tool.
4. Twist up to break the excess wax thread.
5. Hold in front of the fan to cool and dry.
Taps
1. Hold the tap by the shank.
2. Dip straight down and wax only the teeth.
3. Lift and tilt, letting excess wax drip off the edge of the tool.
4. Twist up to break the wax thread.
5. Hold in front of the fan to cool and dry.
Twist Drill Bits
!!! Do not wax coolant thru drill bits !!!
1. Hold the drill by the shank.
2. Dip straight down and wax only the cutting edges.
3. Lift and tilt, letting excess wax drip off the edge of the tool.
4. Twist up to break the excess wax thread.
5. Hold in front of the fan to cool and dry
End Mills
1. Hold the end mill by the shank.
2. Dip straight down and wax only the cutting edges.
3. Lift and tilt, letting excess wax drip off the edge of the tool.
4. Twist up to break the excess wax thread.
5. Hold in front of the fan to cool and dry.
1. Preparation:
a. Optional: Gather 3 empty pans or bag hoppers to help with organizing.
b. Retrieve a hopper filled with recycled bags and bring it to your sorting area.
2. Sorting:
a. Open the hopper and being sorting the bags into 4 size categories:
i. 4x6 bags (or similar size)
ii. 6x8 bags (or similar size) -> Label: SMALL BAGS
iii. 9x12 bags (or similar size) -> Label: LARGE BAGS
iv. Extra Large Bags (usually used for large tool sets)
b. Lay the bags flat to save space and maintain organization.
c. Continue sorting until all bags from the hopper have been organized.
3. Stocking Bags in Designated Areas:
a. Take sorted bags to Danny's Office (which is also the thread gage backup inventory room)
b. Against the back wall, locate the labeled cardboard hoppers:
i. 6x8 bags (SMALL BAGS) -> place in the Small Bag hopper.
ii. 9x12 bages (LARGE BAGS) -> place in the Large Bag hopper.
c. 4x6 bags -> place in the small pan kept by Danny for reuse.
d. Extra Large Bags -> store in Danny's top right cabinet drawer near his photo station.
e. If unsure, ask Danny or your supervisor for assistance.
4. If Danny's Hoppers are Full:
a. Visit each department / office and stock the bags in their designated locations. (Typically in a cardboard box / covered bin labeled LARGE and SMALL)
b. Ask your supervisor if no offices have room for additional bags / you're unsure where to place them.
5. Final Step: Return the empty bag hopper(s) to the shipping station where it was originally taken from.
1. Remove / destroy any stickers on the case that contain Chinese characters, as well as any certs / paperwork inside the case. Stickers will often not peel off easily, in which case you can use a dry Scotch-Brite pad to rub off the labeling.
2. Determine if this is a restock or a new listing:
a. Go to SureDone and type the gage size into the search bar. Enter the diameter as a decimal for best results (for example, 1.375 rather than 1 3/8).
b. Also copy & paste the following into your search (CASE SENSITIVE): sku:MSAF$
c. If the search does not bring back a match, write "MSAF" on a ticket and put it in a bag along with the gages. Set aside and move on to the next size.
d. If the search brings back a match:
i. Click the triangle that appears when you hover over the SKU, then select "Edit Inline":
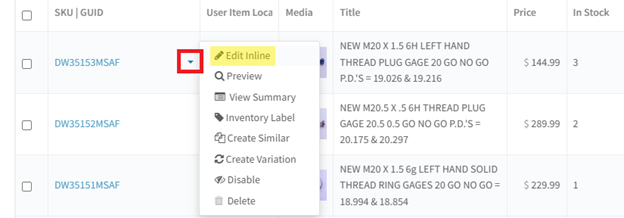
ii. Increase the "In Stock" number by the appropriate amount, then click the checkmark next to the SKU:

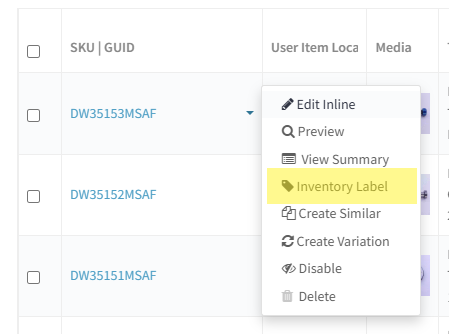
iii. Click the triangle again and this time select "Inventory Label":
iv. In the tab that opens up, right-clilck and select Print. For the print settings (expand the "More settings" to see all):
1. Destination should be your Zebra printer
2. Set "Pages" to "Odd pages only" so it doesn't print the blank 2nd page
3. Change the number of copies to whatever amount is being restocked
4. Layout = Landscape
5. Paper size = 4.00" x 6.00"
6. Scale = Custom, 200
v. Print the labels and put them in a bag along with the respective gages. Set aside and move on to the next size.
3. Once all gages have been assessed, you will need to generate an engraving request. ***If you have a mix of restock gages and new listing gages, make two different engraving requests with all the restock gages on one and all the new listing gages on another
a. Enter today's date in the "Request Date" field
b. Under "Return To:"
i. If these are new listings, put "Danny Filler Tray"
ii. If these are restocks, put "Danny - Bag & Stock"
c. The due date will be 1 week from today's date
d. For each gage size, enter the line item number and quantity, and put "No" under "Receiving Certs?". For the description you will enter the full gage callout along with the Pitch Diameters (P.D.'s). To find the P.D.'s:
[NOTE: Tapered pipe gages (NPT, ANPT, NPTF, BSPT) do not have P.D.'s and can skip this step]
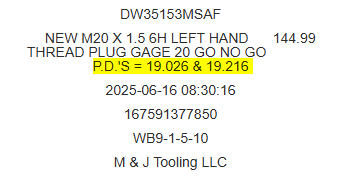
i. If this is a restock, the P.D.'s will be listed in the listing title (which will also be on the labels you printed):

ii. If this is a new listing, you can find P.D.'s using Thread Disk:
1. After opening the program, select "Calculate Dimensions with ASME tables" and then click OK
2. Change the Thread Type to the appropriate option (UN, Metric, ACME, etc.)
3. Select the class from the dropdown
4. Enter the diameter as a decimal (fractions will result in an error). If metric, do not include M in the diameter. Number sizes can be entered as either the decimal equivalent or with a # sign such as #4.
5. Enter the TPI
6. Click Calculate
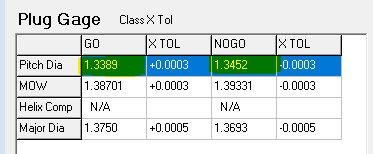
7. Select the corresponding tab for the type of gage you need (Ring Gage, Set Plug, or Plug Gage). You will find the Go and No Go P.D.'s listed at the top of the table:
iii. P.D.'s should always be listed with the Go P.D. first and the No Go P.D. second. Be sure to include the full class (including things like STI, L1, 6-Step, etc.) as well as any specialties such as Left Hand. For example: 1 3/8 - 18 UNEF 2B Left Hand Thread Plug Gage P.D.'s: 1.3389 & 1.3452. Contact Josh or Matthew if you have questions about proper formatting.
4. Once all gages have been entered onto the engraving request:
a. Print the sheet
b. Place all of the gages and the engraing request in a plastic tub which you can get from the top of the shelf at the West Bay ramp
c. Bring to the engraving station.