


Use WD-40 and a Scotch-Brite pad to remove any rust or residue from the cutter, taking care not to damage any cutting edges or smudge / remove any labeling. Wipe down with a dry rag prior to picturing to remove any excess moisture.
Picturing Side Milling Cutters
Click here for info on how to upload pictures
For Side Milling Cutters Without a Shank:
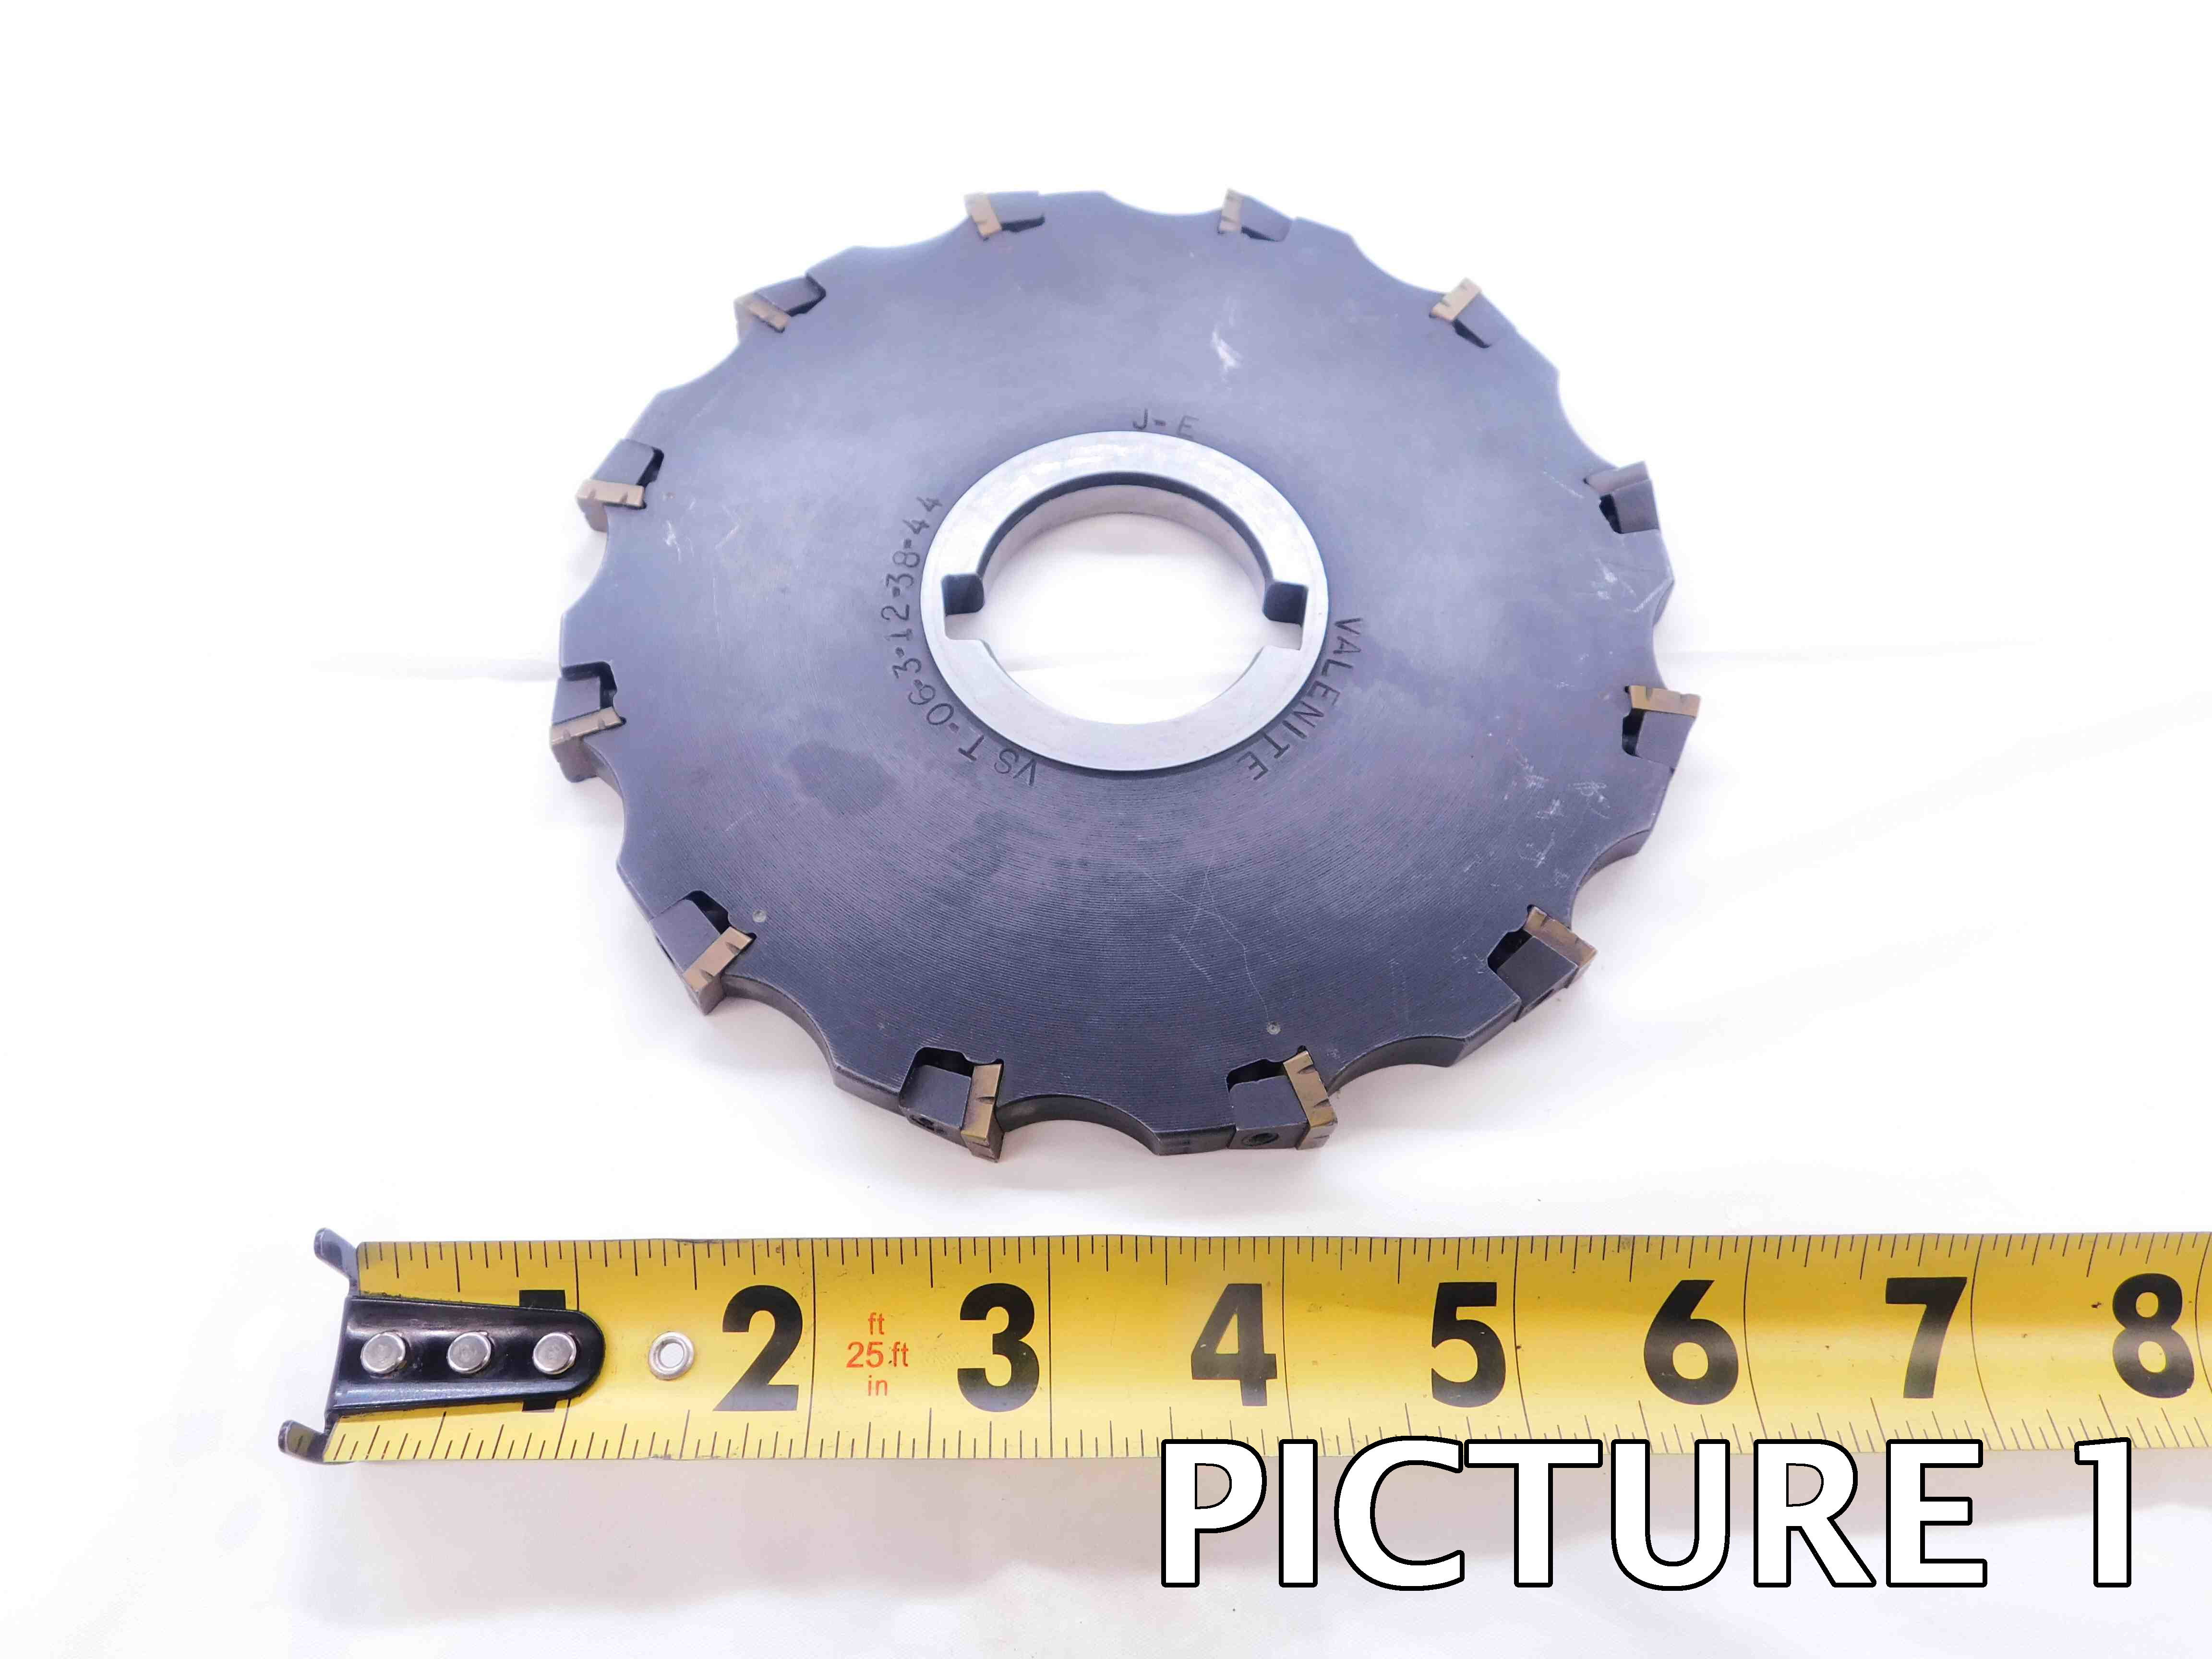
1st Picture: A top-down view of the cutter, with a tape measure for size reference. If there is labeling on the cutter face, be sure to orient the cutter so that the labeling is readable (i.e., right-side up). If there is any packaging, it should be included in this picture as well.
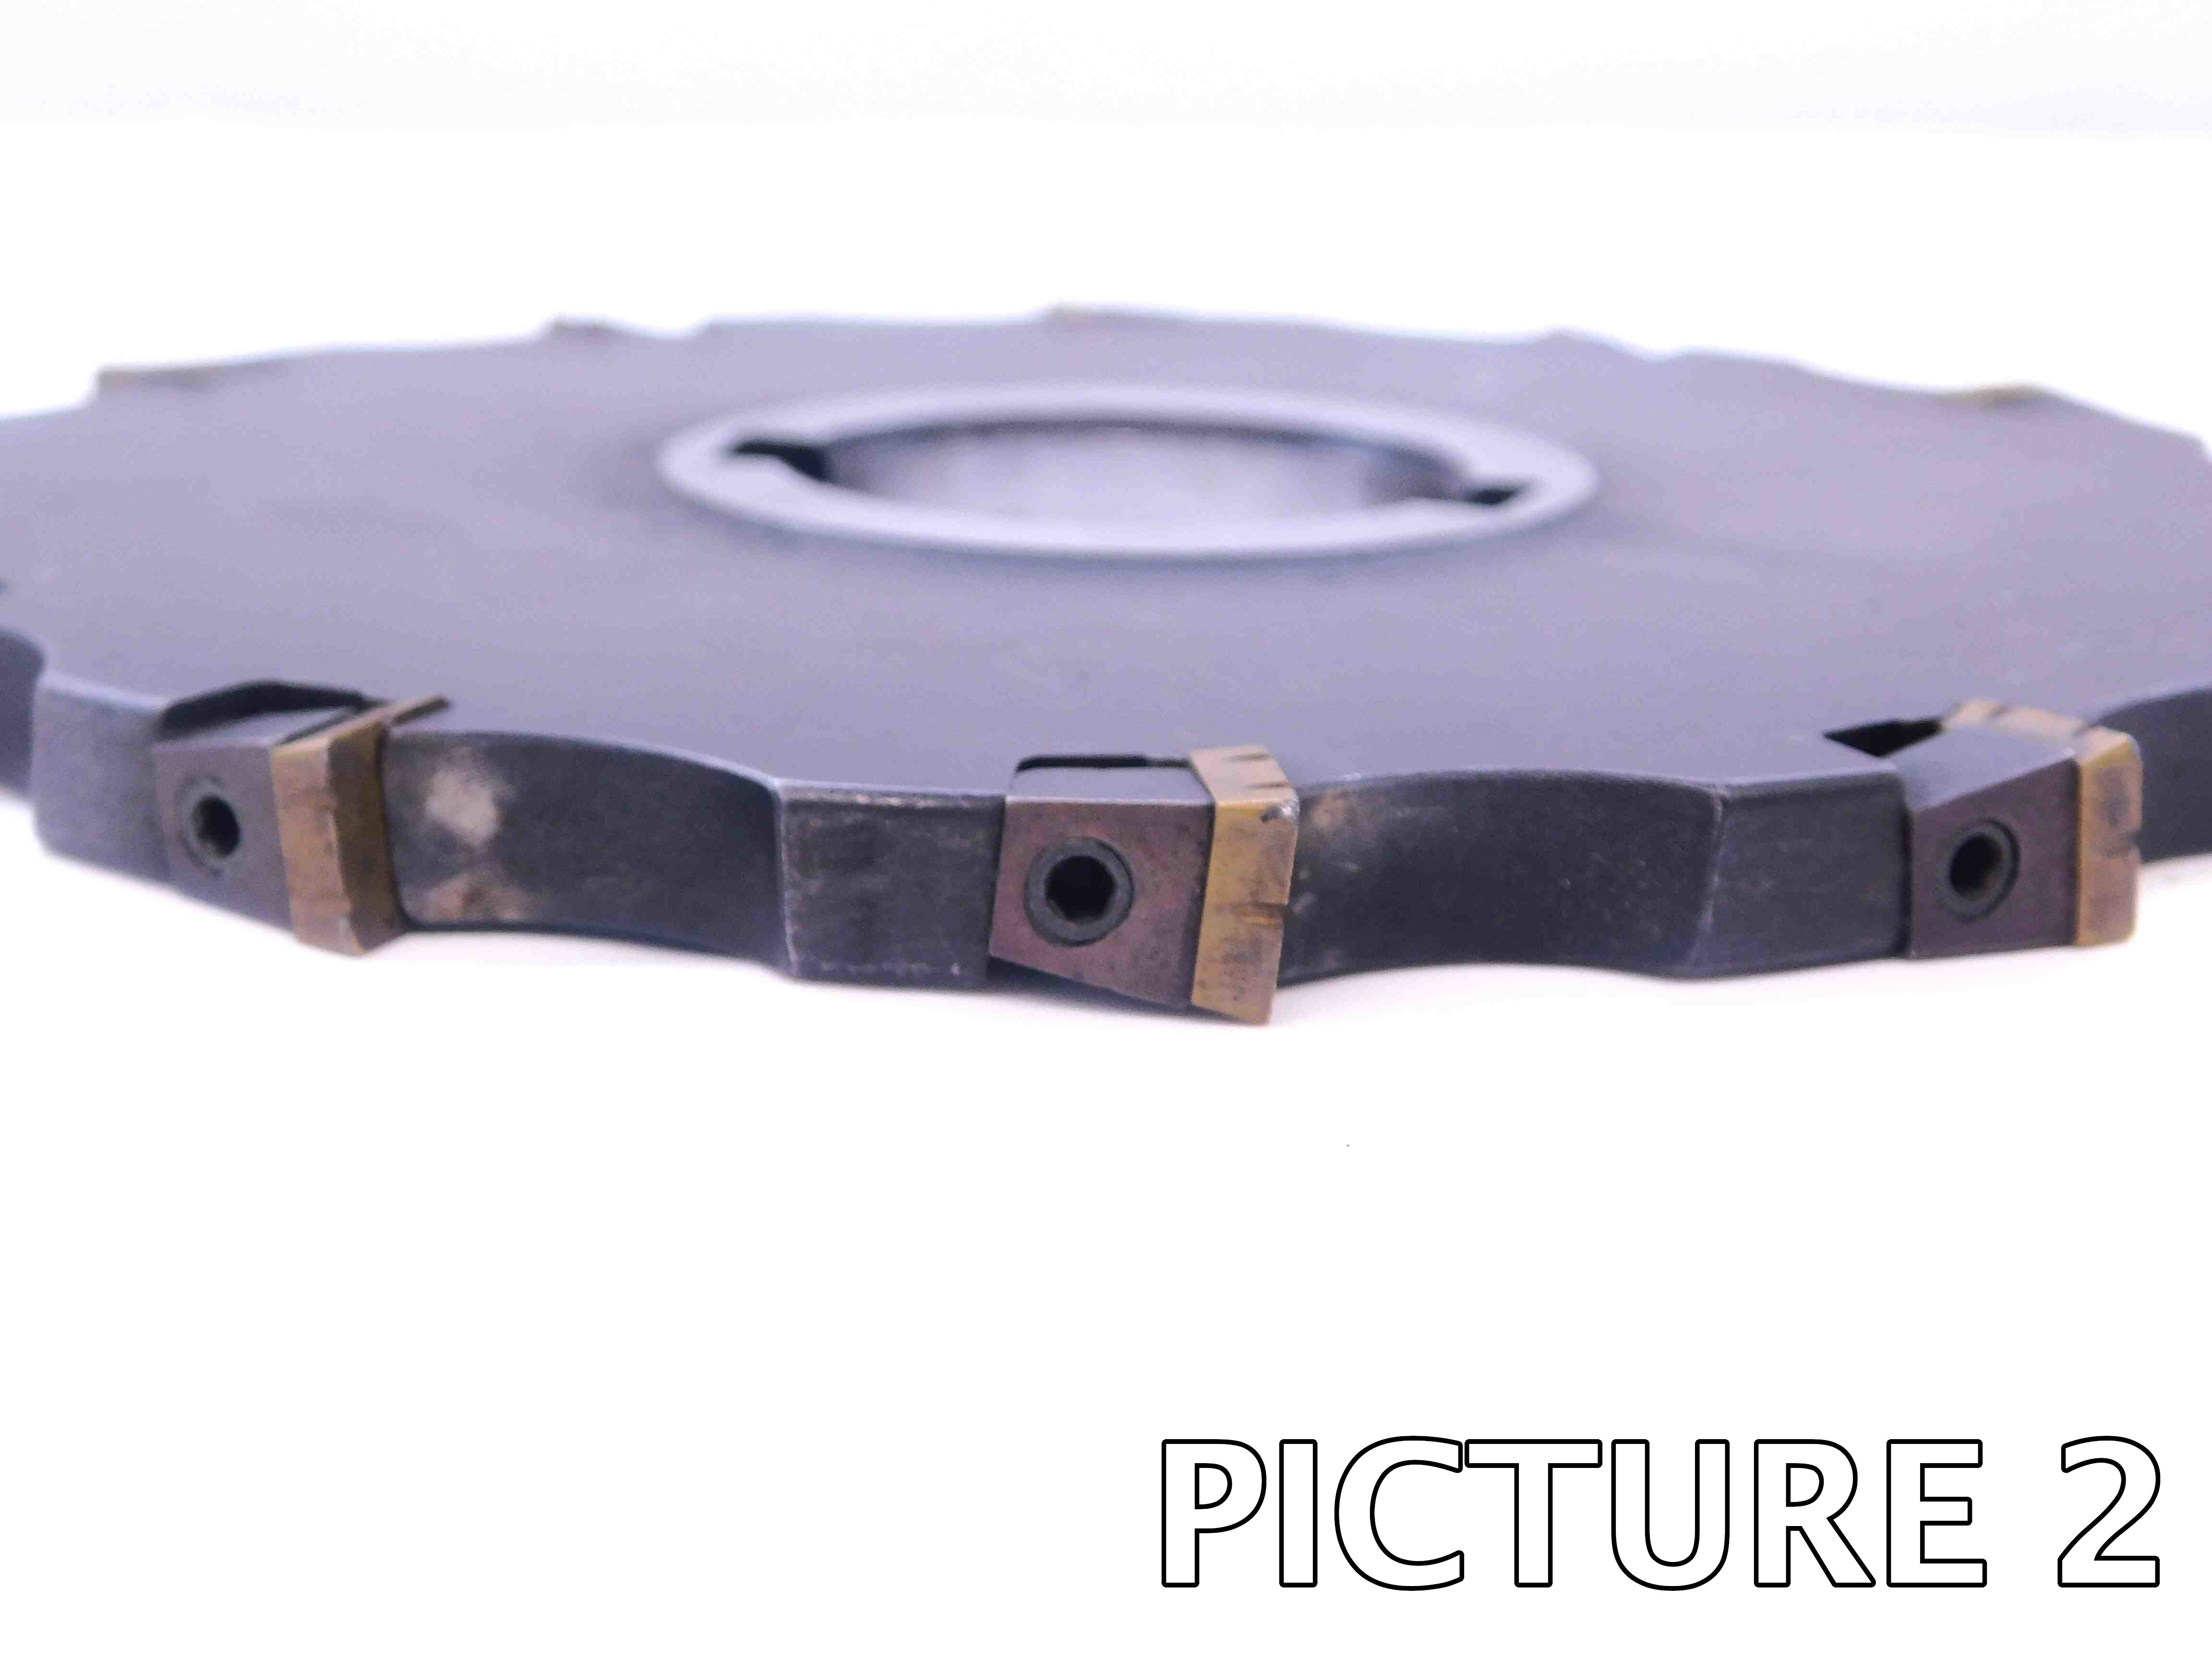
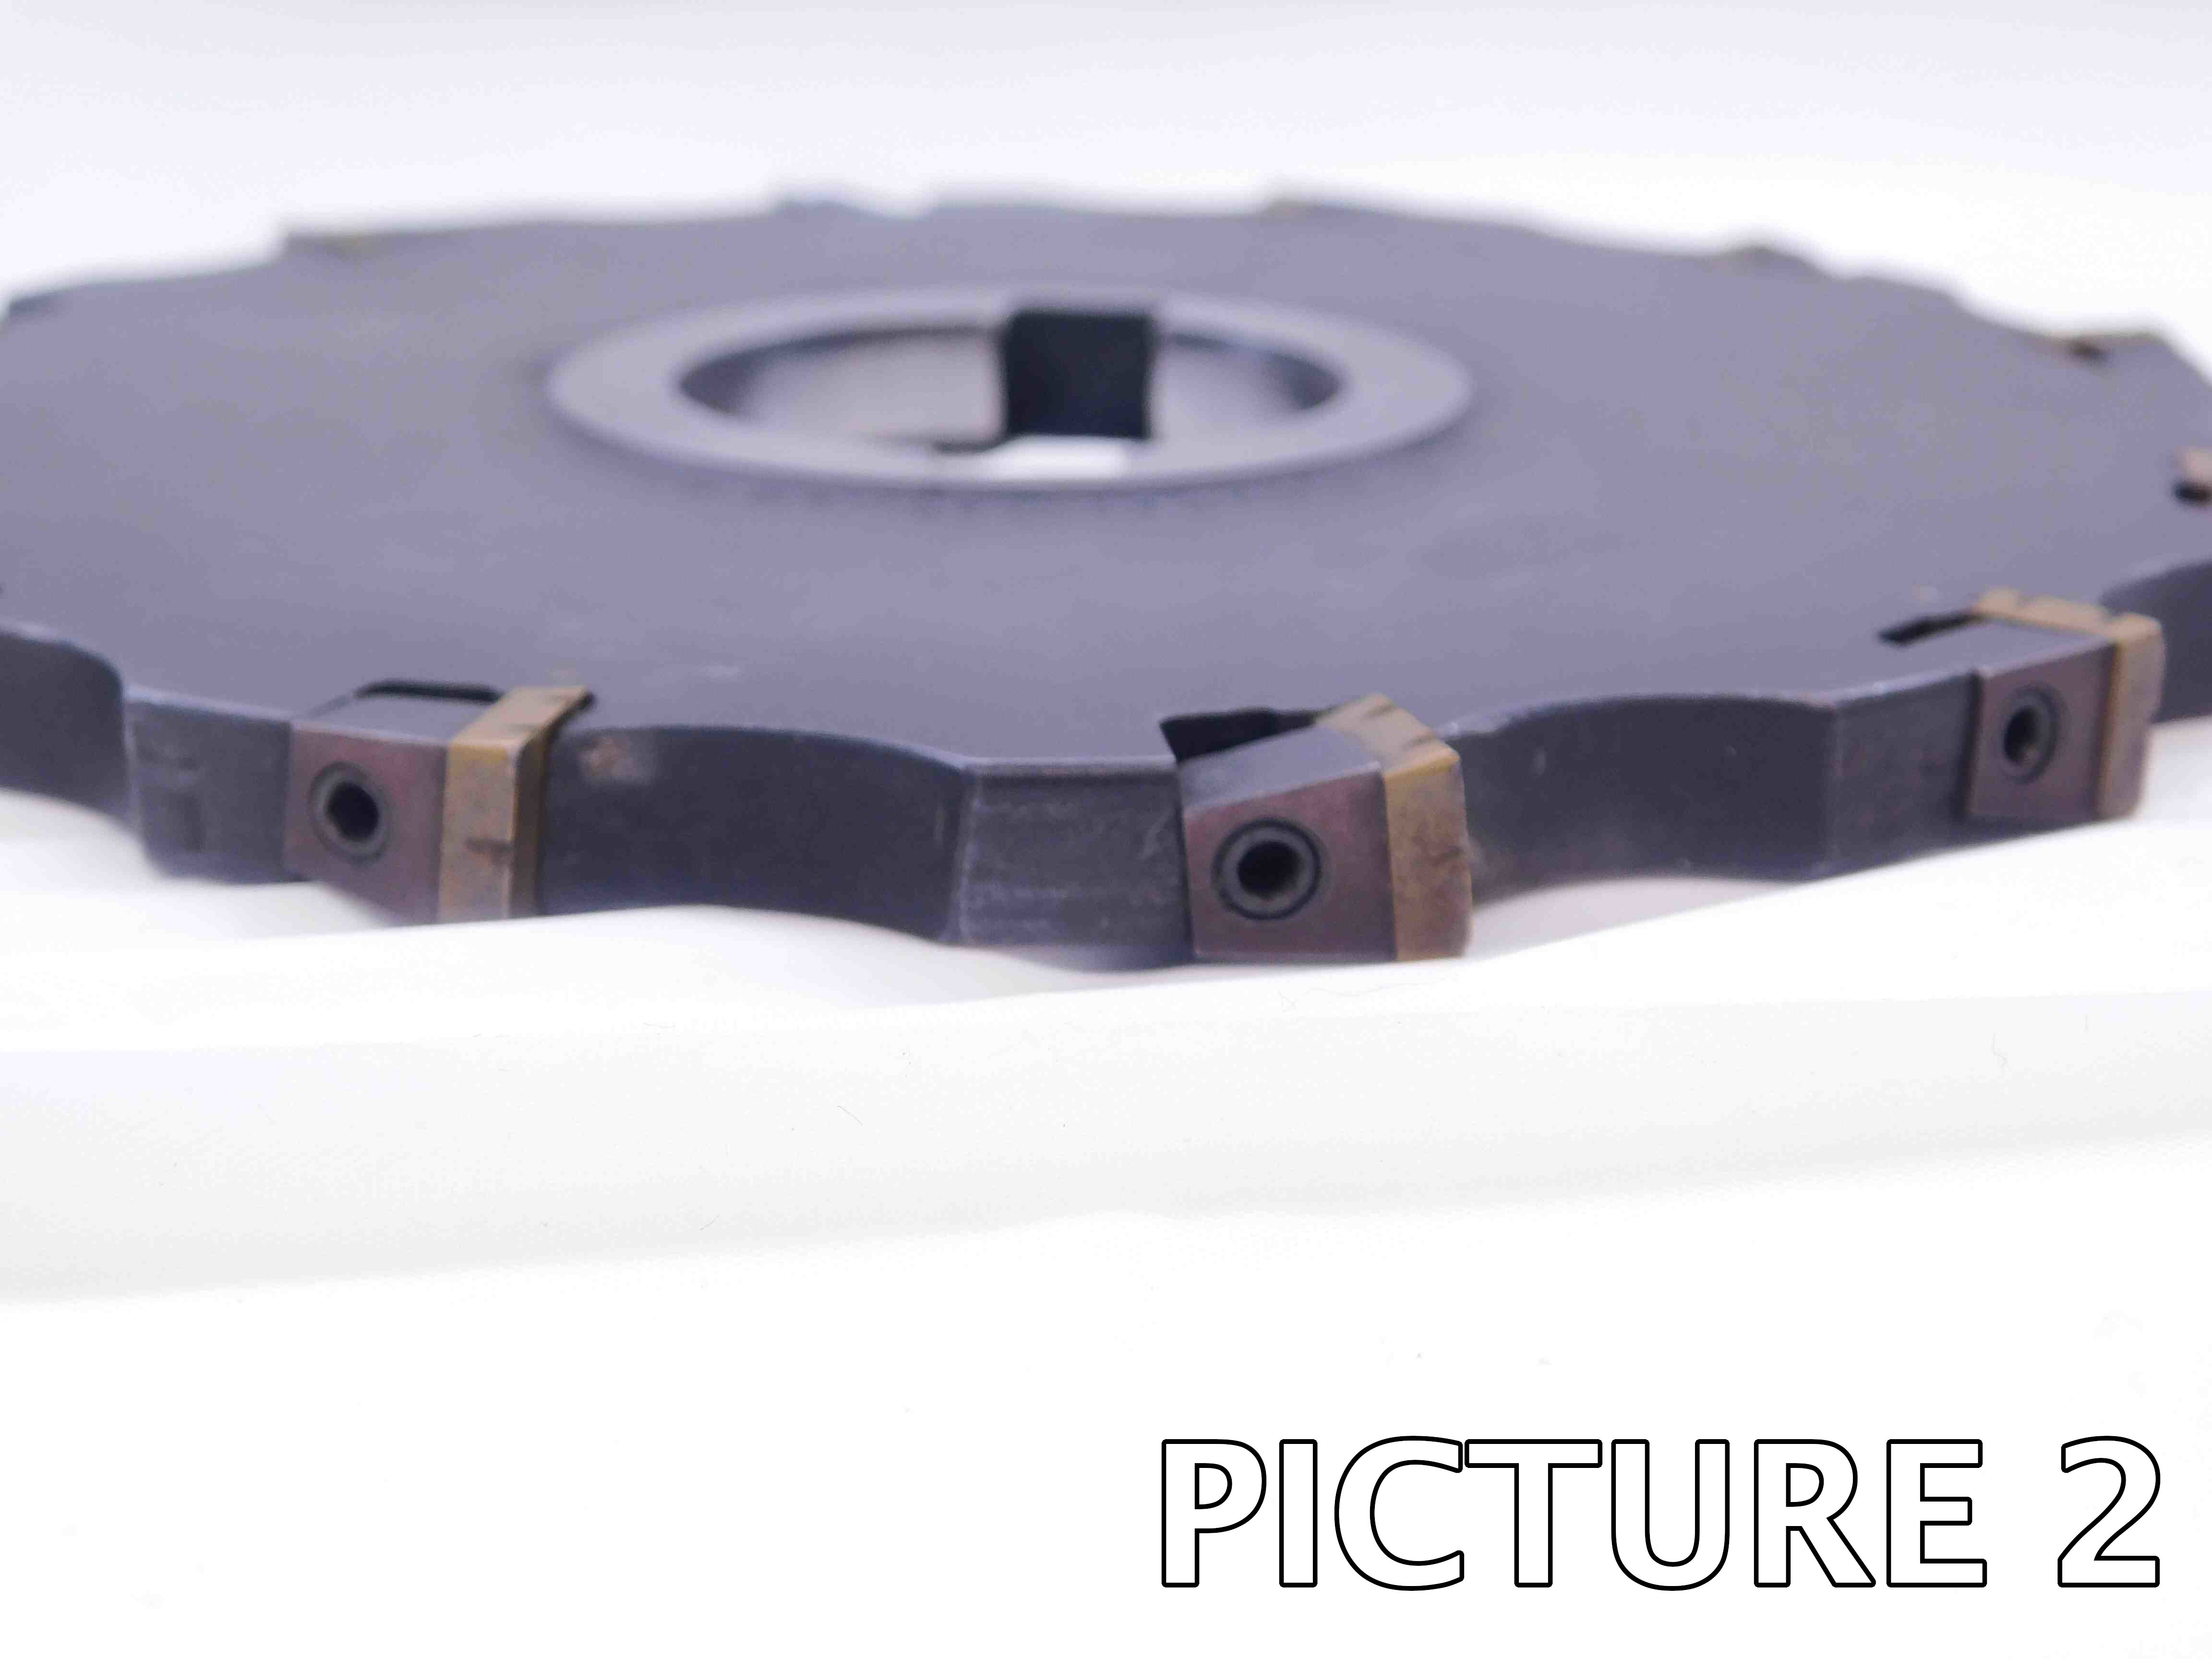
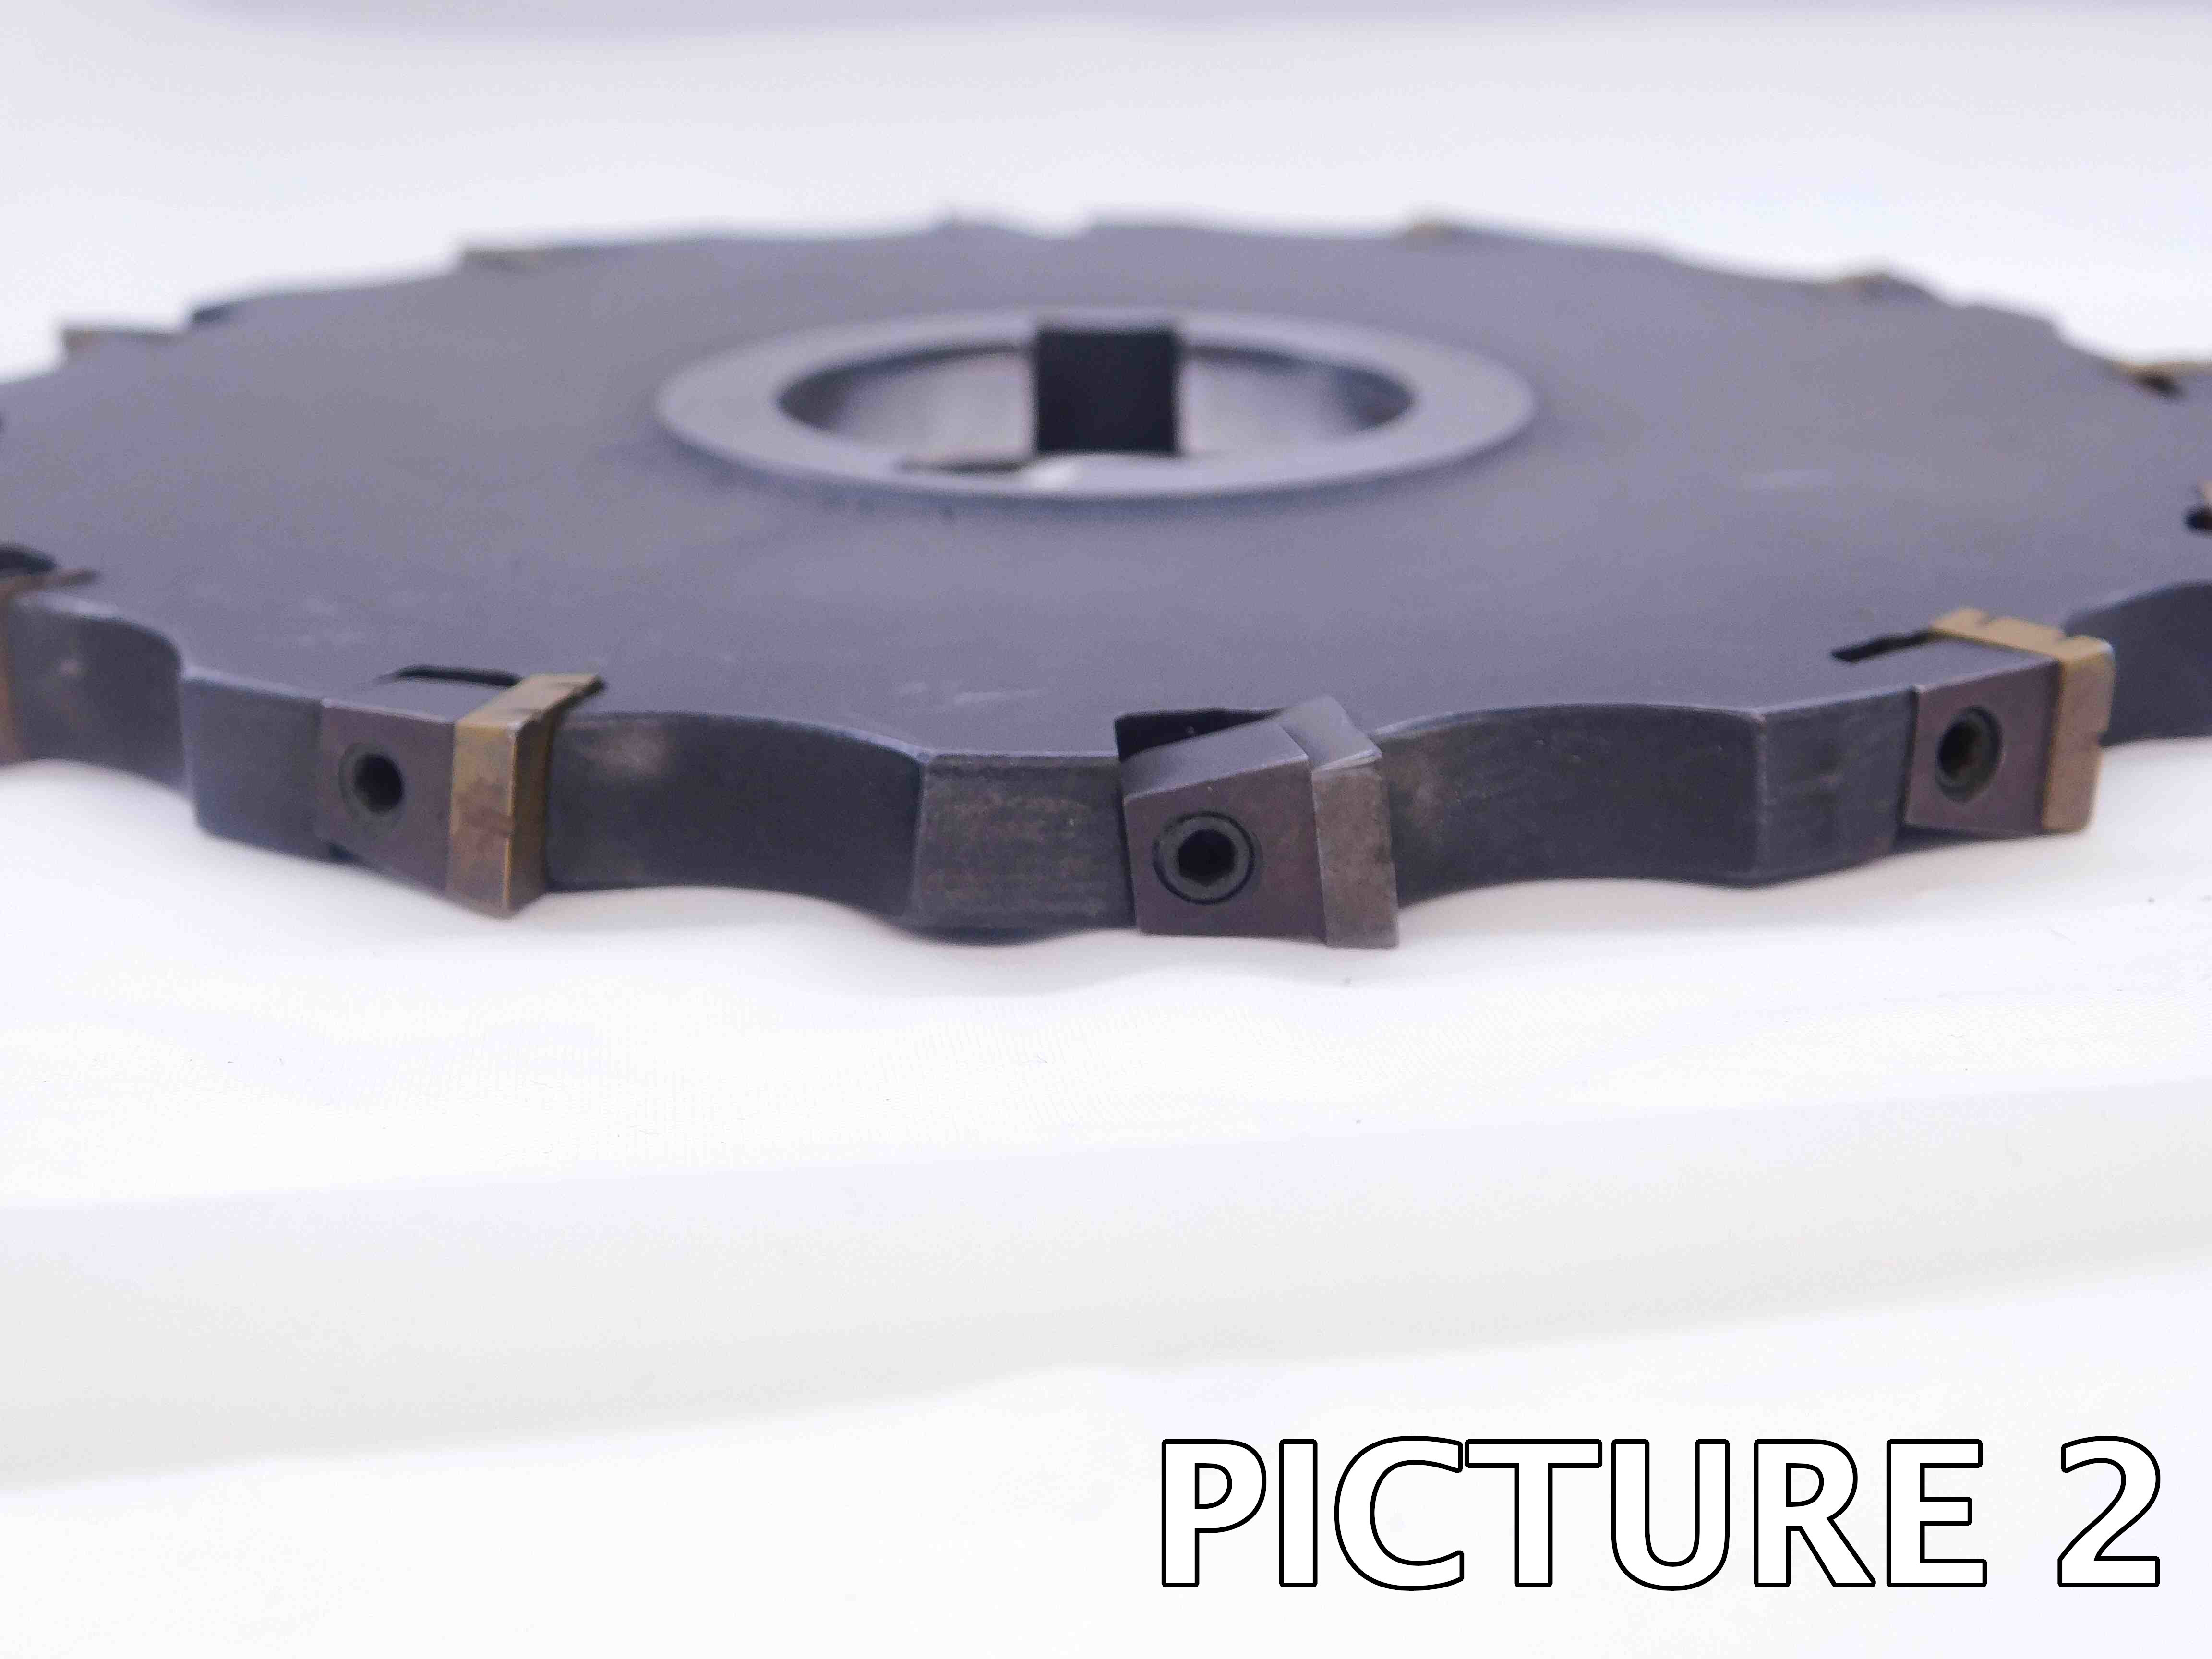
2nd Picture:
Non-indexable cutters: A close-up shot showing several teeth from the side.
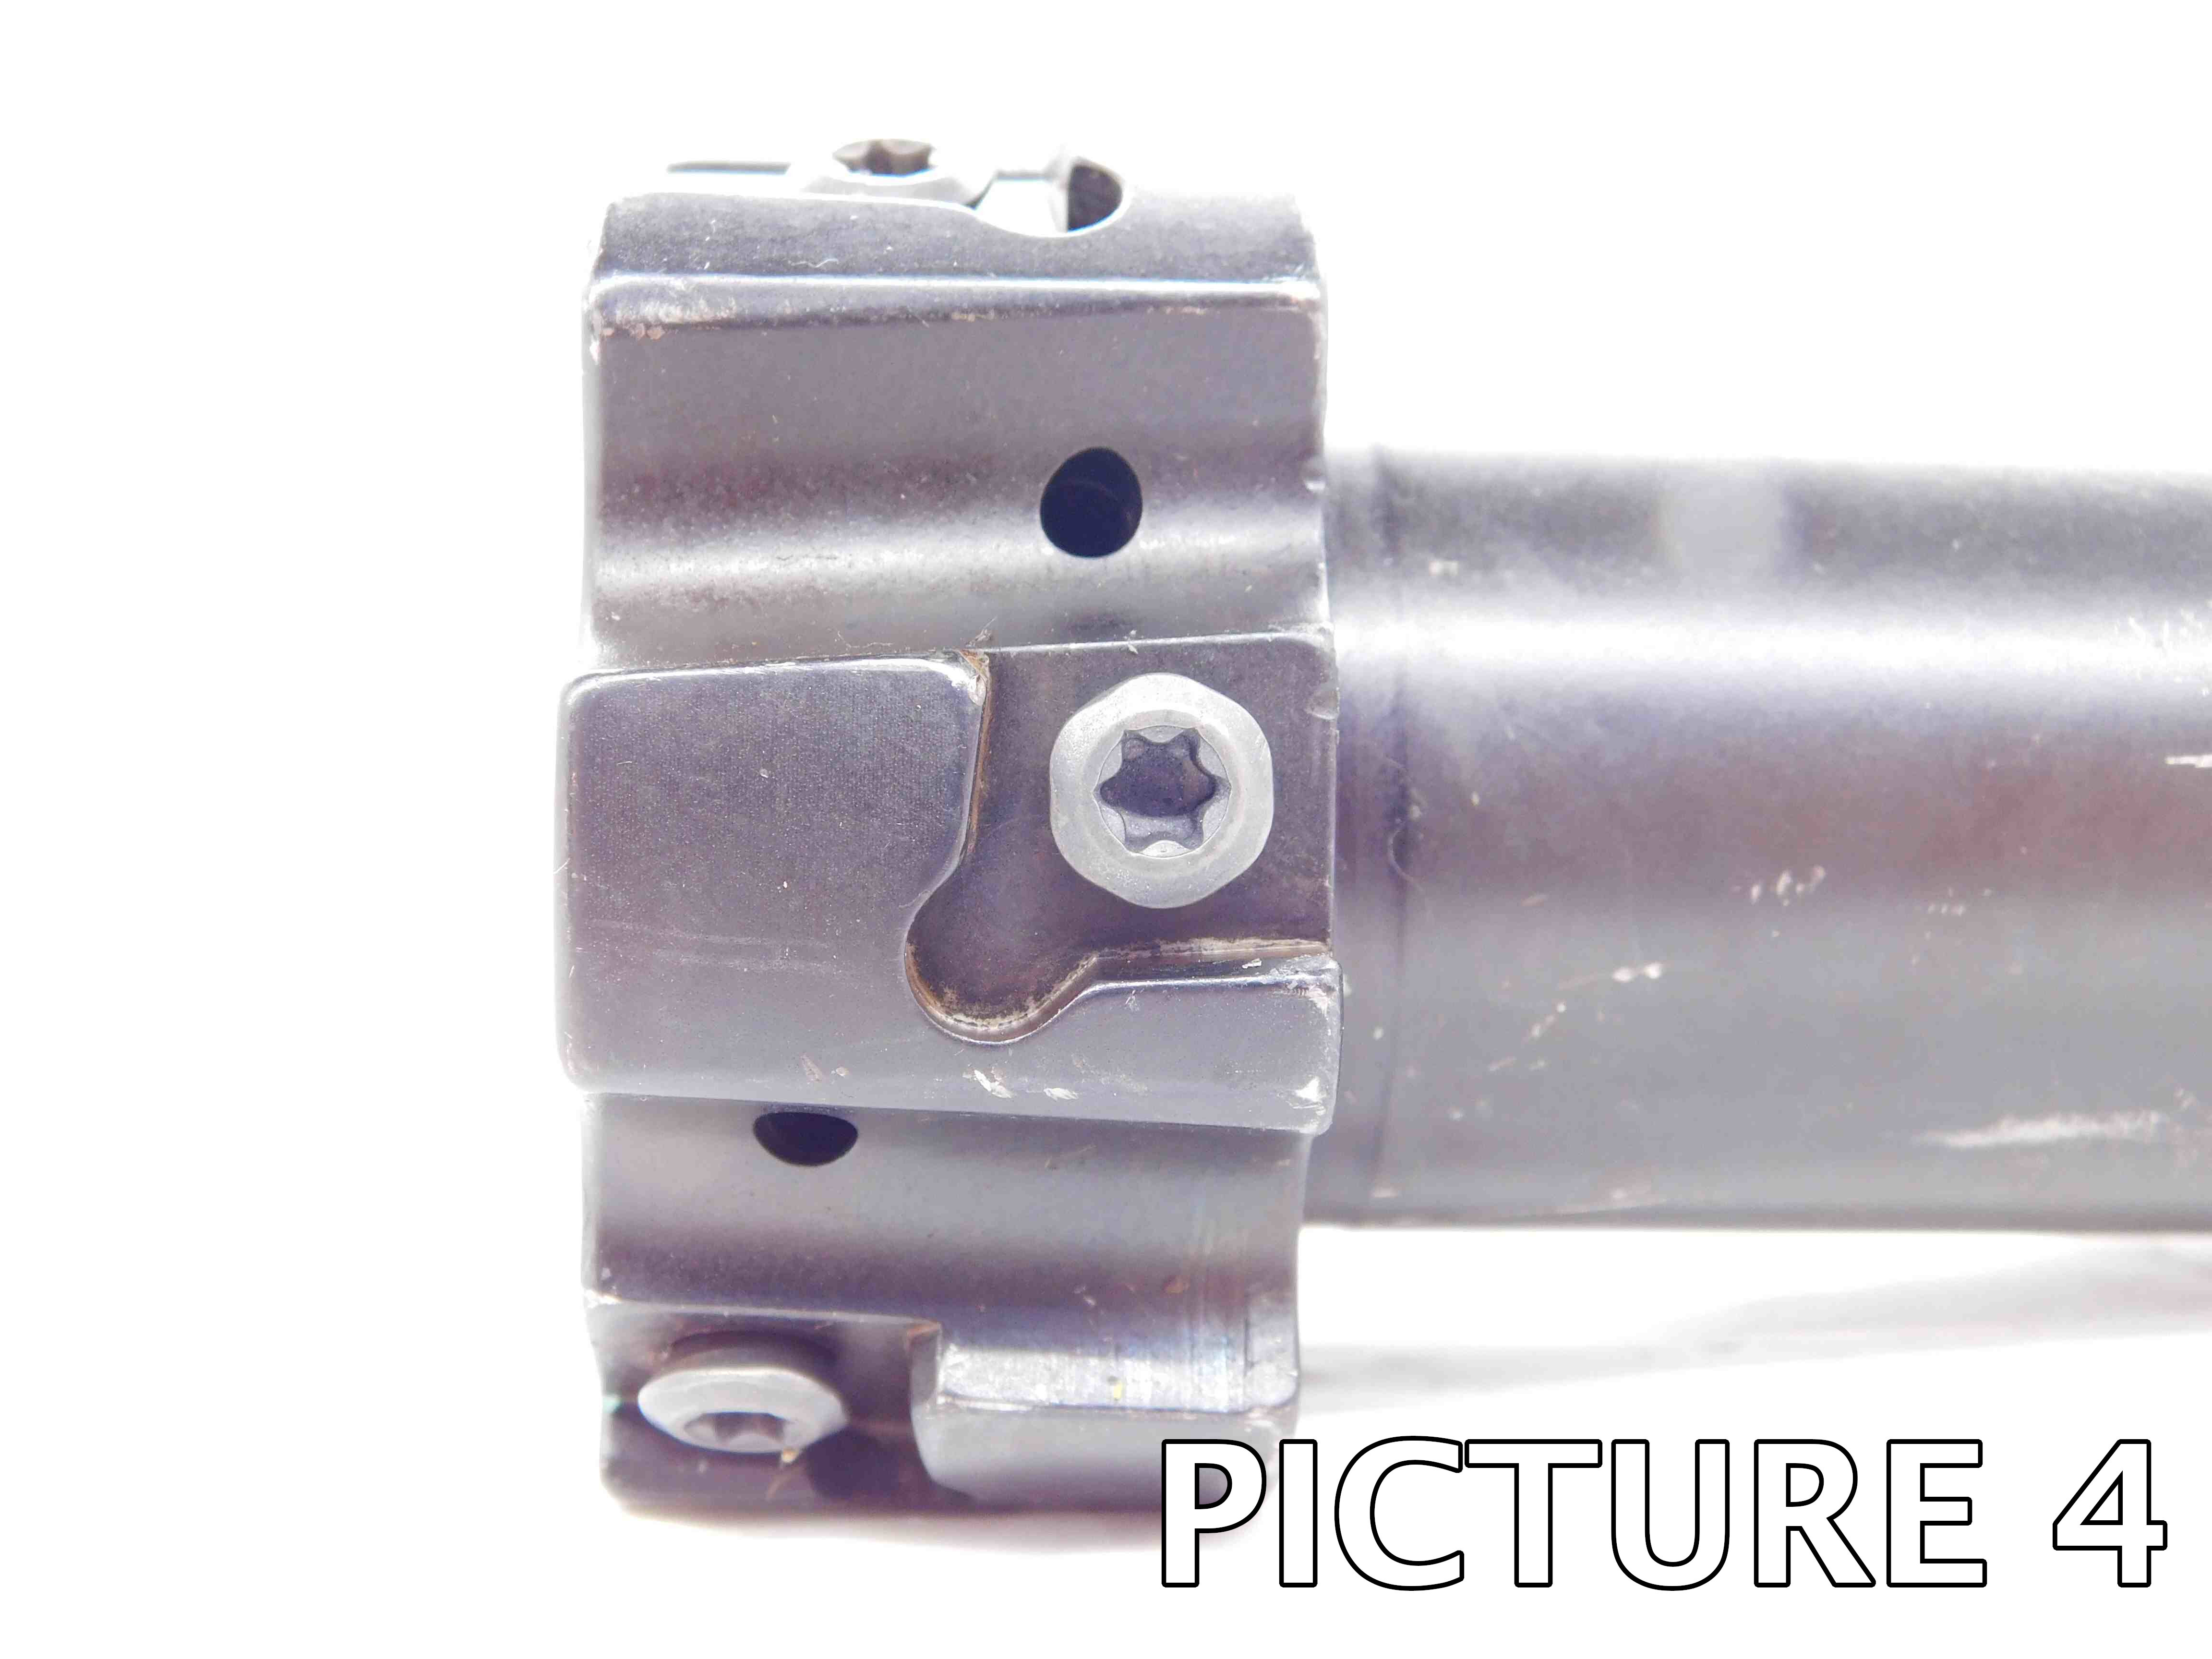
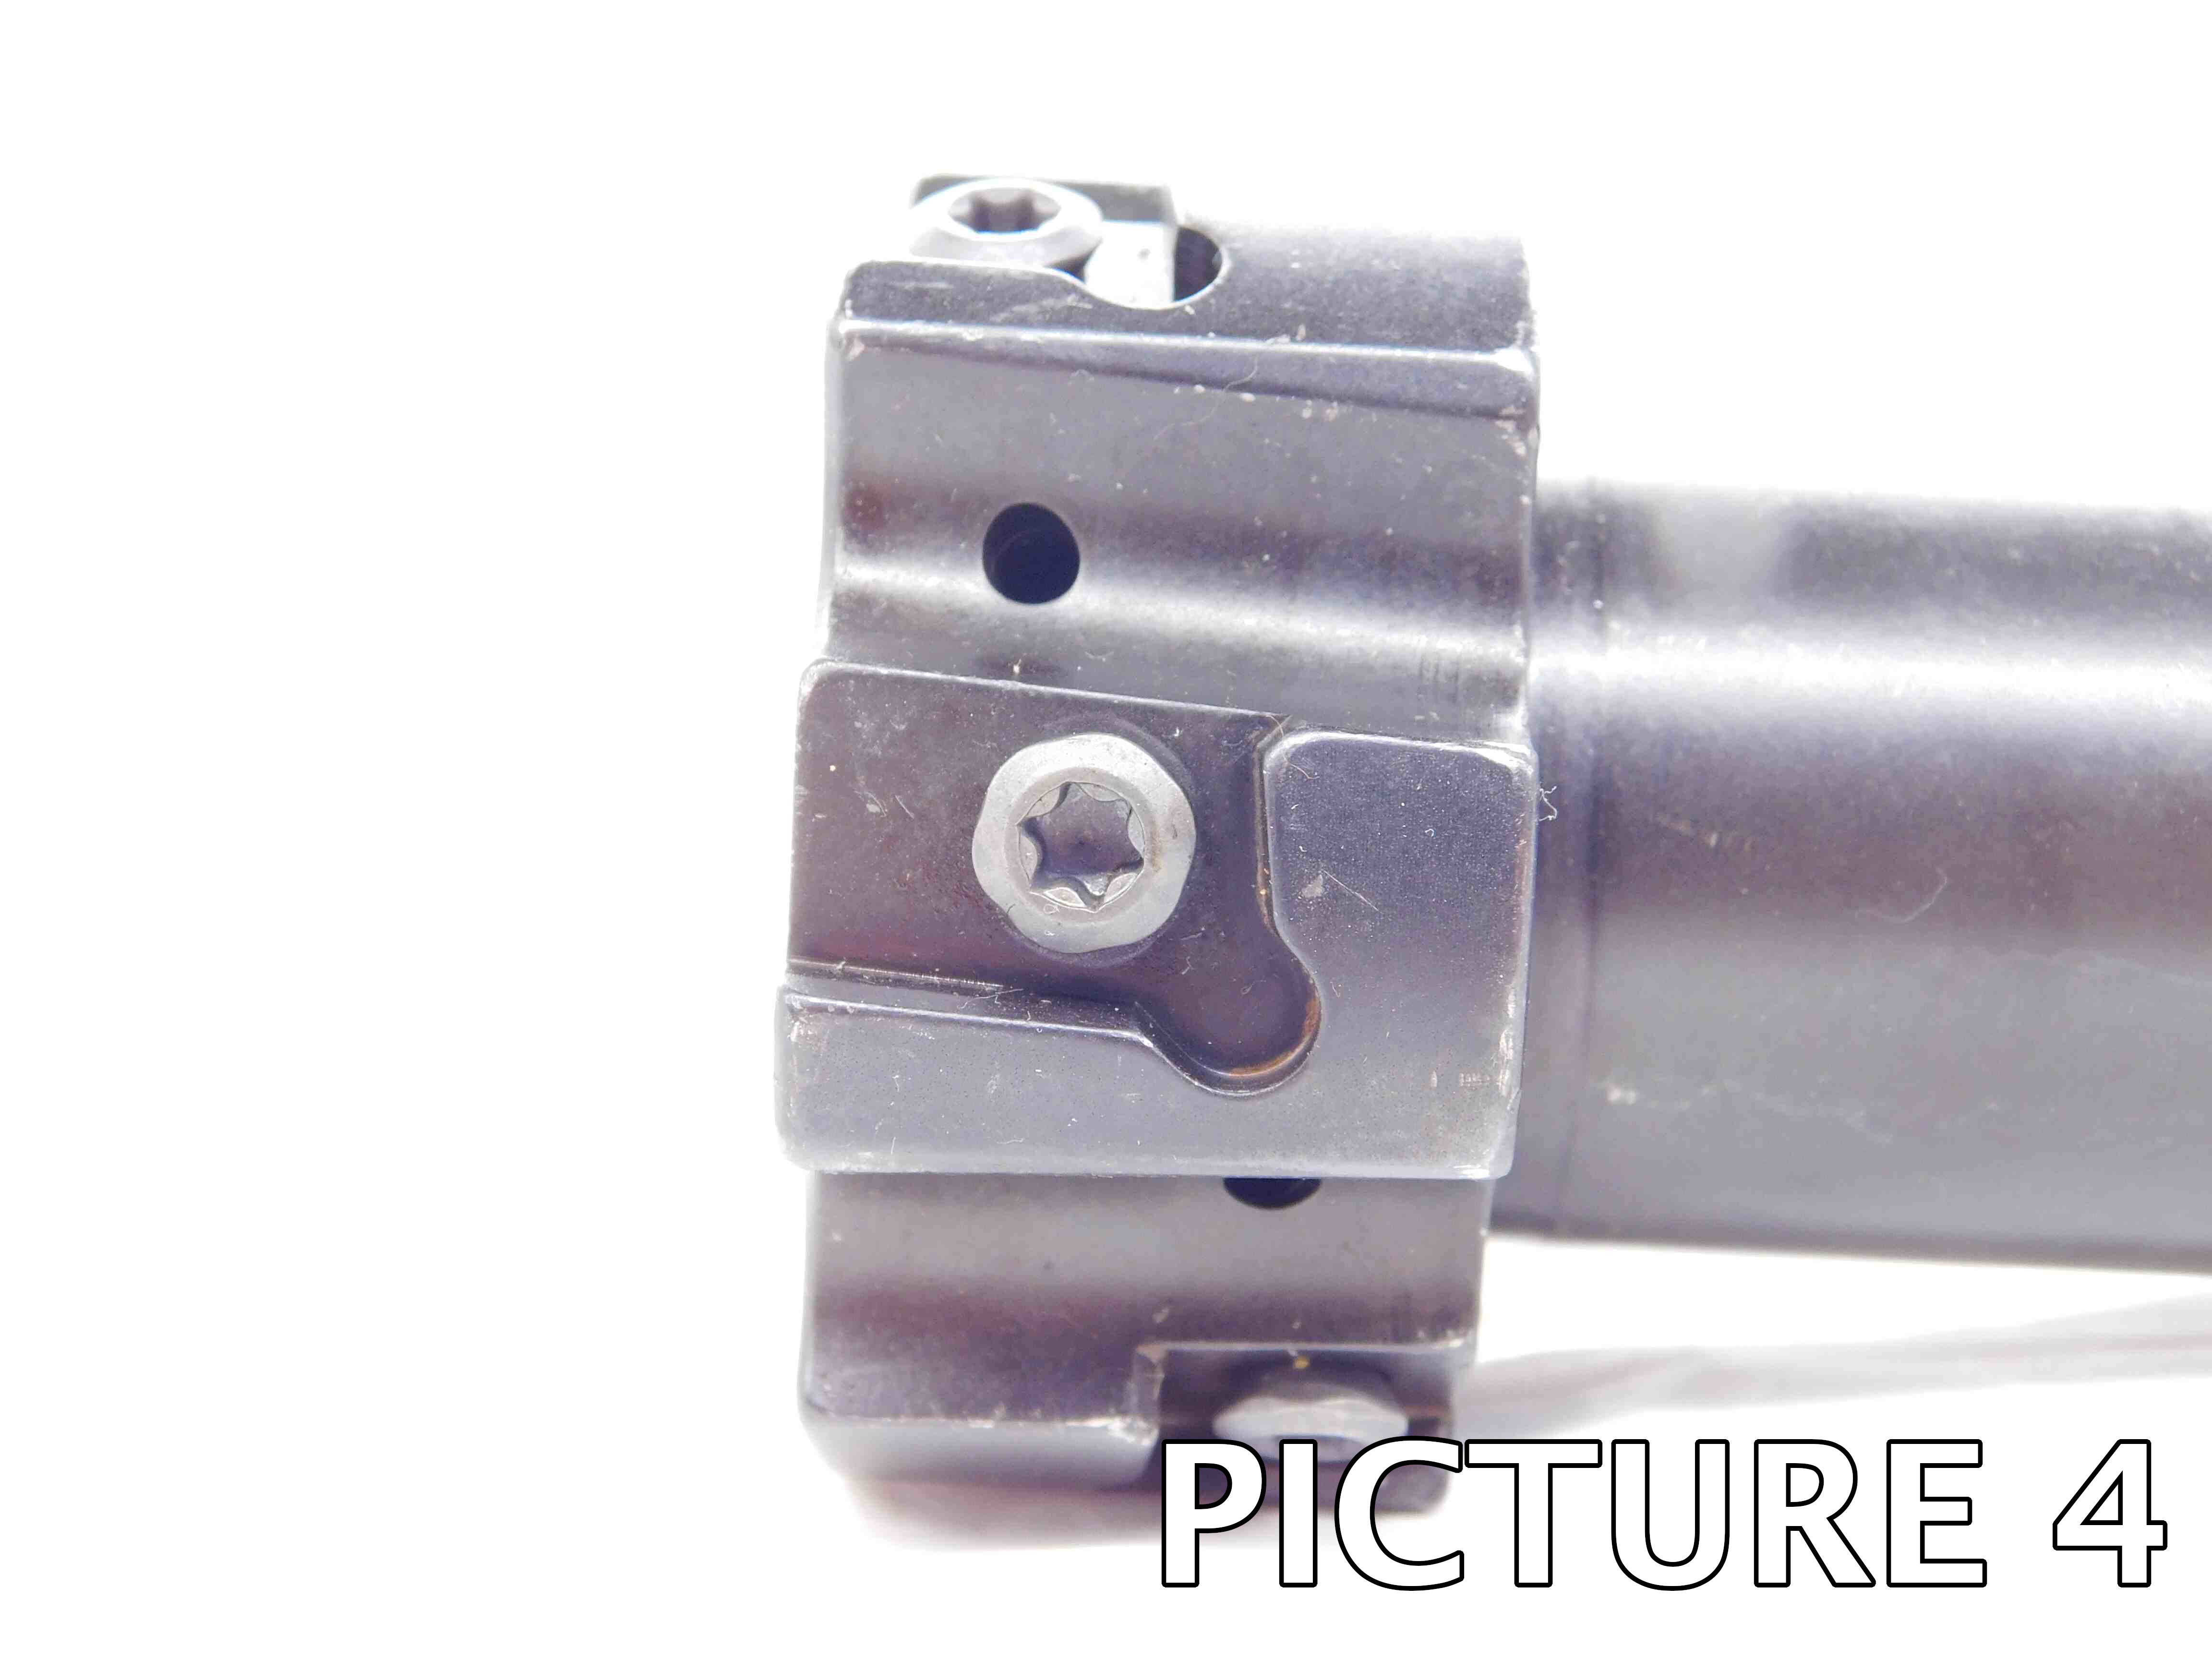
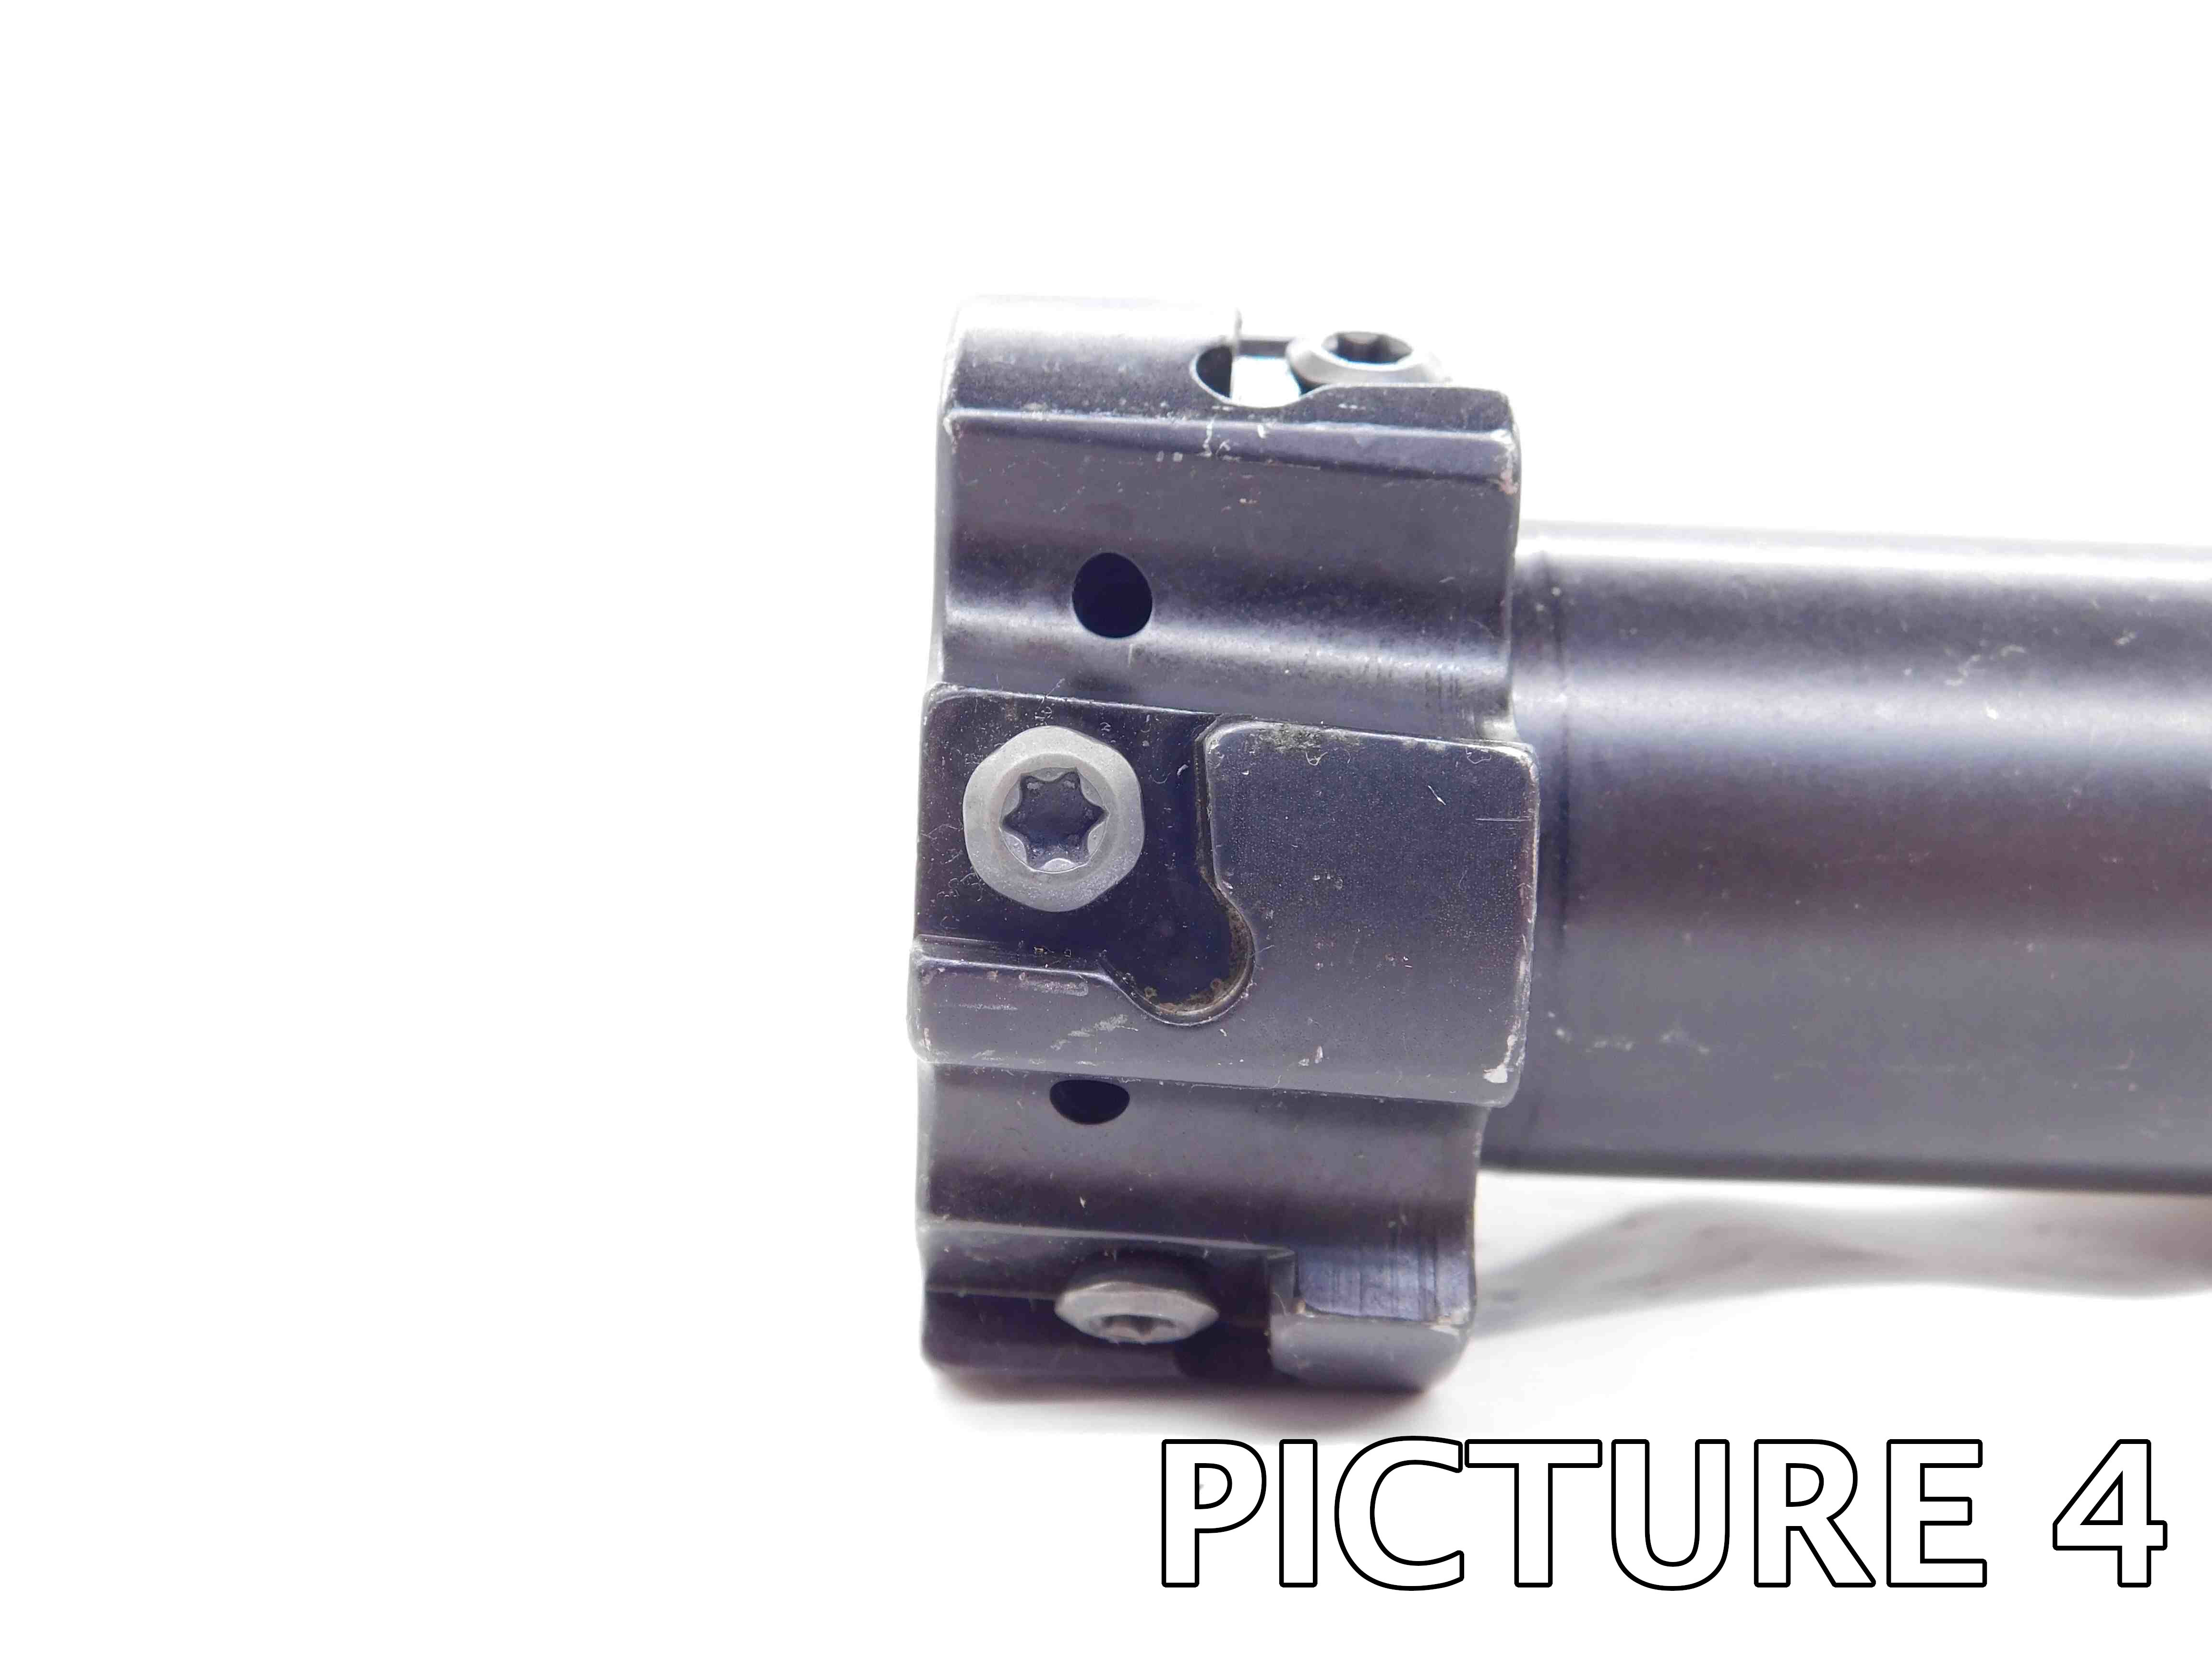
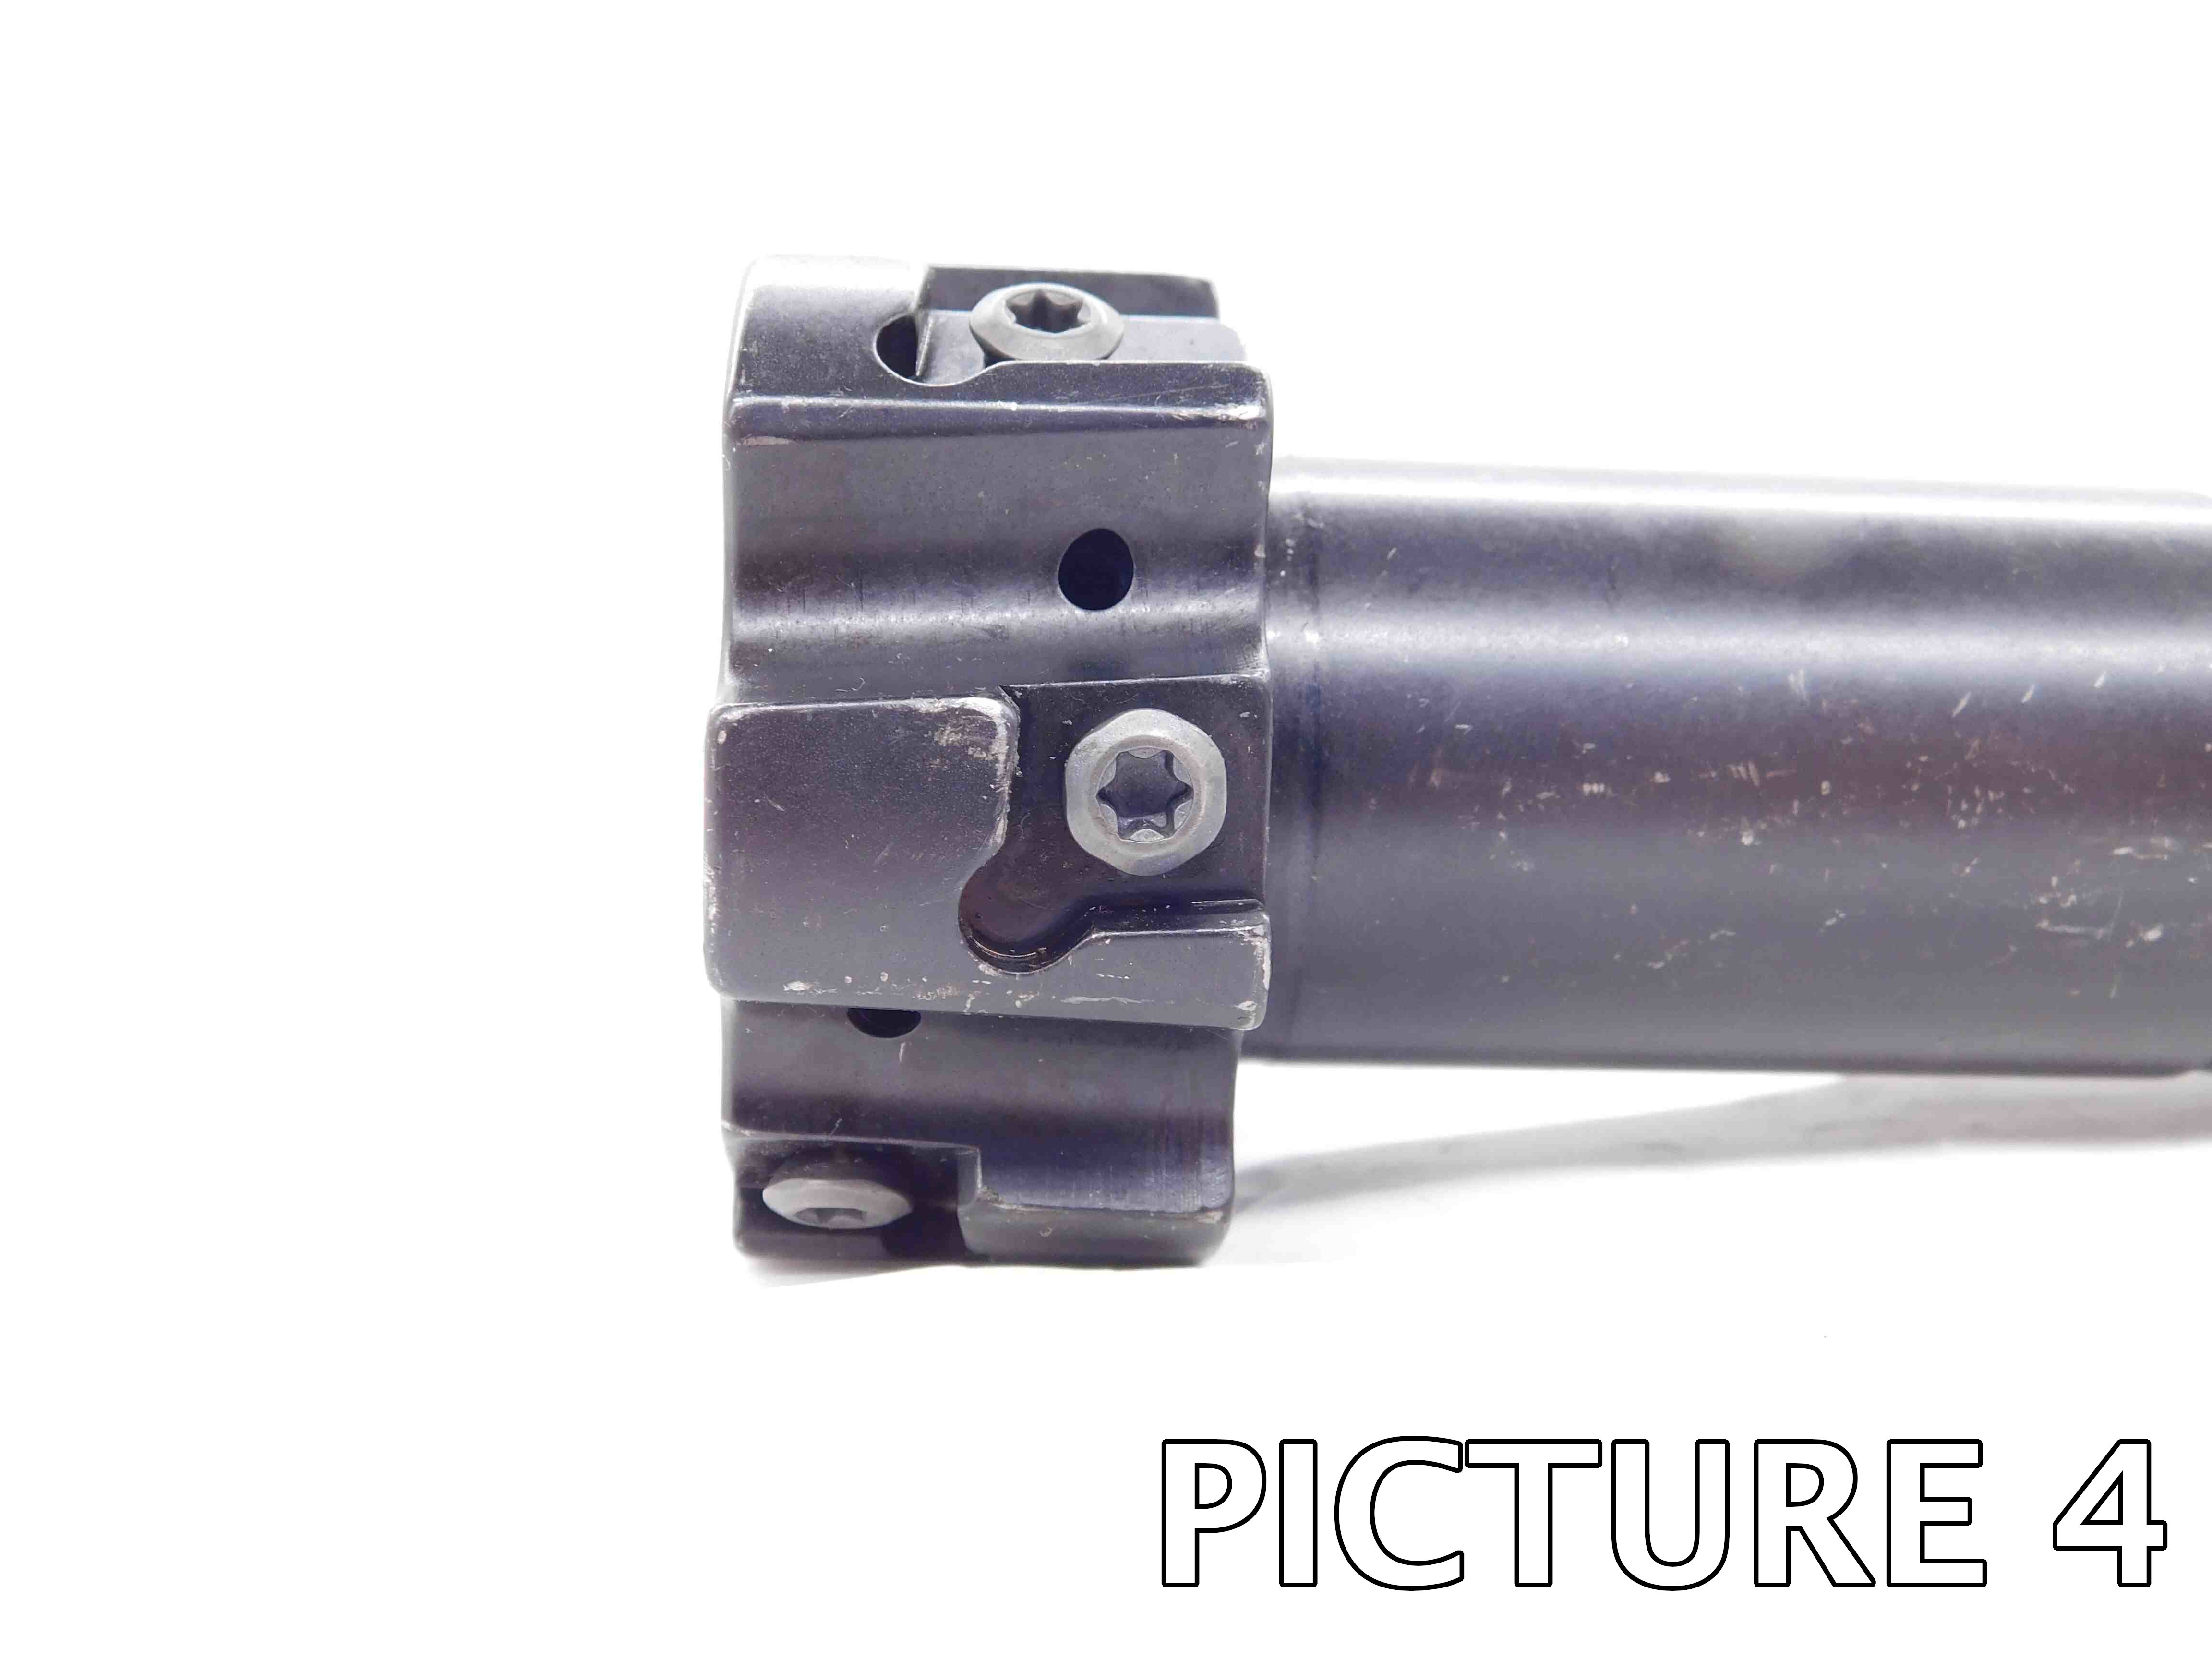
Indexable cutters: Multiple close-up shots showing all of the insert pockets from the side, as shown in the second example below. If possible, try to get 2-4 pockets in each picture in order to reduce the number of pictures you have to take. These pictures must be present on all used indexable side milling cutters! The insert pockets are the most important part of the tool and their condition must always be shown clearly! ***If a cutter is NEW, only one picture is necessary since there will not be any wear / damage that needs to be shown***
3rd Picture: A close up shot of the labeling. If no labeling is present, or if it is too faded to show up in a picture, skip this picture.
Additional Pictures: Any damage to the cutting edges / insert pockets must be clearly pictured. If an indexable cutter is missing any of the insert pocket screws, it MUST be pictured as well as mentioned in the "Special Condition" section. Use a pen to point to the damaged area. If you think you may require additional pictures for any other reason, contact your trainer to verify if they are necessary.
Refer to the examples below:


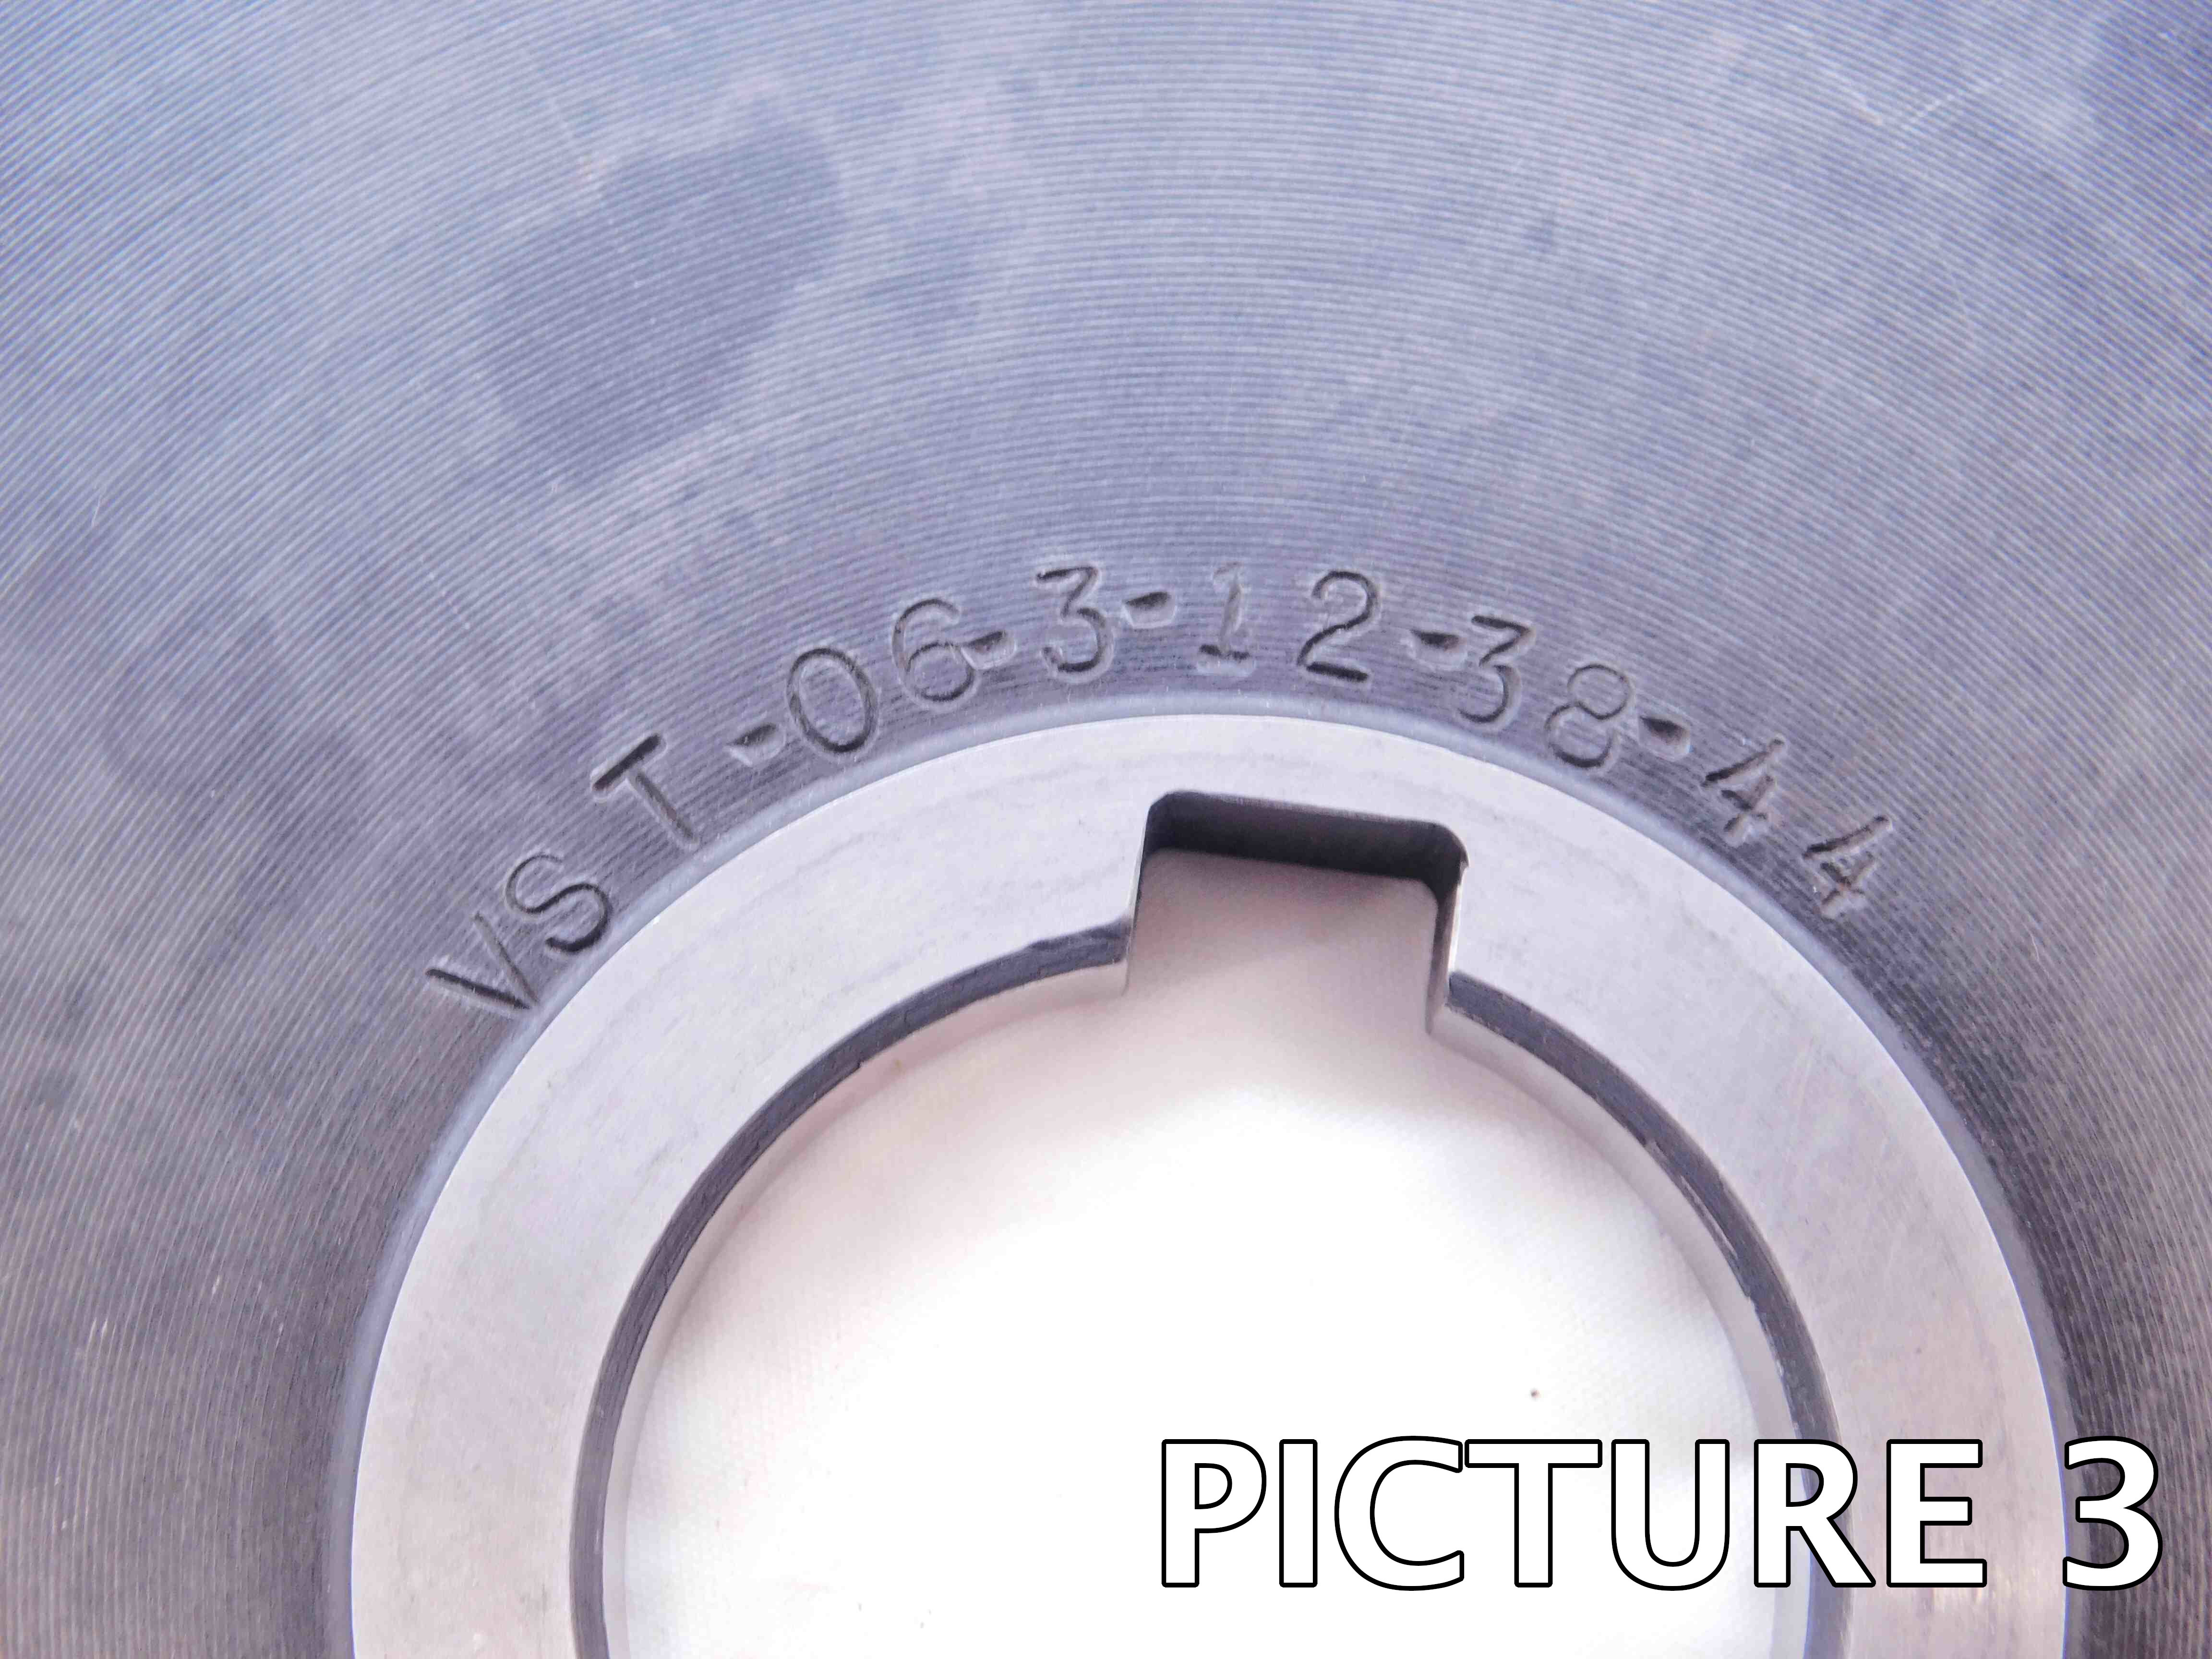
For Side Milling Cutters With a Shank:
1st Picture: A three-quarters (or "3D") shot of the cutter, with the working end facing the camera. If the cutter is indexable, make sure that at least one of the inserts (or insert pockets) is fully visible in this picture. If there is any packaging, it should be included in this picture as well.
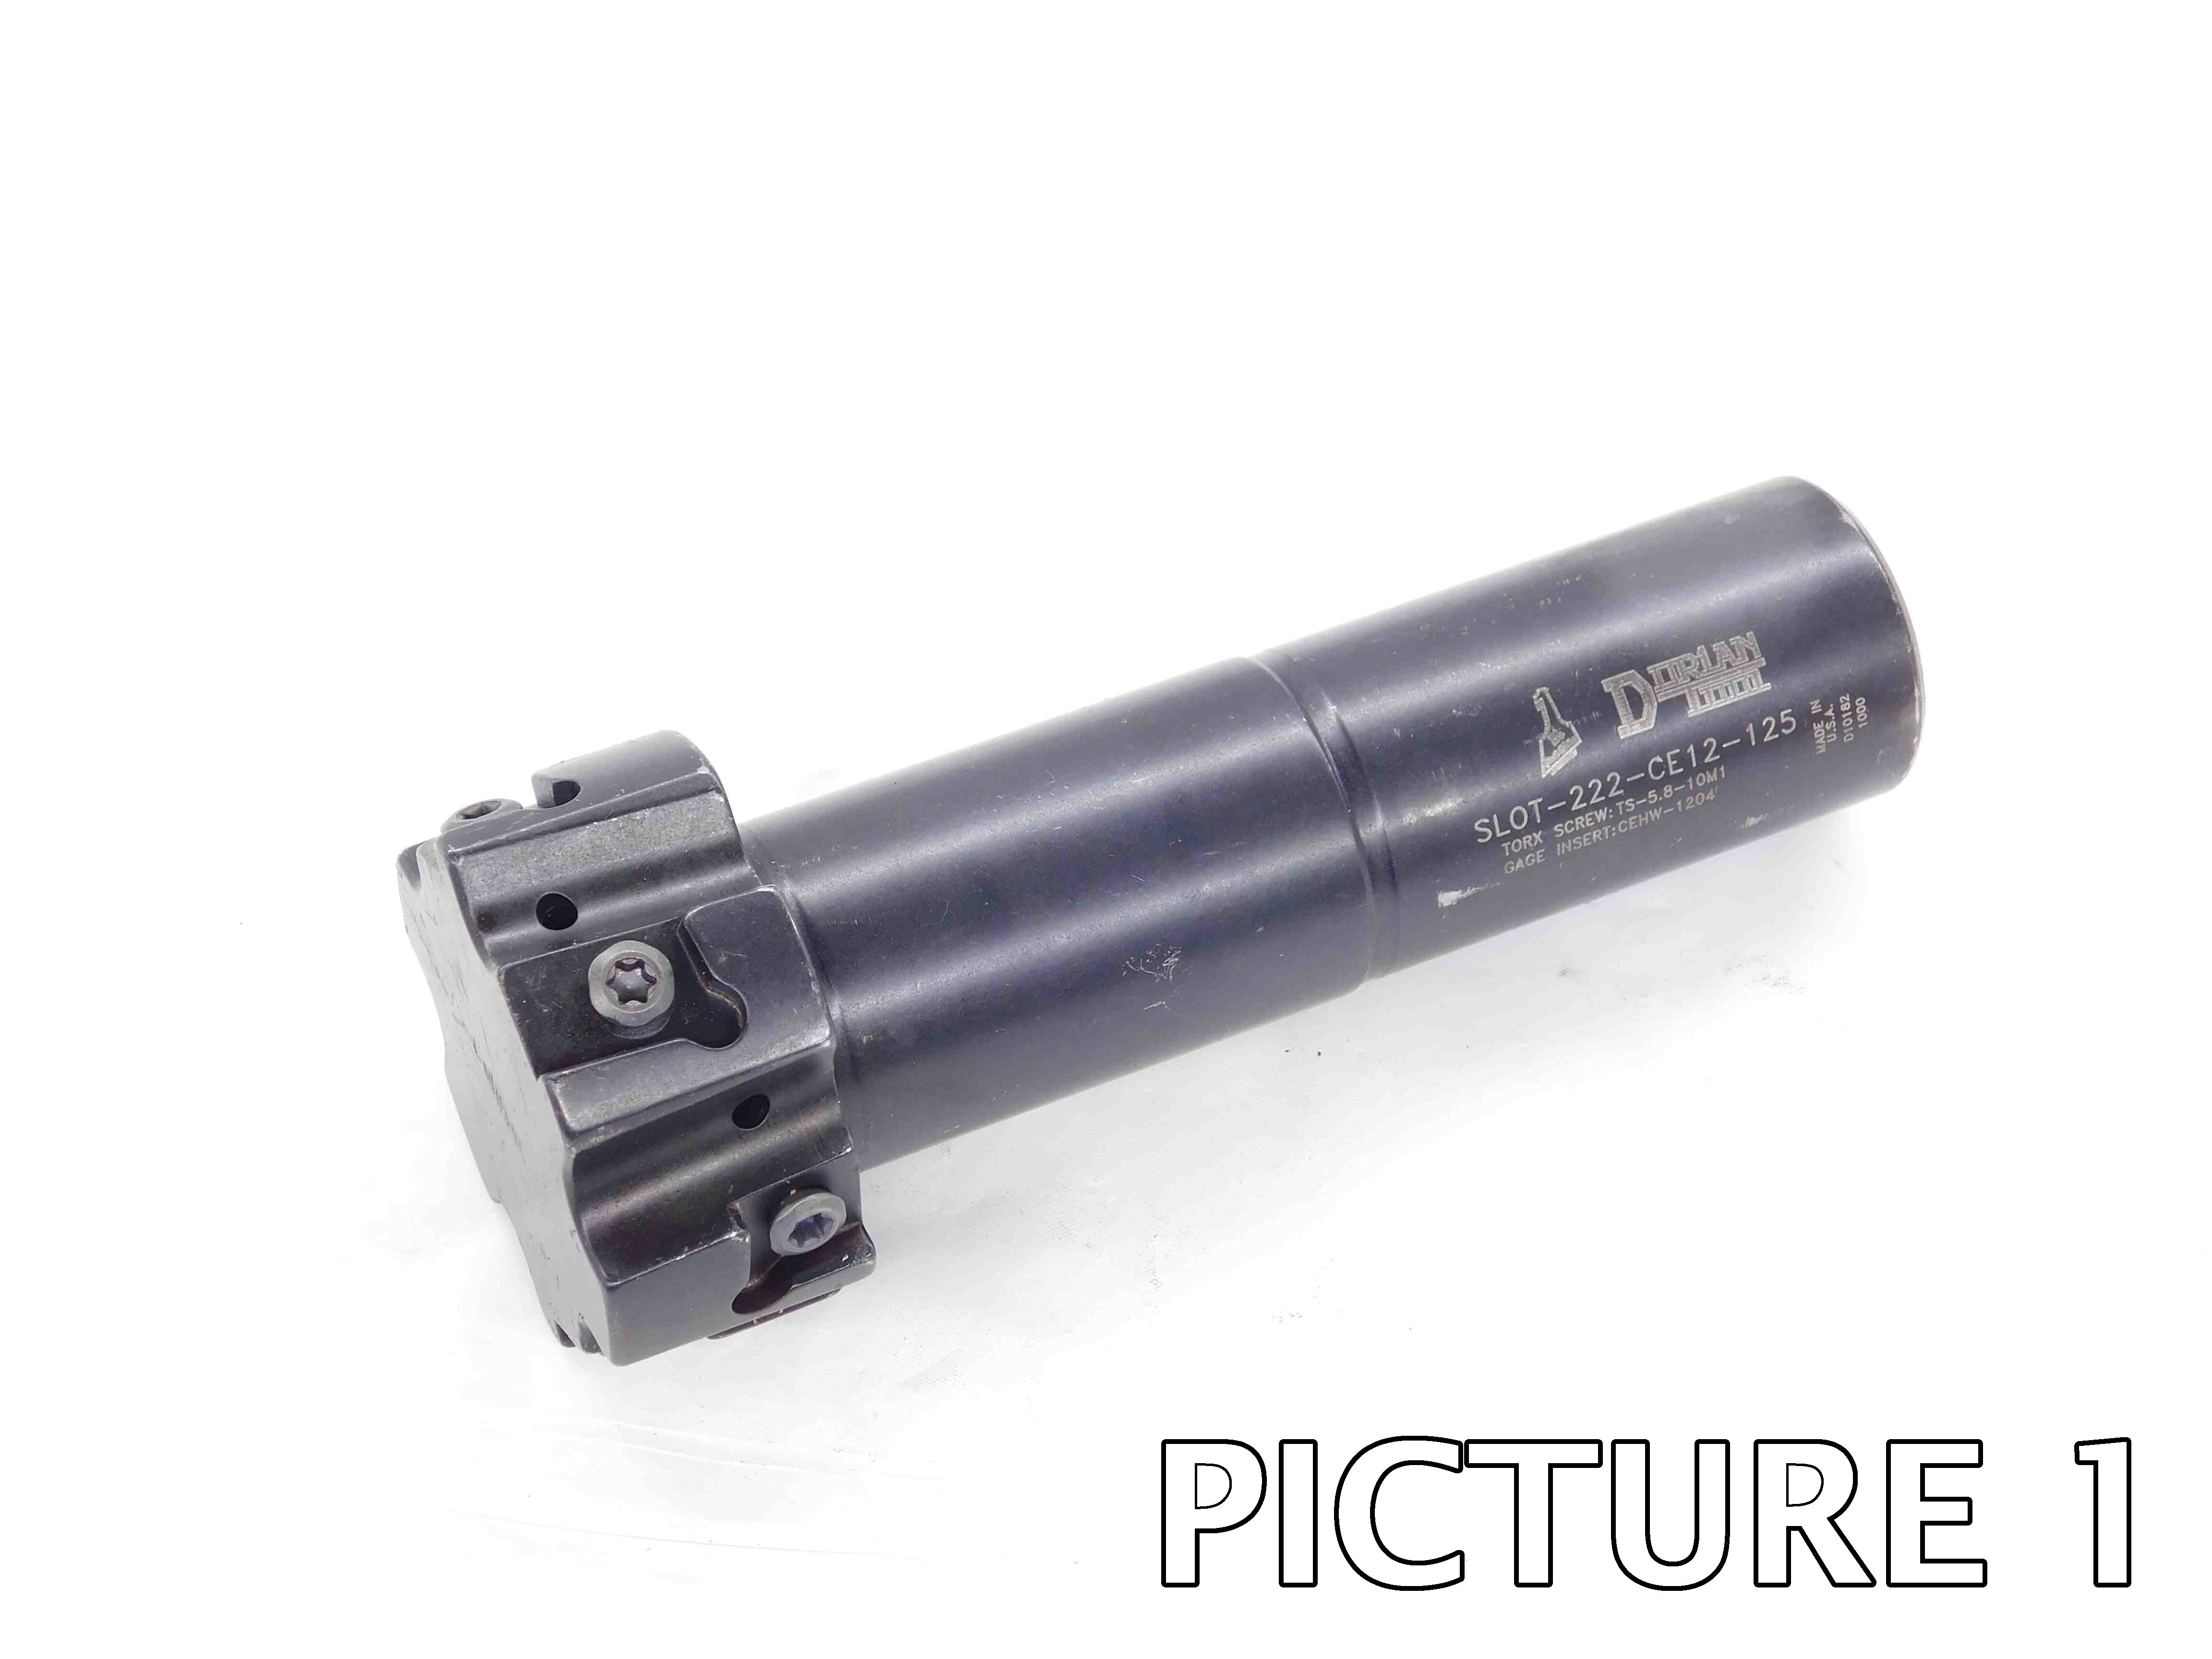
2nd Picture: A side view of the cutter, with a tape measure at the bottom of the frame to provide size reference. If there is labeling on the shank, it should be visible if possible and readable (i.e., right-side up).
3rd Picture: A close-up, head-on shot of the working end.
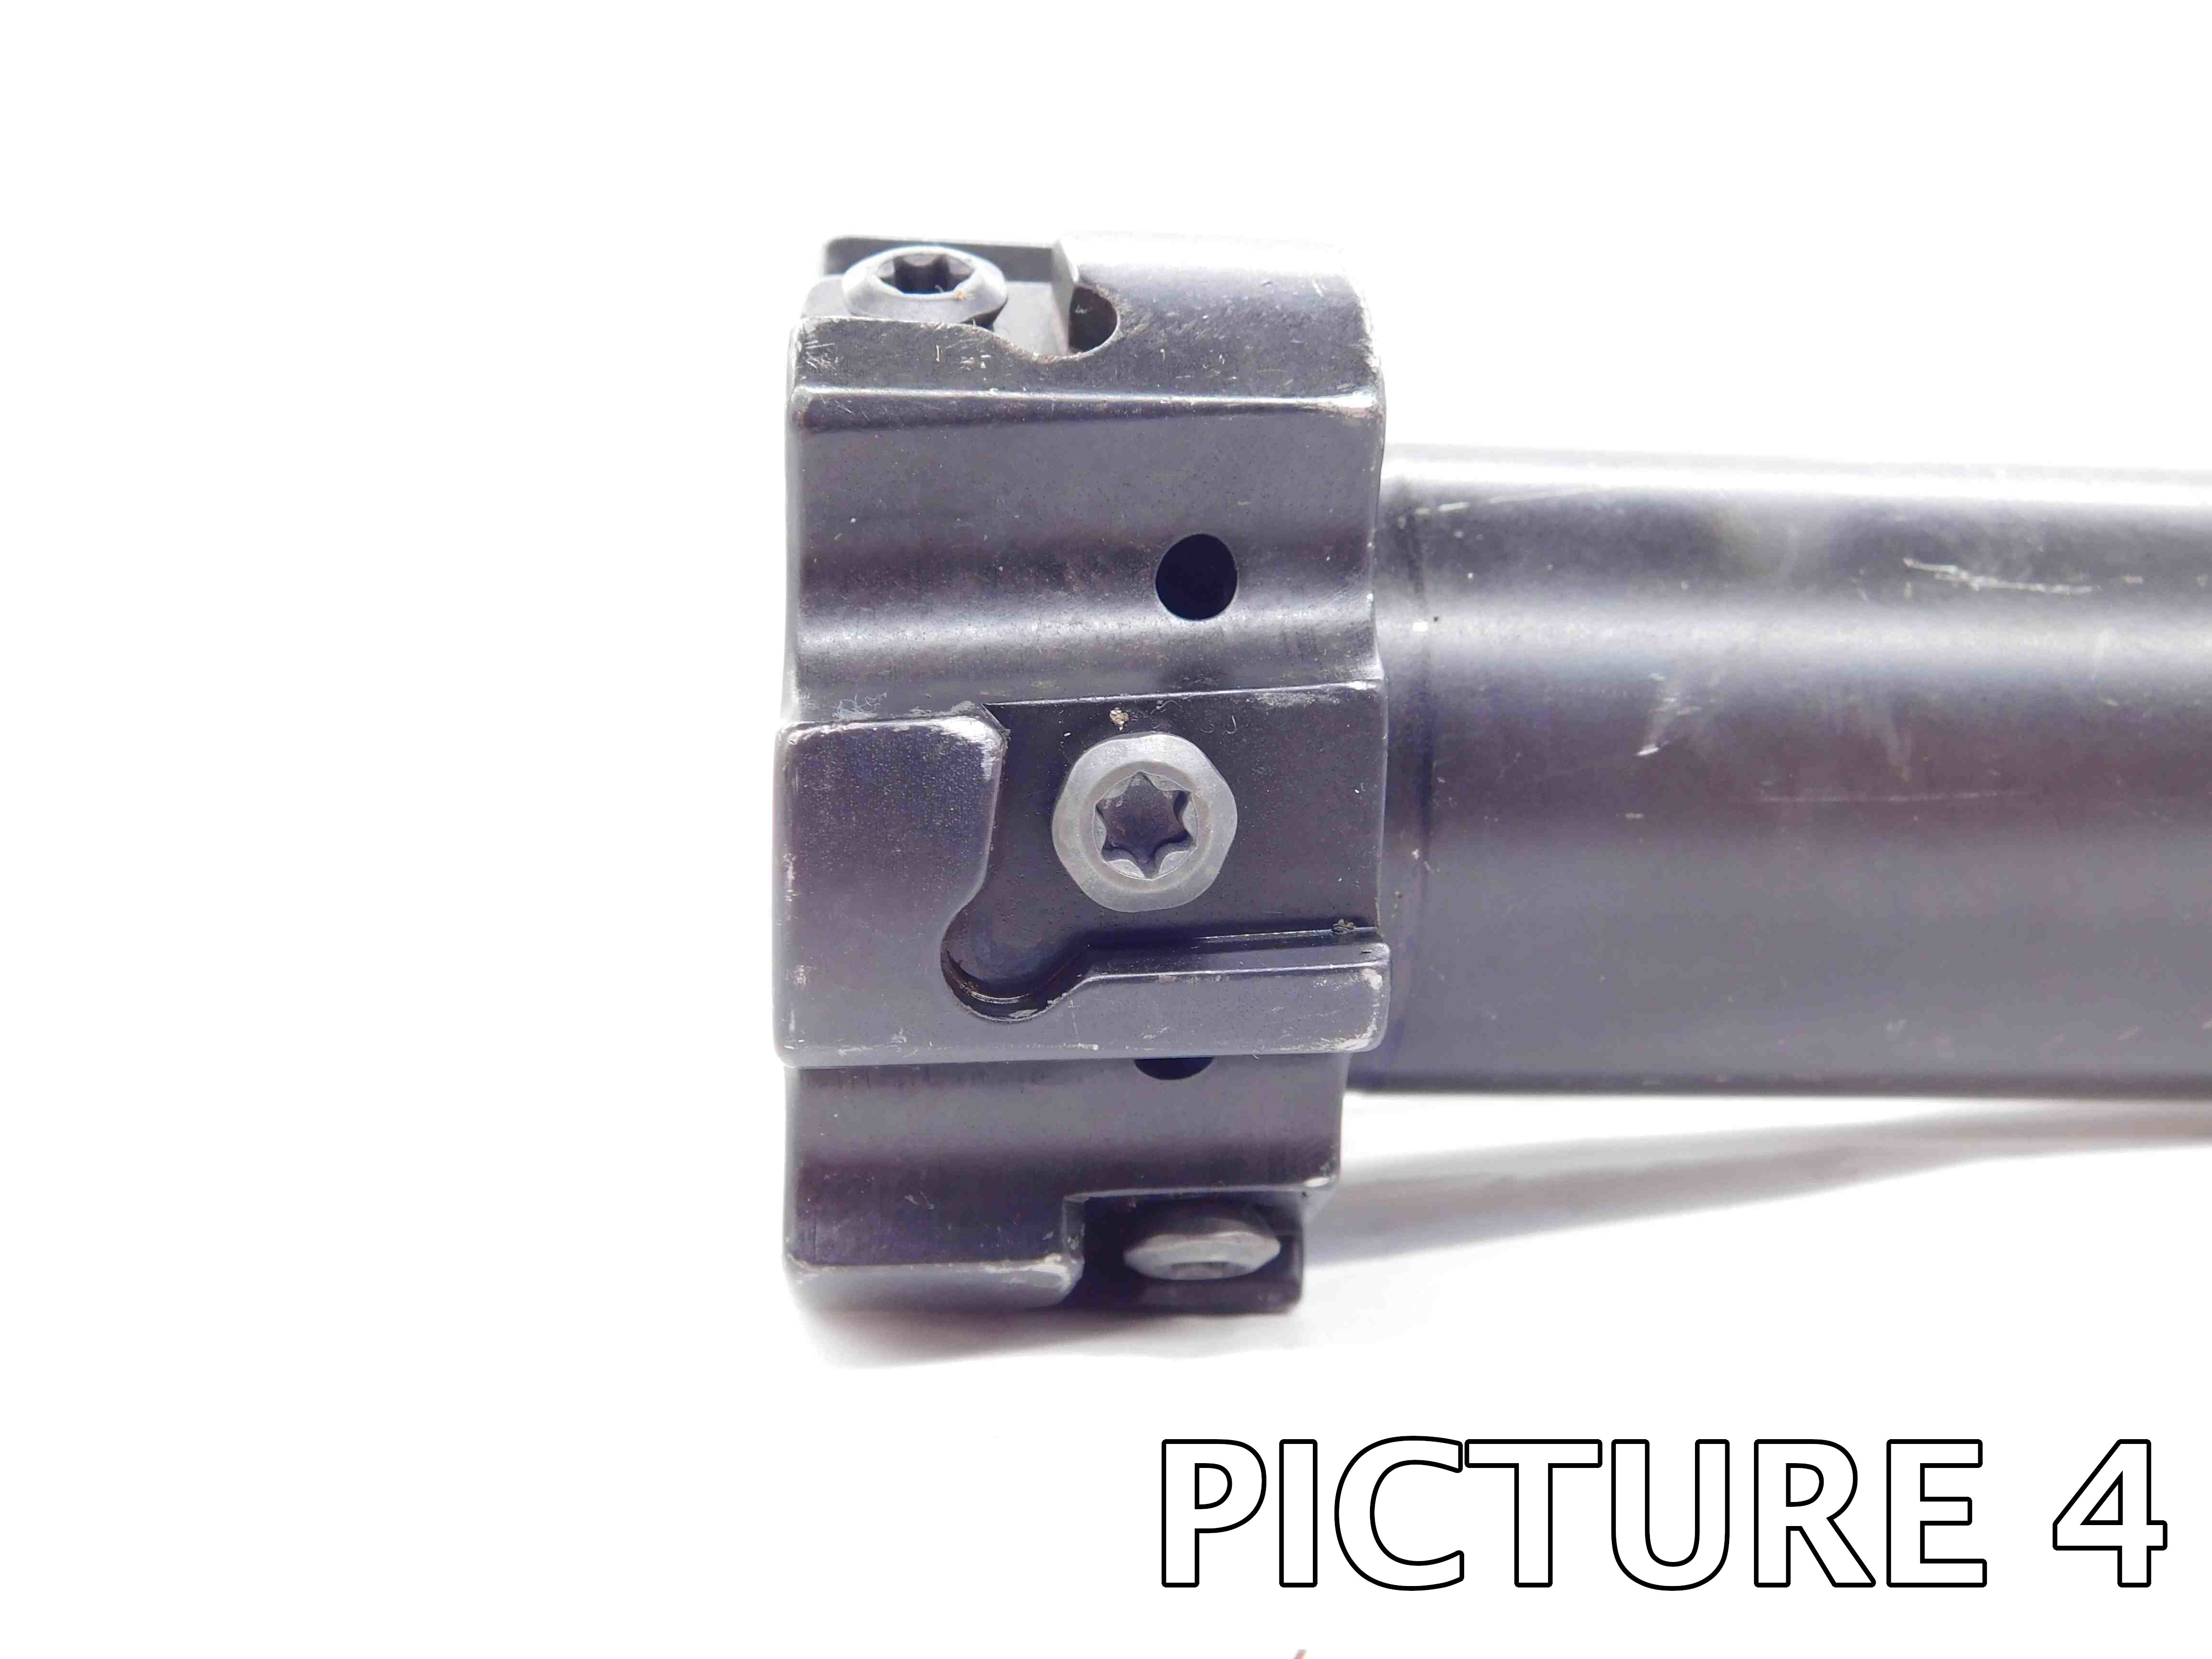
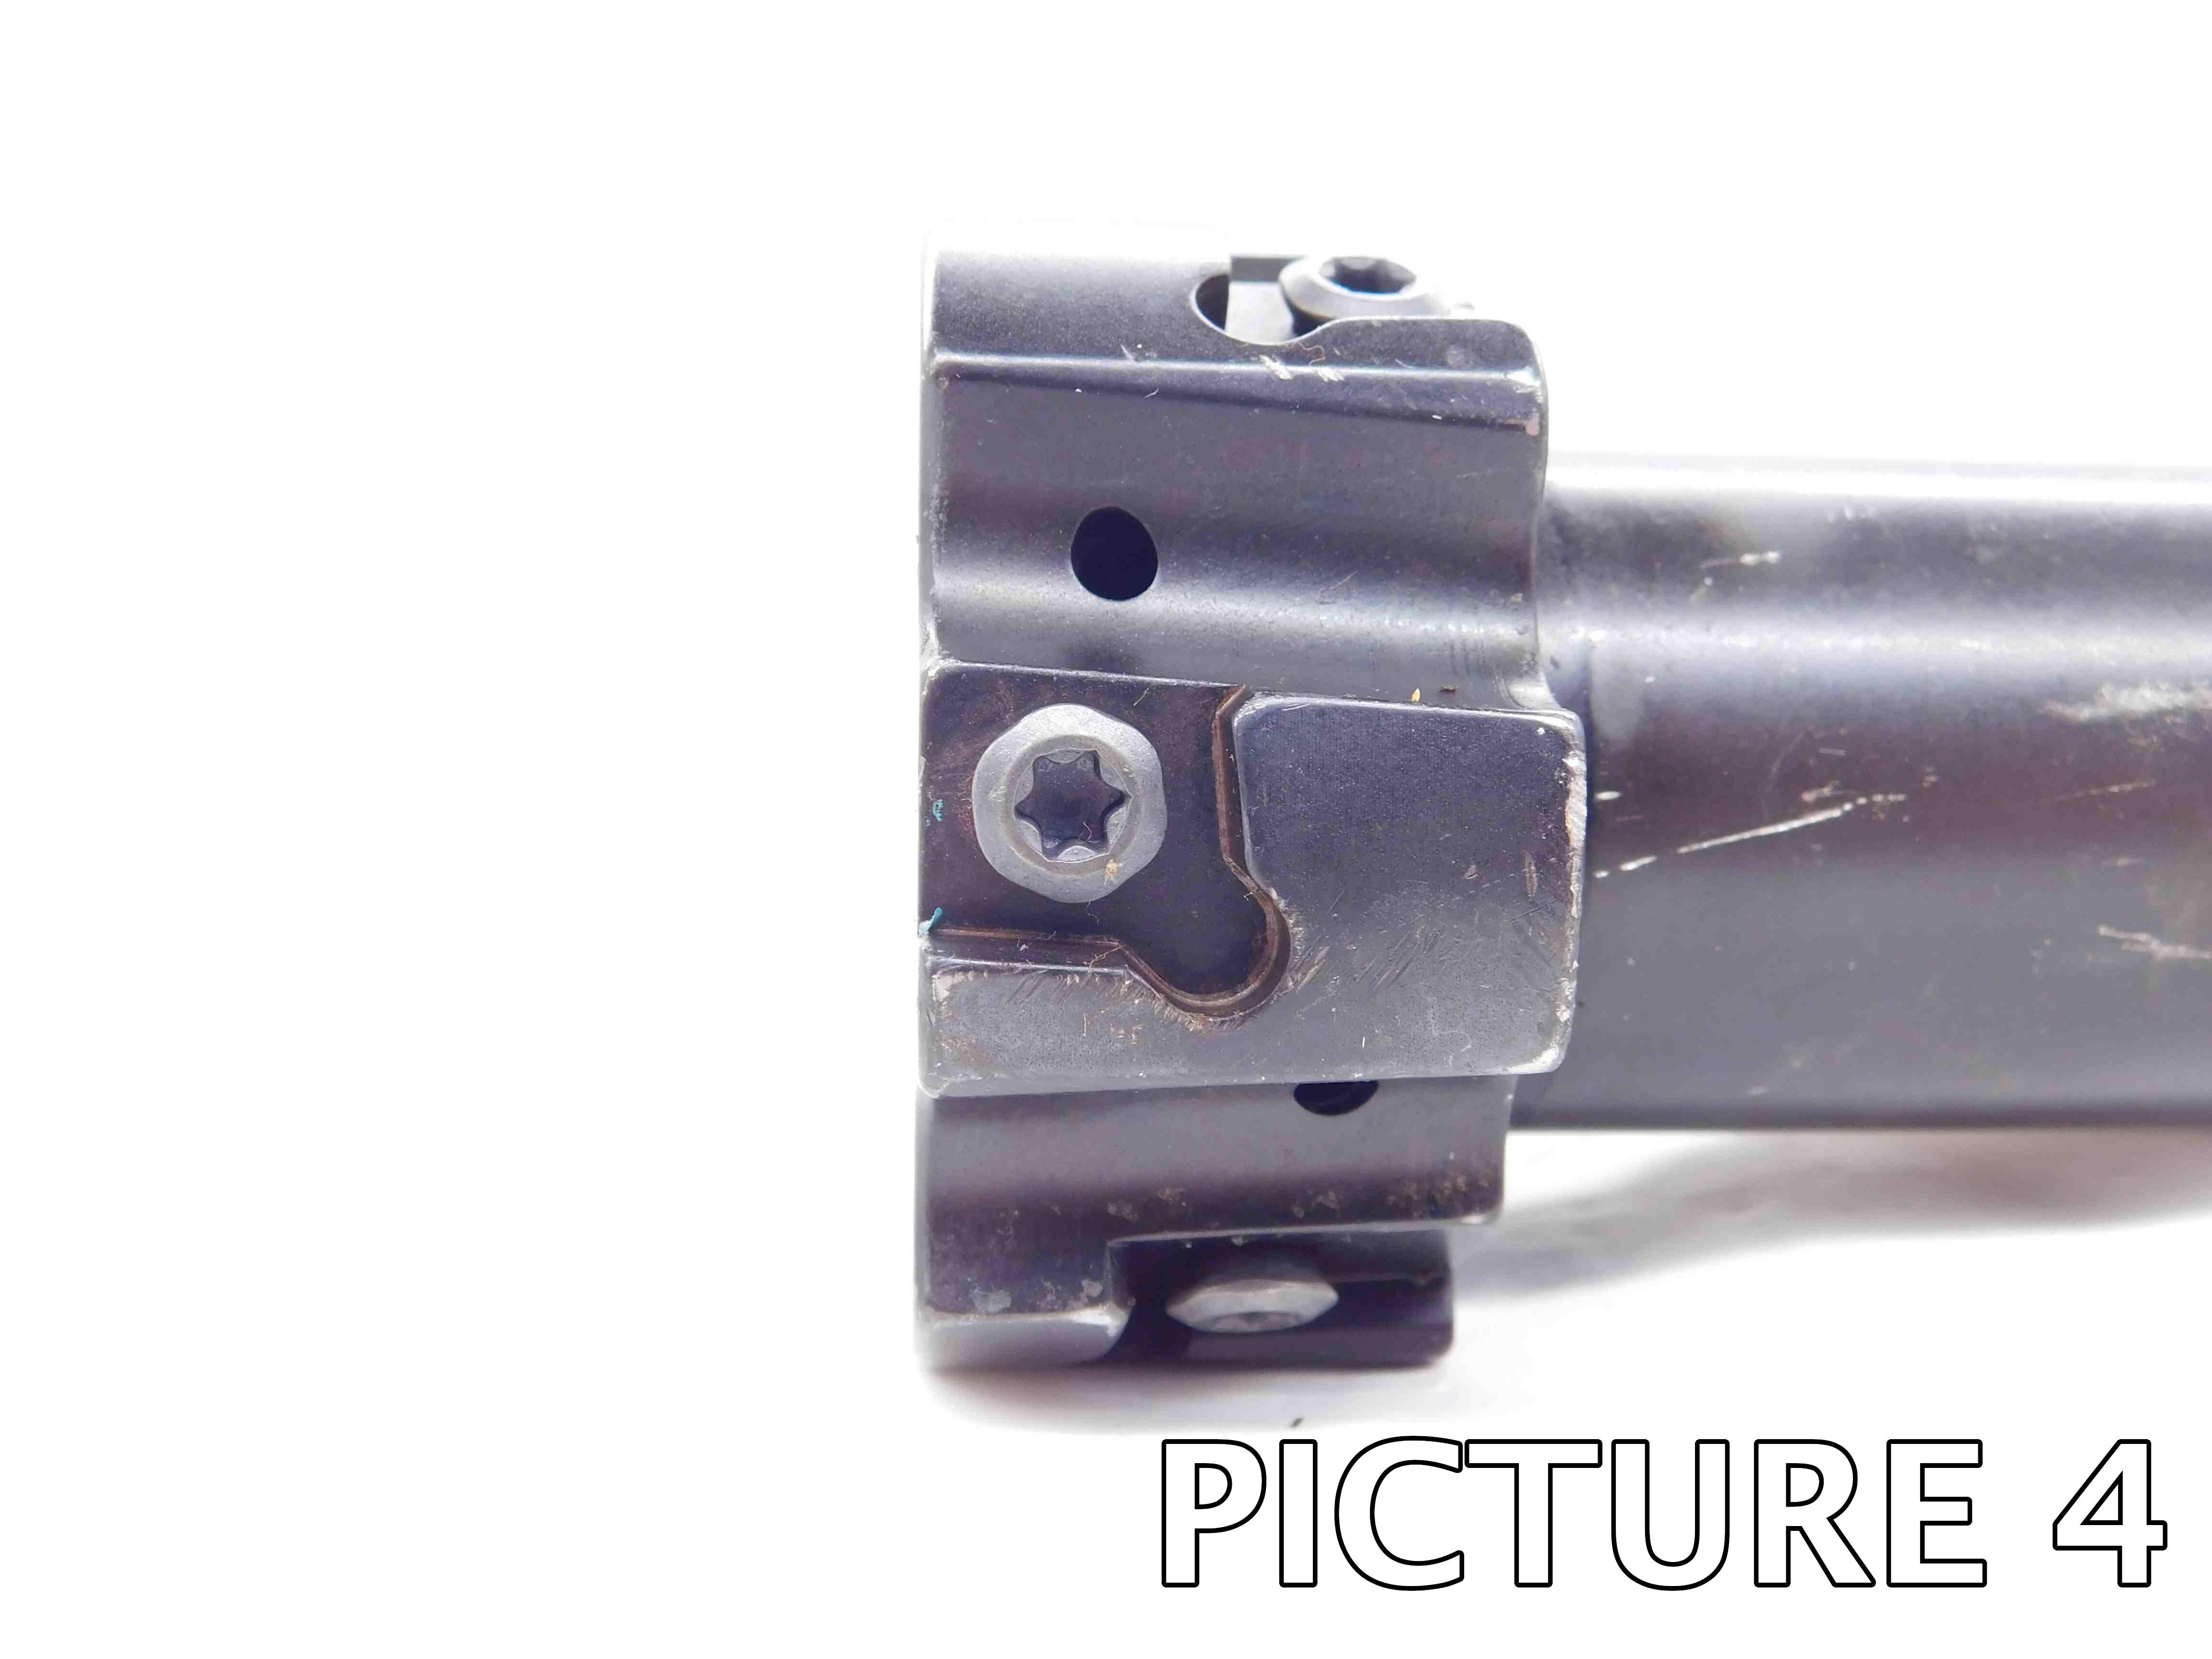
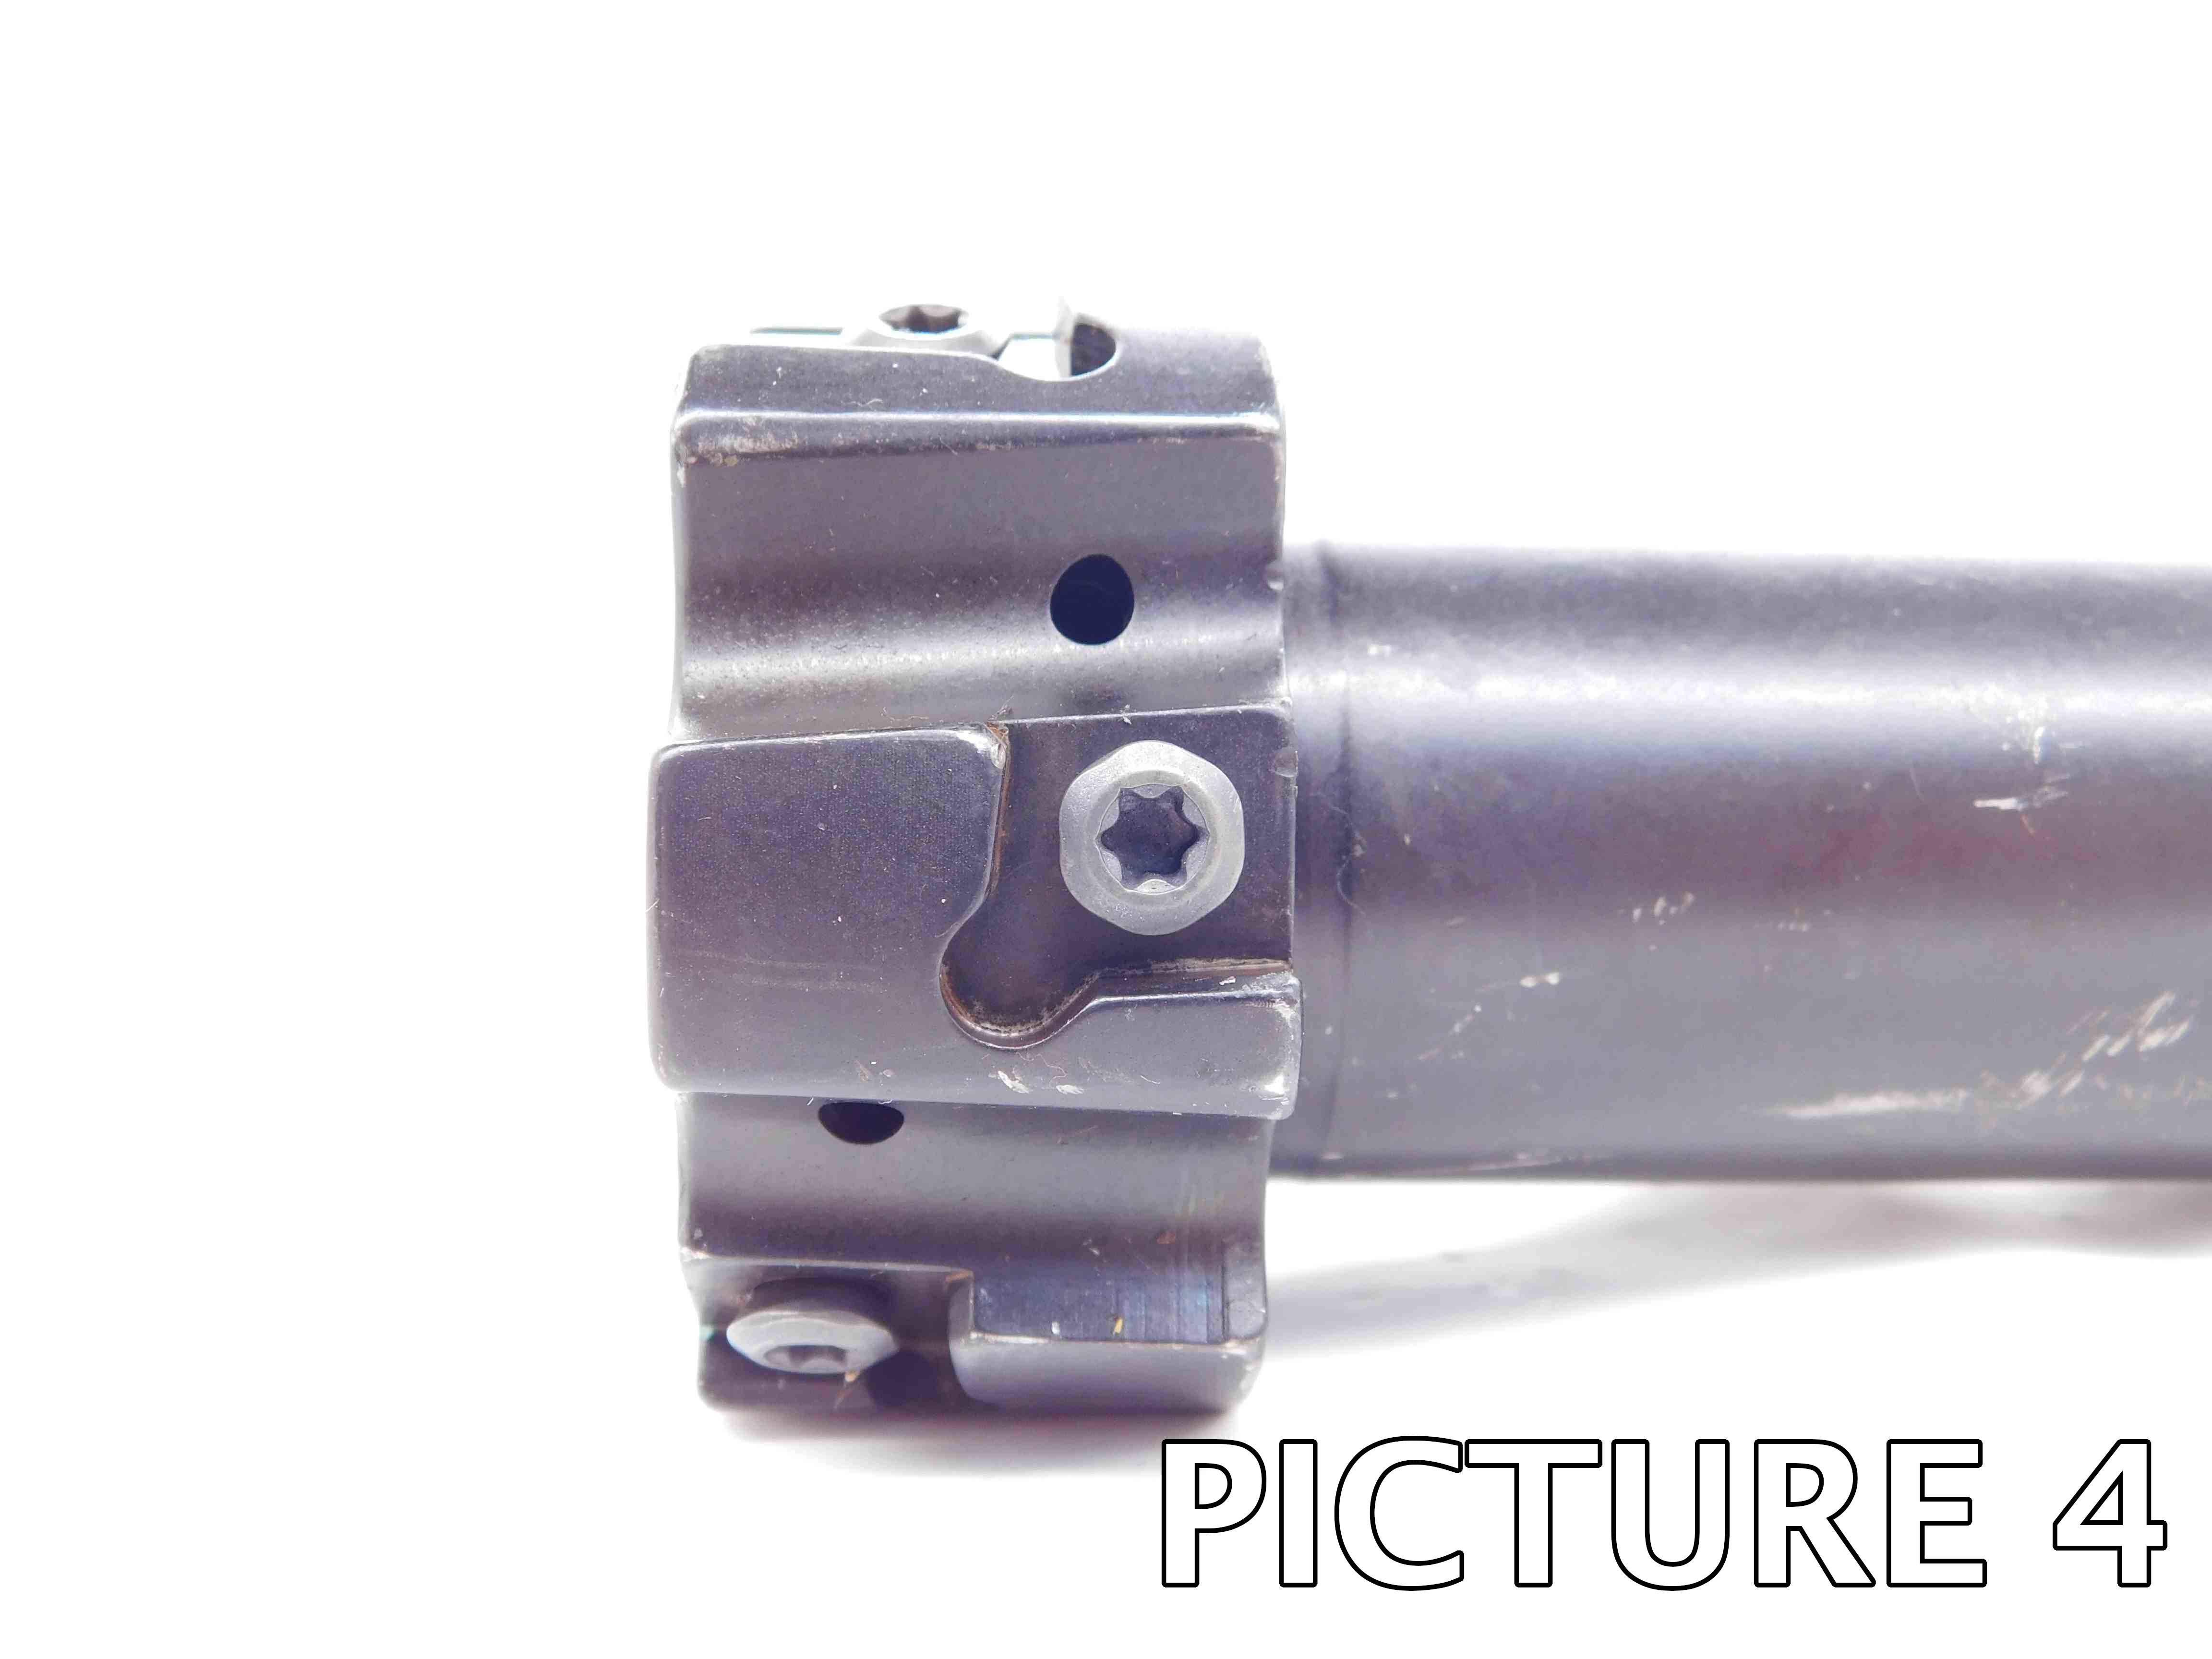
4th Picture: (Indexable cutters only) Multiple close-up pictures showing each insert pocket from the side, as in the example below. If possible, try to get multiple pockets at a time to reduce the number of pictures you have to take. All used indexable side cutters must include these pictures! The insert pockets are the most important aspect of the tool and their condition must always be shown clearly! ***If a cutter is NEW, you may skip these pictures as there will be no wear / damage that needs to be shown***
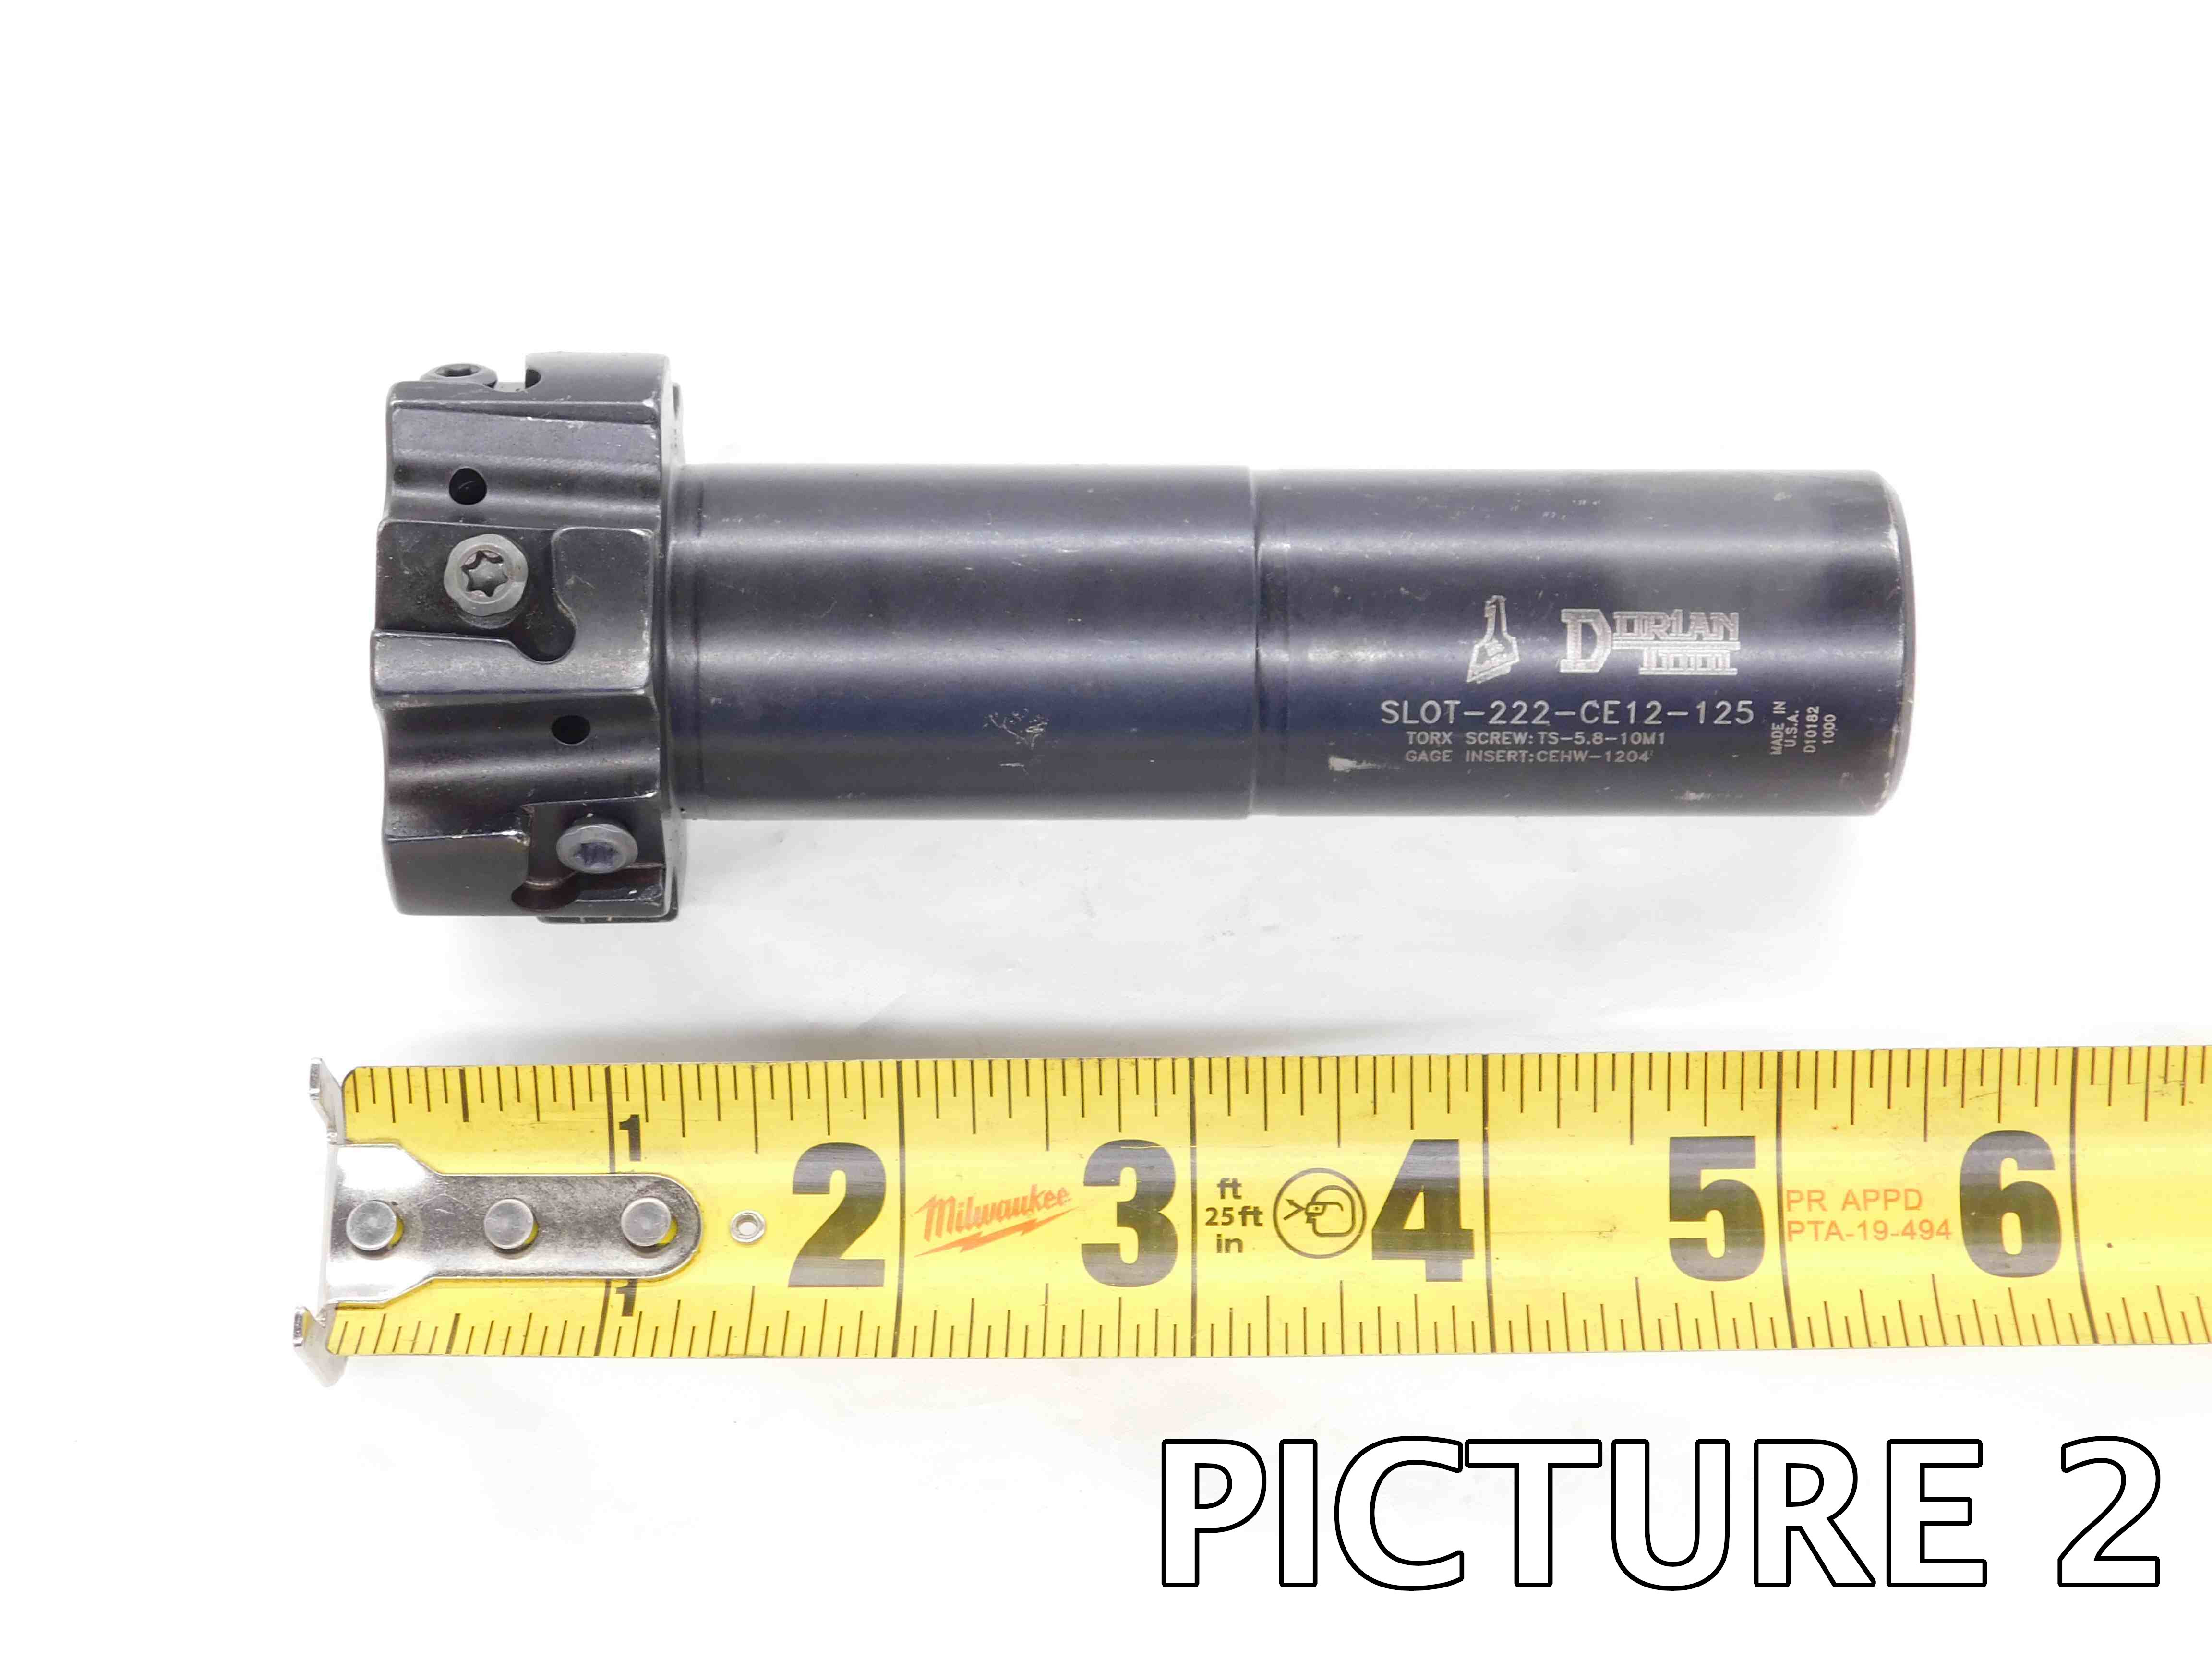
4th Picture: A close-up shot of the labeling. Depending on the size of the cutter and the location of the labeling, this may require more than one picture (in the example below, three pictures were required to capture all of the labeling) . If there is no labeling, or if it is too faded too show up in a picture, skip this picture.
Additional Pictures: Any damage or modifications, especially to the cutting edges / insert pockets or shank, must be clearly pictured. Use a pen to point to the damaged / modified areas. If there are any flat sections on the shank (whether manufactured or modified) which are not clearly visible in the previous pictures, they should be shown in an additional picture as well. If you think you may need additional pictures for any other reason, check with your trainer to see if they are necessary.
Please refer to the example below:
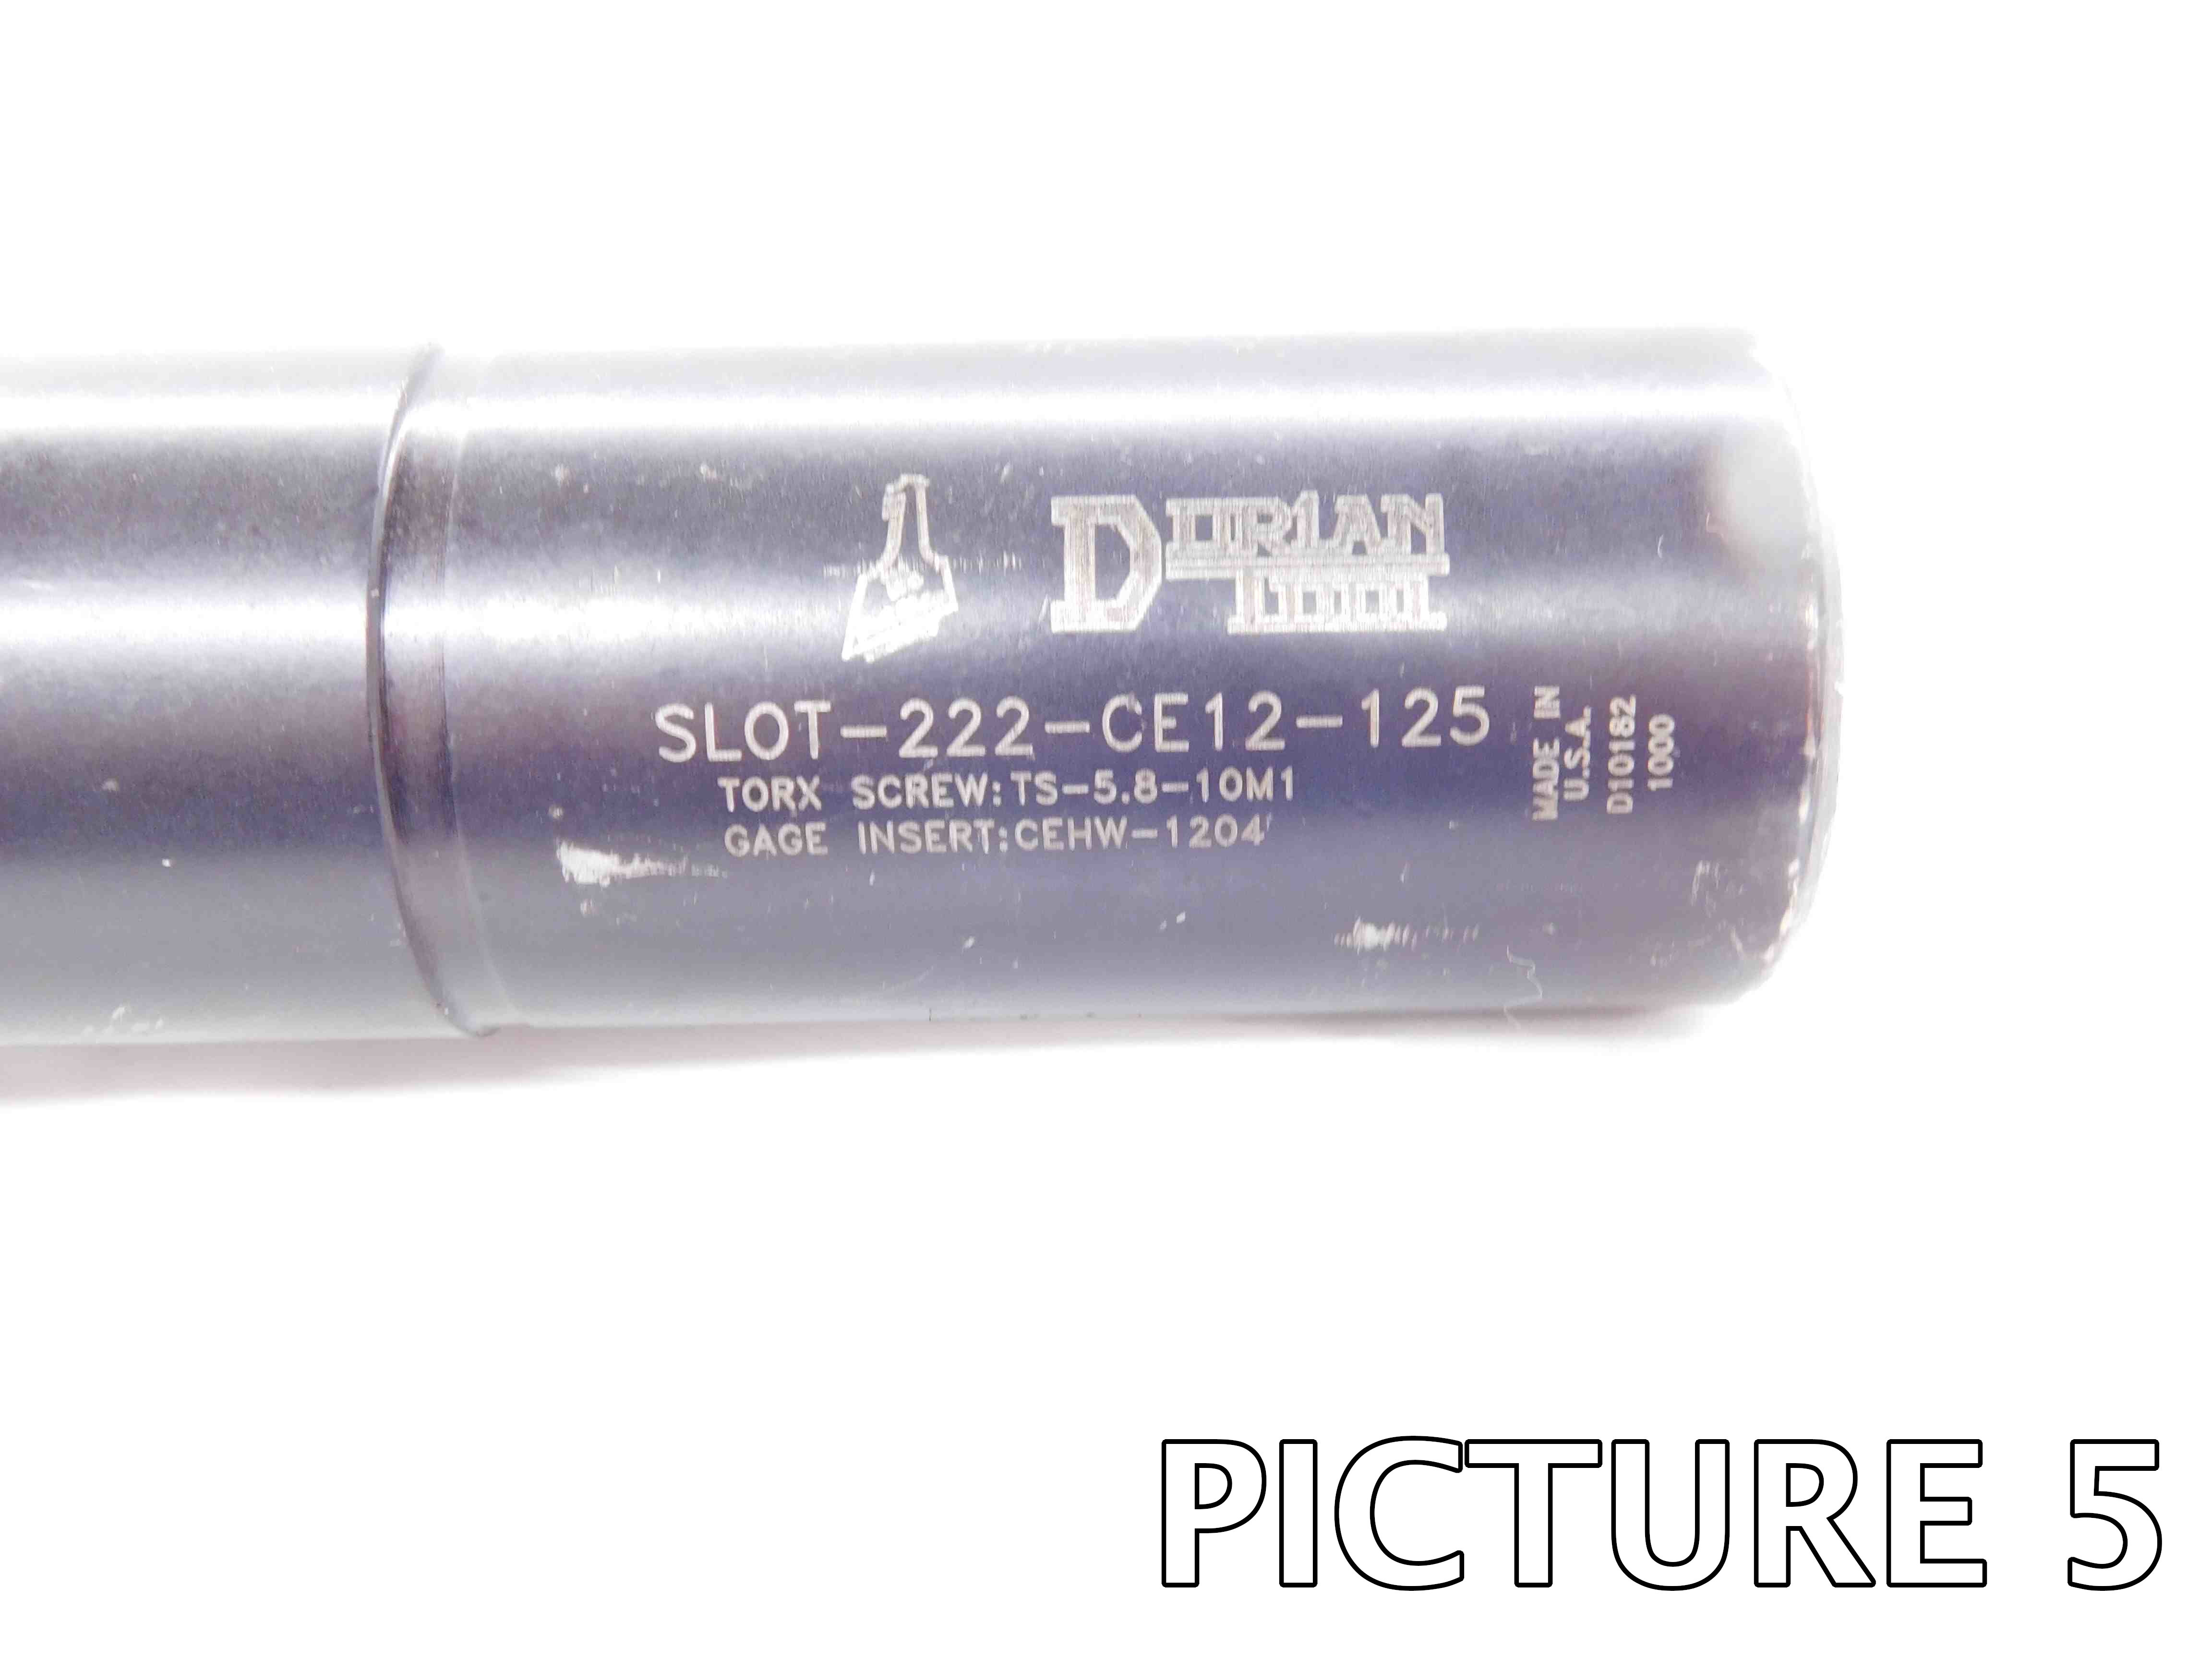
The brand will often be labeled on the face of the cutter or the shank. If there is no brand labeled, click the "Unlabeled" button to the right of this cell. Make sure this cell is not left blank, or the listing will not upload properly. Note: Items are often labeled with the country of origin (USA, China, Japan, Poland, etc). This should NOT be entered as the brand, and furthermore should not be included in the listing at all EXCEPT for USA which can be used as a filler.
Any labeled part numbers should always be listed here. Side Milling Cutters are often labeled with important dimension information - in the first set of example pictures above, the labeled "4 x 3/8 x 1" refers to the outer diameter (4"), cutting width (3/8") and pilot diameter (1"). This specific information does not need to be included in the "Part #" section since it will be covered by the other sections below.
![]()
![]()
![]()
![]()

![]()
![]()
![]()
![]()


Slitting Saws and Slotting Saws are two very similar types of side cutters. They are sawblade-type cutters which are mounted on an arbor and used to cut slits or slots in the side of a workpiece.
The difference between the two lies in what parts of the saw are actually doing the cutting. A Slitting Saw only cuts on the face of each tooth, while a Slotting Saw
also has a cutting edge on the side of each tooth. See the image below for examples:


Slitting Saws will almost always be Straight Tooth. Slotting Saws will frequently be Staggered Tooth.
If a slitting or slotting saw has a radius, meaning the cutting edge is rounded rather than square, it should be listed as a Convex Radius Cutter instead.


T-Slot Cutters are use for cutting T-shaped slots such as the ones shown above. A slot is first cut in the top of the workpiece for the shank to pass through as it enters from the side. T-Slot Cutters are almost always Staggered Tooth, and are differentiated from a similar type of cutter described in the next section by the fact that, like Slotting Saws, they have cutting edges along the sides of each tooth.


Keyseat Cutters, also known as Woodruff Cutters, are used to cut along the side of a workpiece similar to a slitting or slotting saw. They are usually Straight Tooth, but can be staggered as well. Like a slitting saw, Keyseat Cutters do not have cutting edges along the sides of the teeth, which is the main way to tell the difference between a Keyseat Cutter and a T-Slot Cutter.


Dovetail Cutters are similar to T-Slot Cutters in how they are used, but rather than a T-shaped slot a Dovetail Cutter creates a trapezoid. Like a T-Slot cutter, a slot is cut into the top of the workpiece first, which the shank then passes through as the cutter enters from the side.
Dovetail cutters are always Straight Tooth and come in a variety of Cutting Angles, the most common being 45, 60, and 90. The angle should always be included in the listing whenever it is known.


A Convex Radius Cutter is a side milling cutter with cutting edges that are rounded outward. They are used to create rounded slots in the side of a workpiece such as in the image above. They can have either an arbor hole or an attached shank and are always Straight Tooth. The Radius is easy to determine, as it is simply half of the cutting width.


A Concave Radius Cutter is a side milling cutter with cutting edges that are rounded inward. They are used to created rounded, raised surfaces like the image above by cutting the material around the radius. They can have either an arbor hole or an attached shank and are always Straight Tooth. The Radius is measured according to the image below:


Double Angle Cutters, also known as Double Chamfer Cutters, are distinguished by the two equal angles on either side of the teeth. They can have an arbor hole or an attached shank and are considered to be Straight Tooth. They come in a variety of Chamfer Angles, with the most common being 45, 60, and 90. The angle should always be included if it is known, and should be able to be measured relatively easily with a protractor.


Involute Gear Cutters, as the name implies, are used to make gears. They have double-angled or double-radiused teeth which come to an elongated and often rounded edge. If the cutter is labeled with the Gear Pitch that it cuts, this should be included in the listing either as Filler (if there is room in the title) or in the Additional Specifications. If the Gear Pitch is not labeled, there is unfortunately not an easy way to determine it. There may also be a Module number labeled, which is an alternative measuring system to Gear Pitch and should also be included in the listing whenever possible.

Slab Mills, also called Plain Mills, are arguably more closely related to end mills and face mills than they are to the other types of side milling cutters described on this page. They are mounted on an arbor and run horizontally across the top of a workpiece to remove large amounts of material at once. Slab mills will have a much larger cutting width than other side cutters - usually larger than the outer diameter. They always have spiral flutes, but should not be considered to be staggered tooth.
As mentioned in the previous section, the outer diameter will often be indicated by the labeling. If it is not, the O.D. can be measured with calipers - or, if it is too large for handheld calipers, a tape measure can be used (but be aware that it is not a precise measuring tool - large side milling cutters typically have sizes in denominations of 1/4" or larger though, so in most cases this will be fine).
If there are an even number of teeth, the O.D. is simply measured from the outer edge of one tooth across to the outer edge of the opposite tooth as shown in the diagrams at the top of this page.
If there are an odd number of teeth, measuring the O.D. is a little trickier but can be done using the following method:
1. Measure from the edge of one tooth to the pilot hole, and multiply this number by two.
2. Measure the pilot's inside diameter and add this to the number from step 1. This will give you the cutter O.D. (the O.D. is very often a common size, so if you are slightly over/under you can round this number).
Note: When entering a whole-number inch size, always include the " sign. The " sign should not be included for any size including a fraction or decimal. So, for example: If a cutter's diameter is exactly one inch, it should be entered as 1" and not just 1. If the cutting diameter is one and a half inches, it should be entered as 1 1/2 or 1.5 and not 1 1/2" or 1.5".
Metric size measurements should be entered with a lowercase "mm" (ex.: 16mm, 40mm).
Cutting Width / Thickness & Staggered Teeth

The measurement of the cutting width depends on whether or not the cutter has Staggered Teeth. A staggered-tooth cutter has teeth which alternate cutting directions.
If a cutter does not have staggered teeth, you can simply measure the width of any one of the teeth using calipers.
If a cutter does have staggered teeth, you will have to measure the width from the outer edge of one tooth to the opposite outer edge of the alternate tooth next to it. This may be difficult to measure if the teeth are far enough apart, so you may need to list this measurement as "About (x)" if you are not able to get an exact measurement.
The cutting width will often be a common fractional size, however it is not uncommon for the width to be a metric size even if the rest of the cutter's dimensions are nominal - so if you are getting an unusual size for the cutting width, try converting it to millimeters.
Refer to the three diagrams at the top of this page for an example of cutting widths - the first two do not have staggered teeth, and the third does have staggered teeth.
Arbor Hole / Shank Dia. & Key Width


Note: "Pilot Diameter" and "Arbor Hole Diameter" are used interchangeably.
Side milling cutters will either be held onto an arbor by a pilot & key, or will have a shank similar to those seen on end mills and other tools. The most common is the pilot & key, which can be measured by a pair of calipers and are typically very standard sizes. The straight shank seen in the 2nd picture is less common, but can also be measured with calipers.
If the pilot diameter & key cannot be measured because it cannot be removed from a shank / arbor, and using the labeling / part # for research doesn't give you the information, this may be left blank.


Indexable side milling cutters use replaceable inserts which are held in place by a screw or clamp. The inserts can be changed out when they get worn down, greatly extending the life of the cutter. Due to this, indexable side milling cutters are often much more valuable than non-indexable cutters.
The number of teeth / inserts can simply be counted. Using the cutters pictured in the previous section as an example, the first two have 8 teeth, and the third has 12 teeth.


The most common cutting material is High Speed Steel (HSS). This is a general purpose material which will generally have a bright silver color.


Another popular cutting material is Carbide. Carbide is much heavier than HSS, with higher hardness and durability. It usually has a duller gray appearance and will be distinct from the rest of the cutter which will typically be made from HSS (solid carbide side cutters do exist but are much less common than carbide-tipped HSS).
For indexable cutters, the material can be assumed to be carbide since that is what the vast majority of inserts are made from. If you know the specific type of inserts the cutter uses (either from the labeling directly or by searching the part # online), include that information here as well.
The "Filler" section is used to add other relevant information to the title which is not covered by the other sections. Fillers can be a good way to increase a listing's visibility - we always want to include as much information as possible that we think a customer might be searching for in order to make sure that our listing is coming up in their search results.
There is not necessarily one right answer when it comes to fillers, and often it will be up to you to decide what should and should not be added as filler. Side milling cutters often will not require much filler, but here are some possible fillers that can be included:
-Secondary labeling or branding / product names
-"USA" or "USA Made" for any US Manufacturers (you may need quickly research a brand if you are not sure since this will not always be specifically labeled)
-The type of inserts used by an indexable cutter
Note: Keep in mind that titles have a maximum limit of 80 characters.
Additional Specifications & Special Condition
The Additional Specifications section should be used for any secondary labeling or additional measurements that do not fit in the other sections of the listing. There is no character limit here so any relevant information that is not already covered should be included (within reason - we don't want to overload the listing with unnecessary information, so ask your trainer if you are not sure whether or not to include something in this section).
The Special Condition section should be used for any special notes about the item's condition such as damage or modification. Try to be specific when describing the condition, and reference pictures that point out the damage / modification if applicable. For example, "A few of the teeth are chipped - see picture #5 for details." General wear and tear does not need to be mentioned, but anything that will affect the tool's usage should be included here.
Once all information is entered, click here for the next steps.