Use WD-40 and a scotchbrite pad to remove any rust or residue from the tap, taking care not to remove any of the labeling while doing so. The teeth can also be cleaned with WD-40 by using a wire brush or, if it is especially rusted, your trainer can instruct you on using a wire wheel.
Once the tap is clean, wipe down with a dry rag to remove any excess WD-40.
Click here for info about how to upload pictures
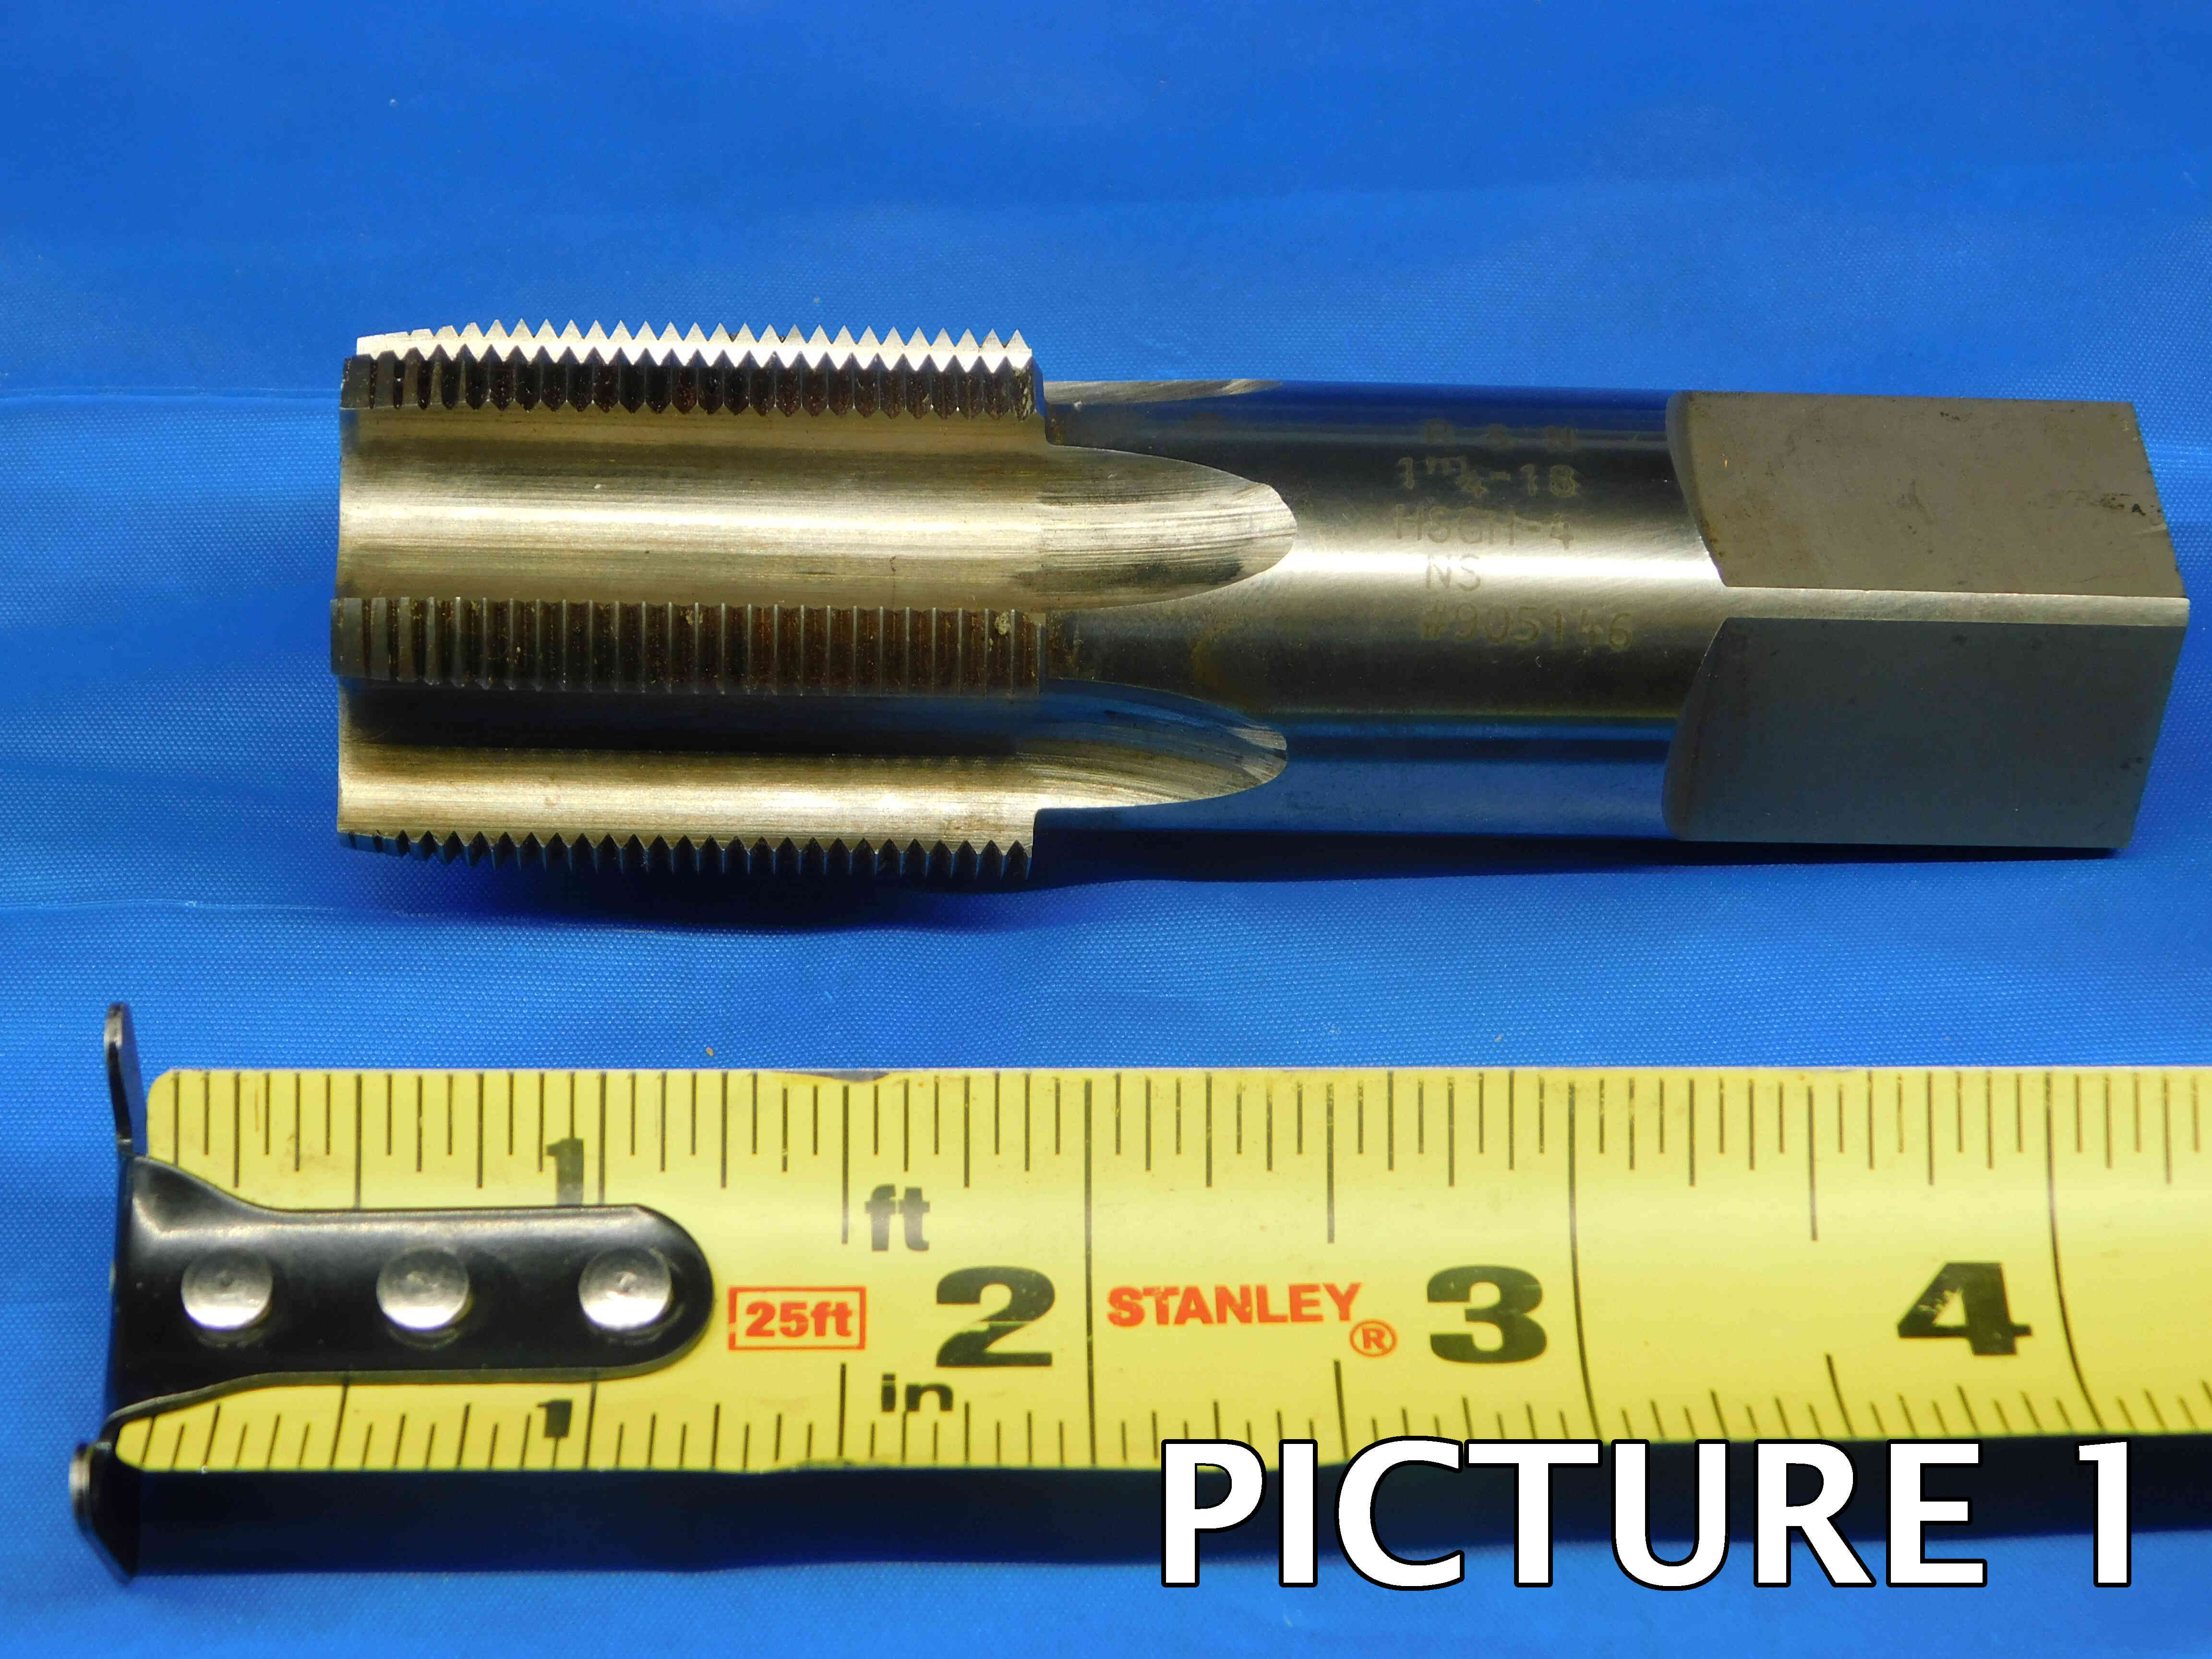
1st Picture: Side profile of the tap, with a tape measure at the bottom of the frame to provide size reference. Make sure there is sufficient space between the tap and the tape measure so that the tape measure is not covering up any part of the tap. The tap should be oriented so that any labeling is visible and readable (i.e., right-side up). Any packaging should be included in this picture as well, with labeling also visible.
NOTE: If you have packaging with labeling that does not match the item, black it out with a marker before taking pictures. Used items can often end up in mismatched packages and we do not want to cause confusion by having inaccurate brands or part numbers showing in the listing.
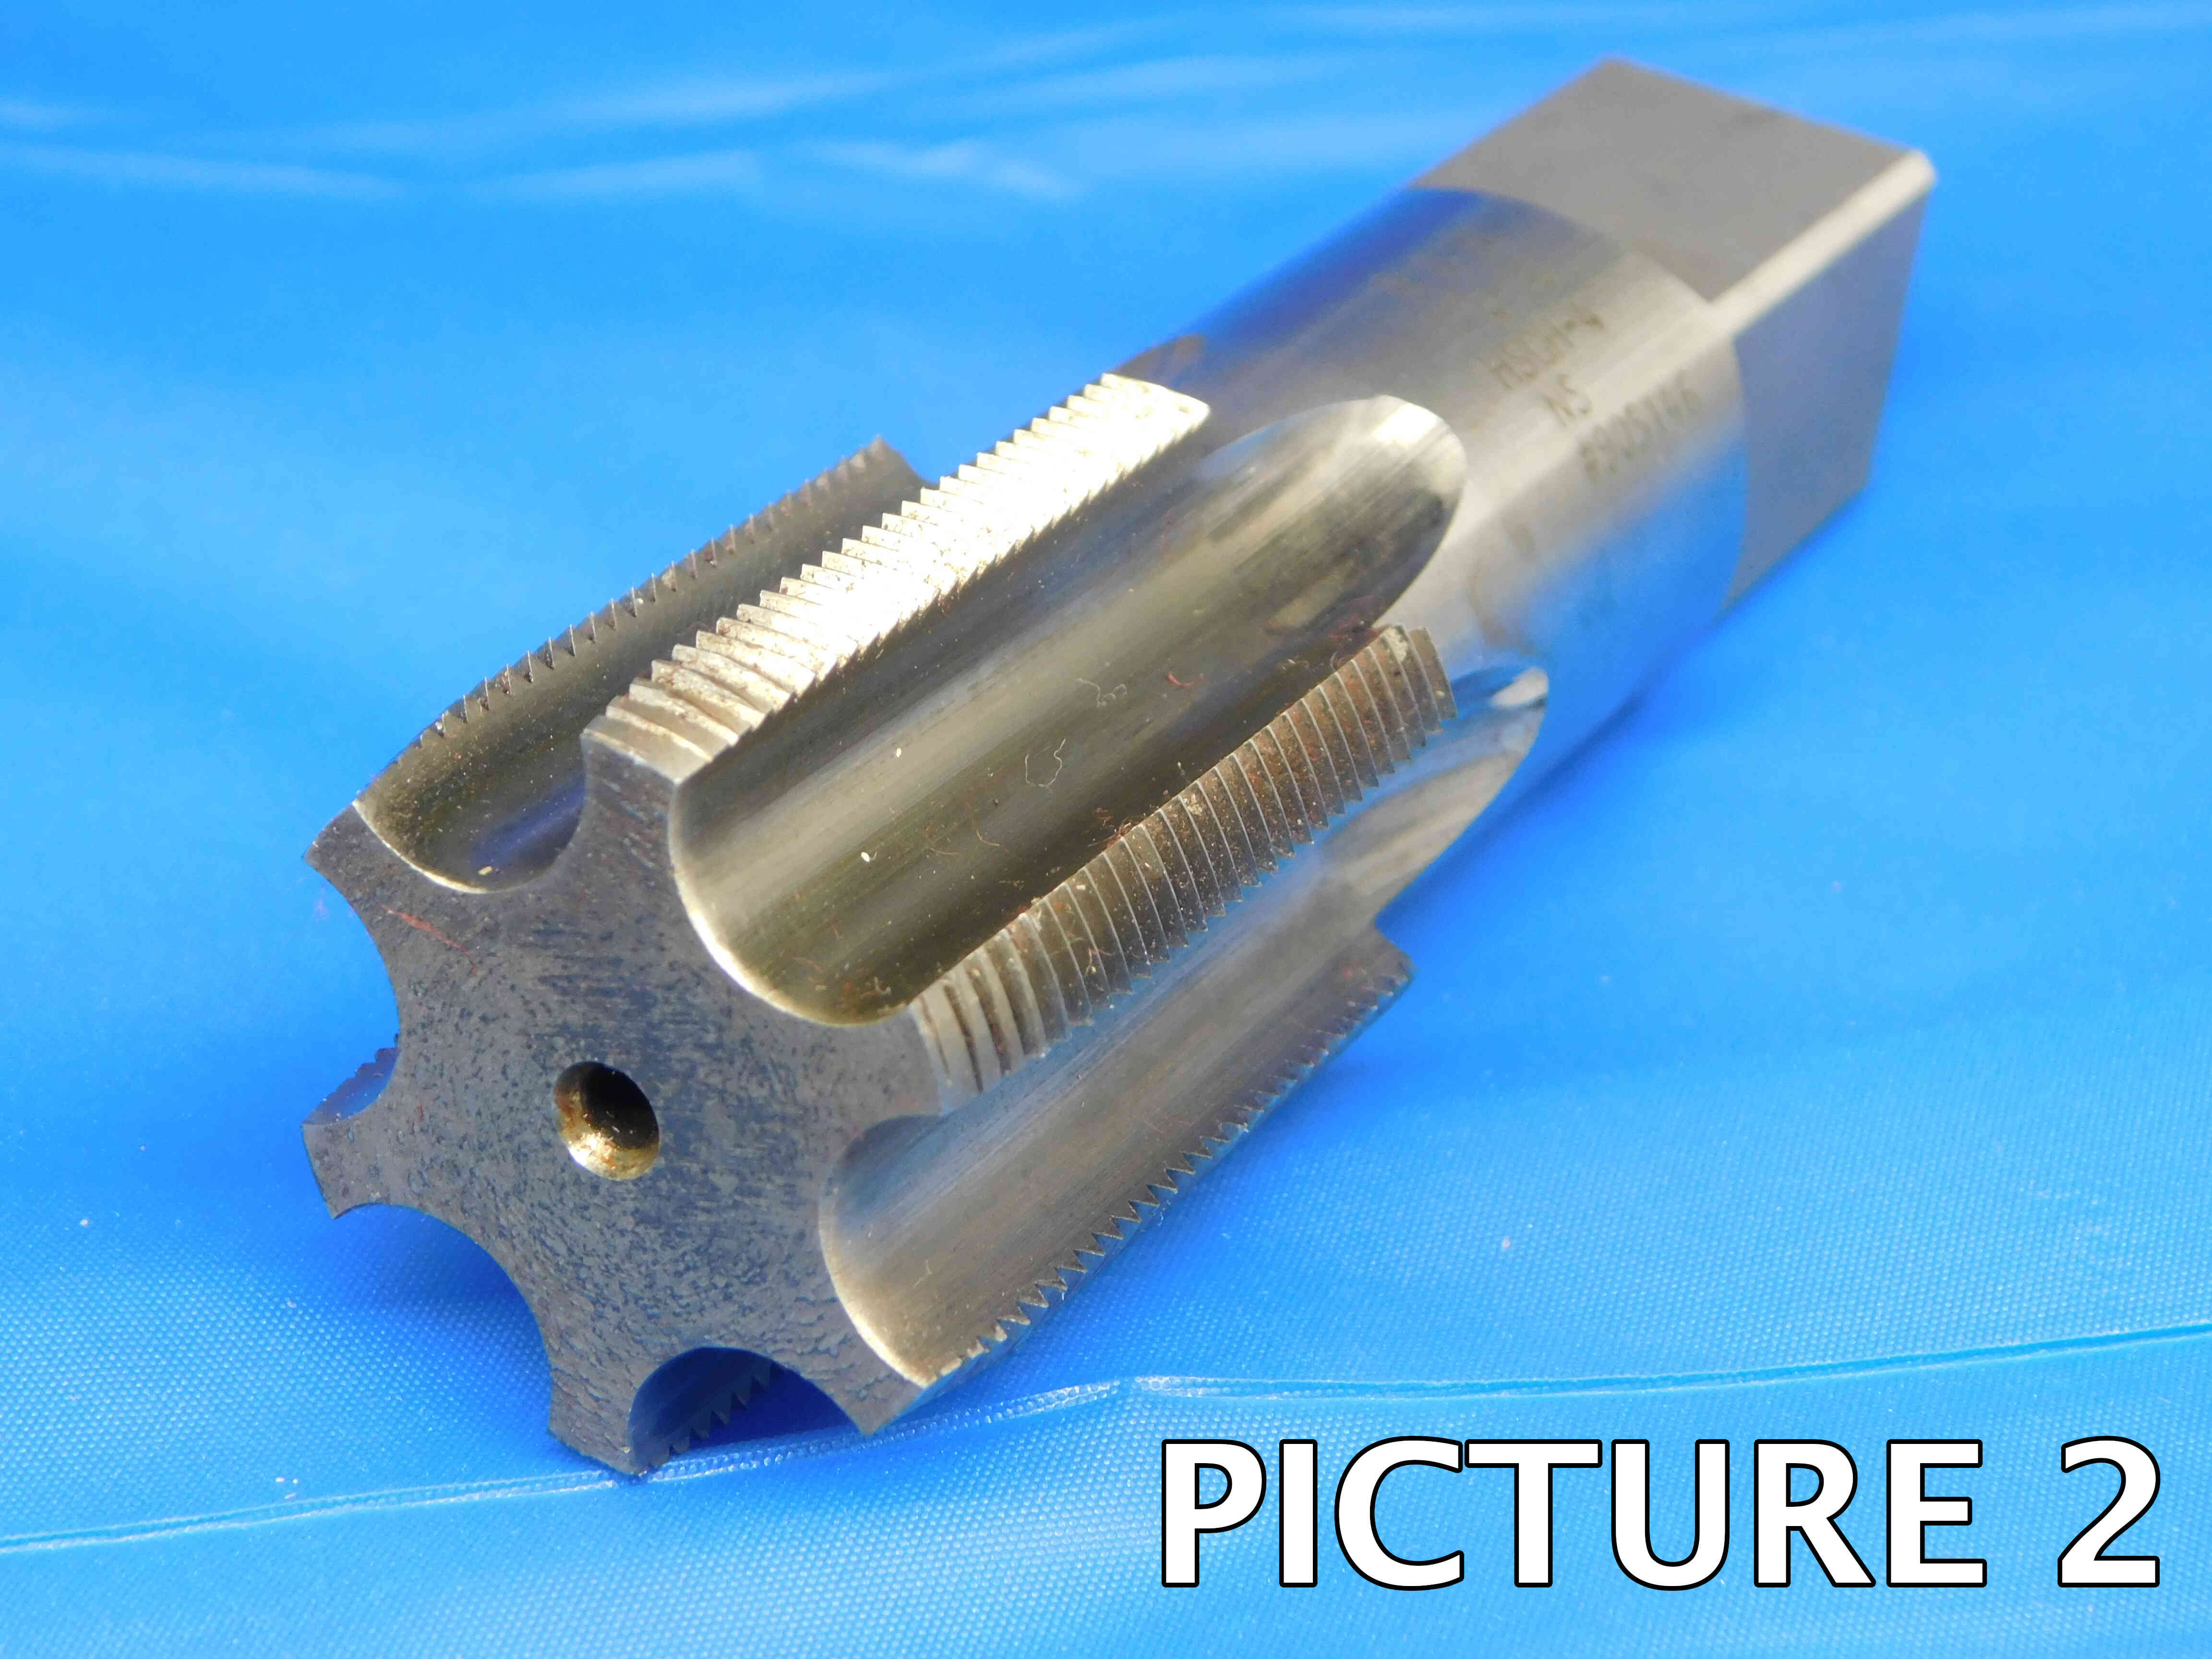
2nd Picture: A three-quarters (or "3D") angle of the tap, with the working end facing the camera. The tape measure does not need to be present in this picture.
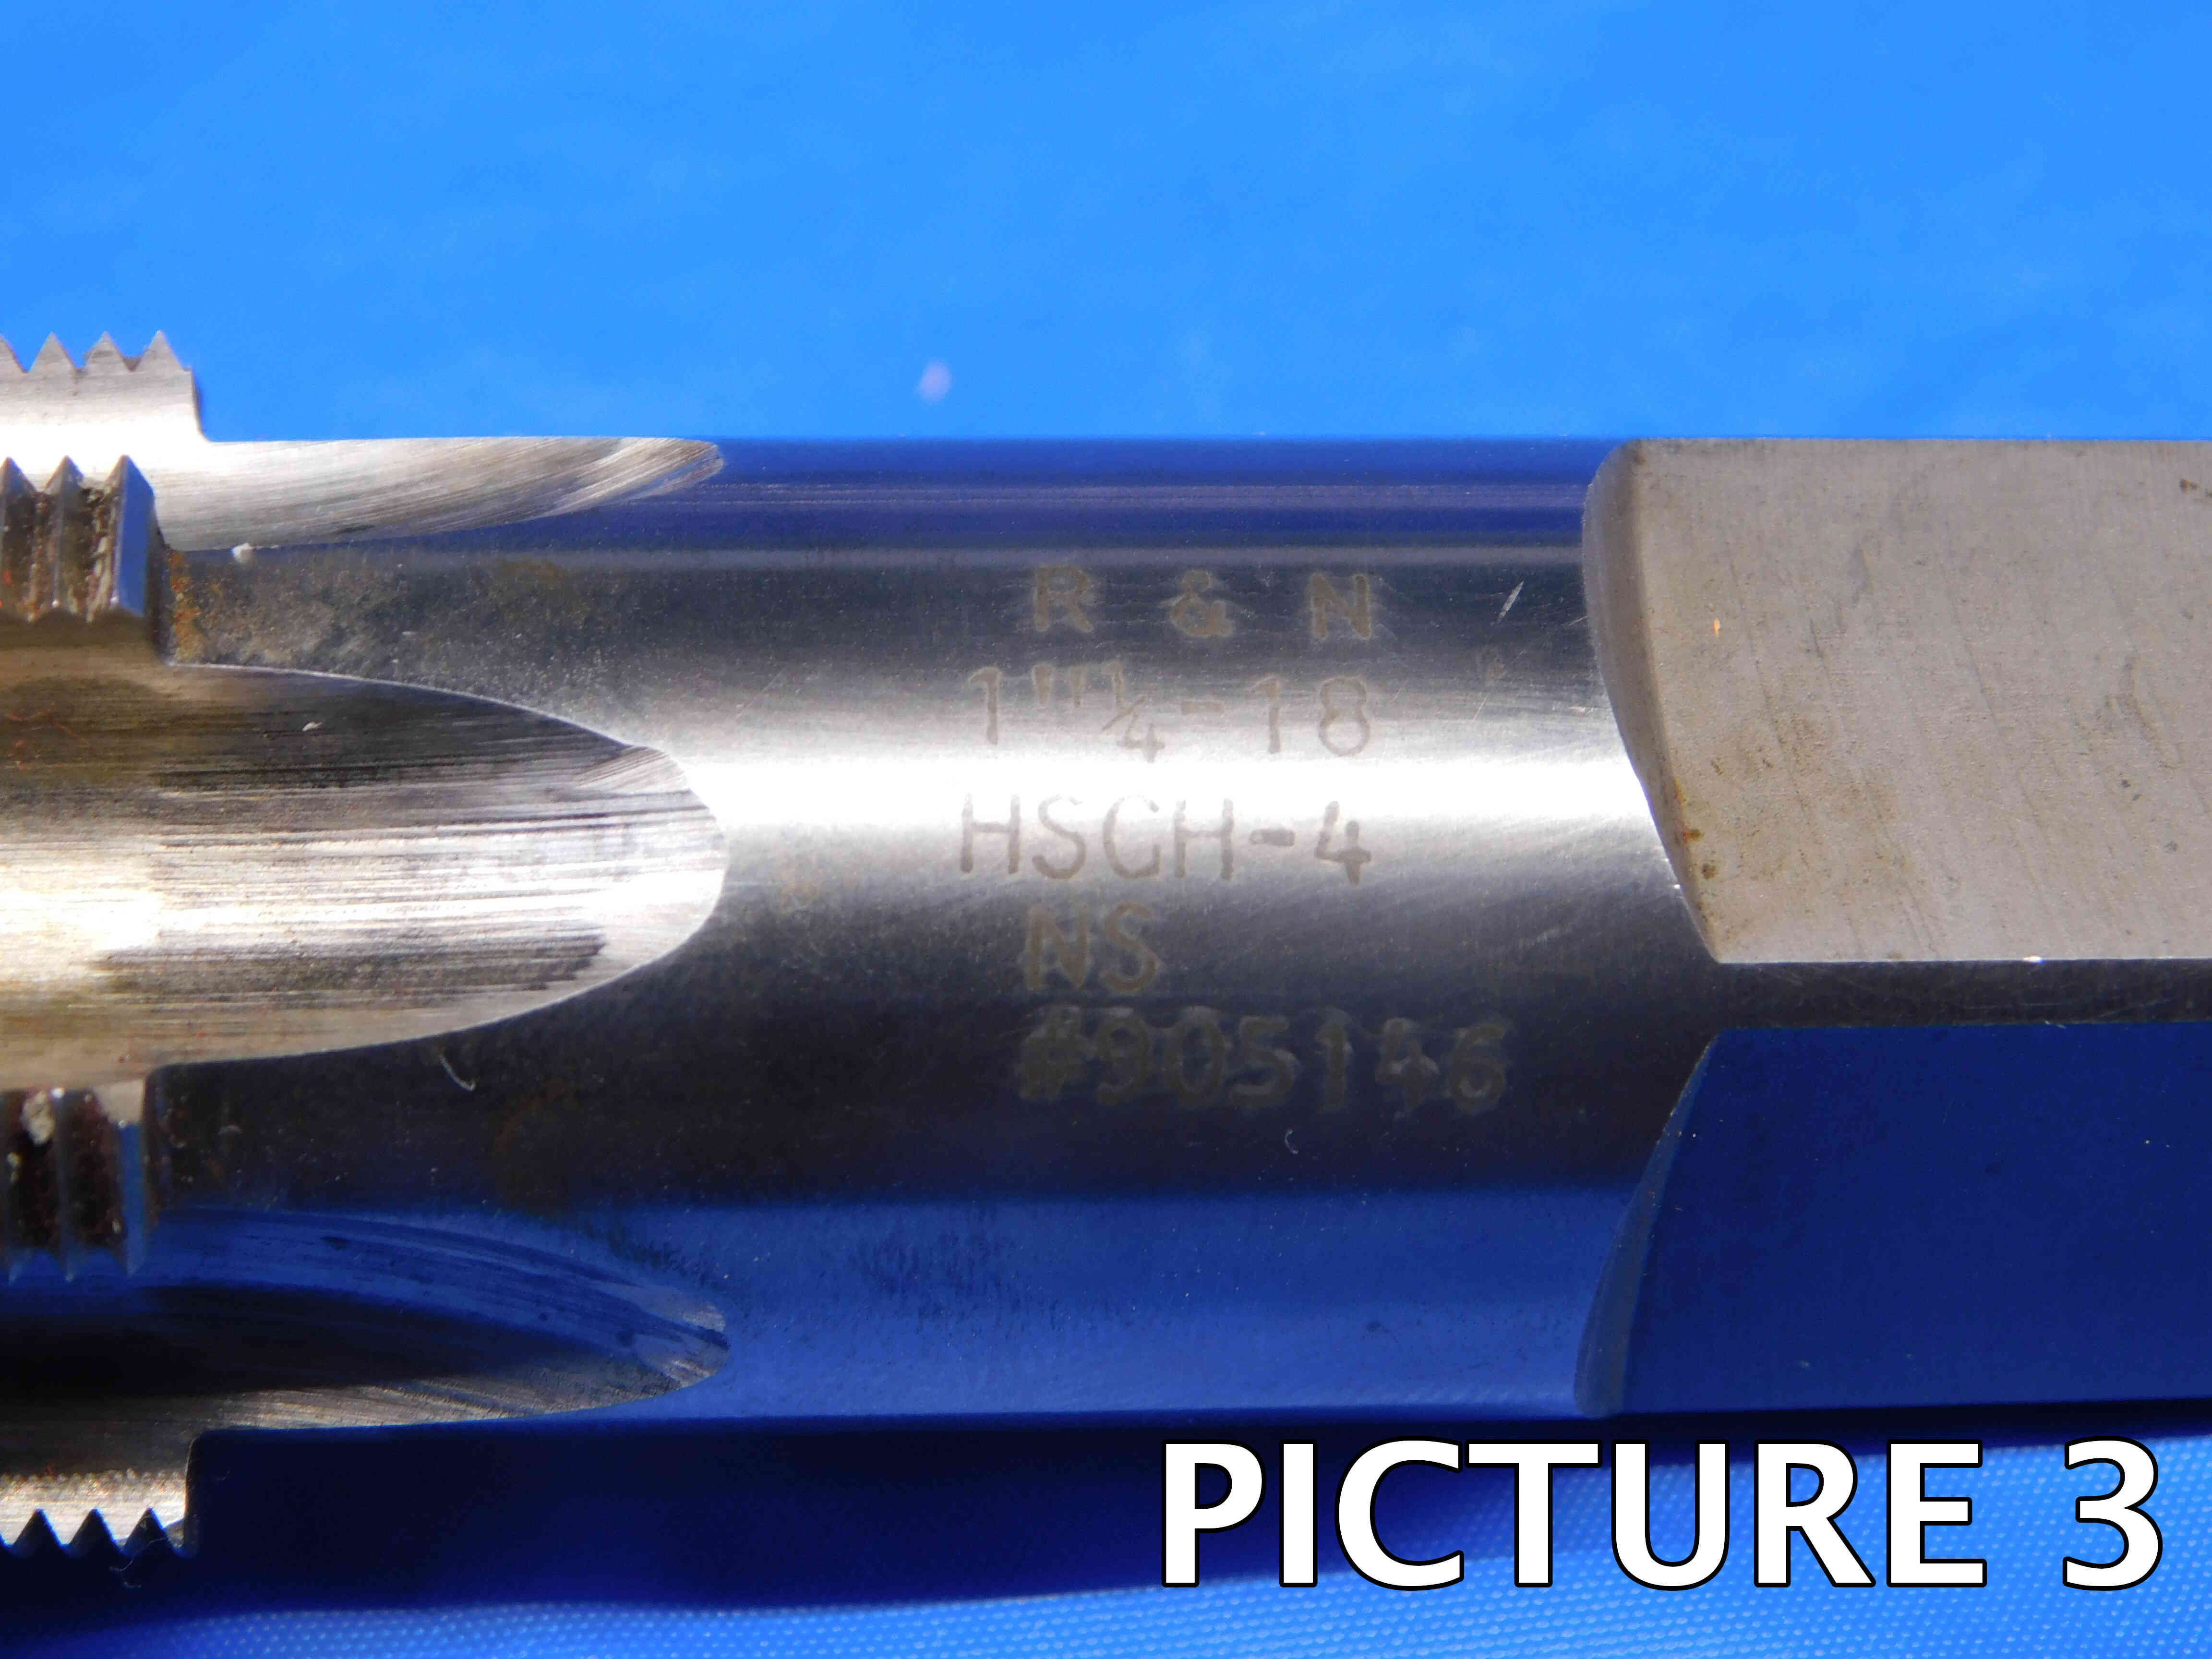
3rd Picture: A close-up of the labeling. Depending on the size of the tap and the placement of the labeling, you may need to take more than one picture to get all of the labeling. If the tap has no labeling, or if it is too faded to show up in a picture, skip this picture.
Additional Pictures: If there is any damage to, or modification of, the threads or shank, it must be clearly pictured. Use a pen to point to the damaged / modified area. See the second set of pictures below for an example. If you think any additional pictures are needed for any other reason, contact your trainer to confirm if they are necessary.
When Picturing Multiple Taps, the same ideas apply - but make sure that all taps are visible in the first and second pictures. If the taps are different sizes, position them with the smallest at the front (closest to tape measure) and the largest in back. Make sure there is enough space between each tap that the cutting edges are not touching. If the taps are all the same, only one needs to be pictured for the labeling - if you are listing a lot of different taps, try to get the labeling on as many taps as you can in one or two pictures. Refer to the 3rd set of pictures below for an example of picturing multiple taps.
Refer to the pictures below for examples:
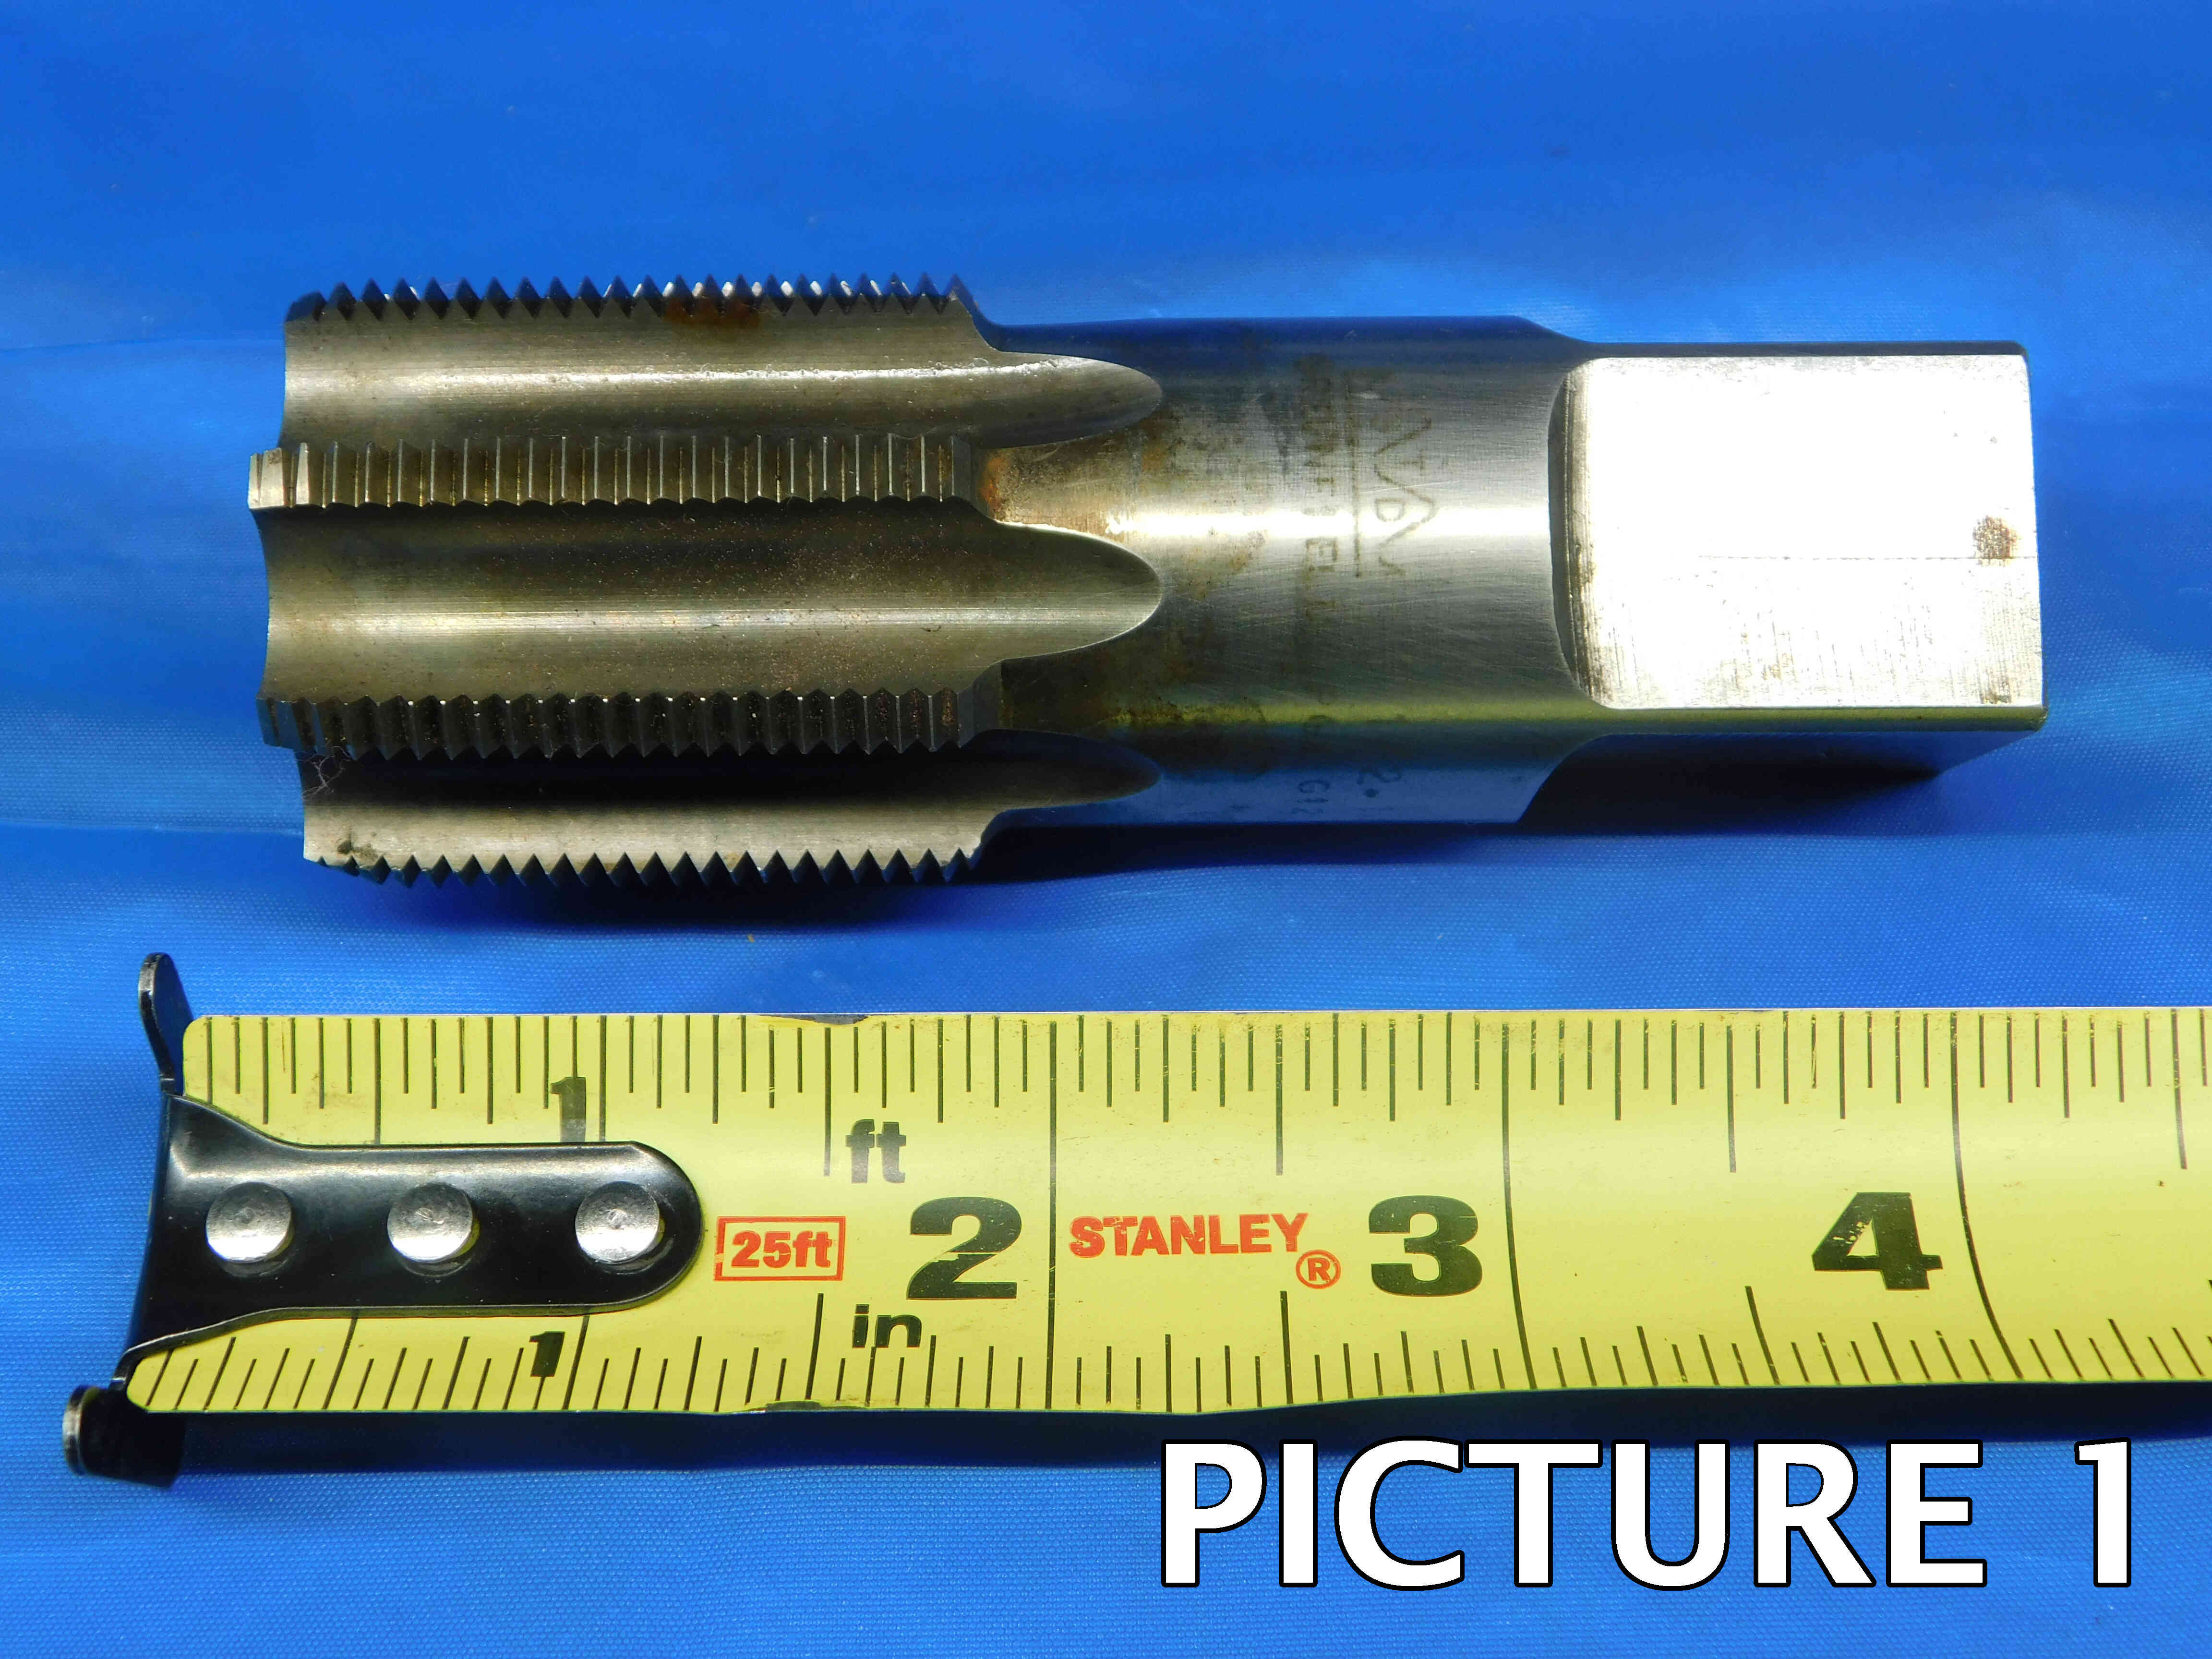
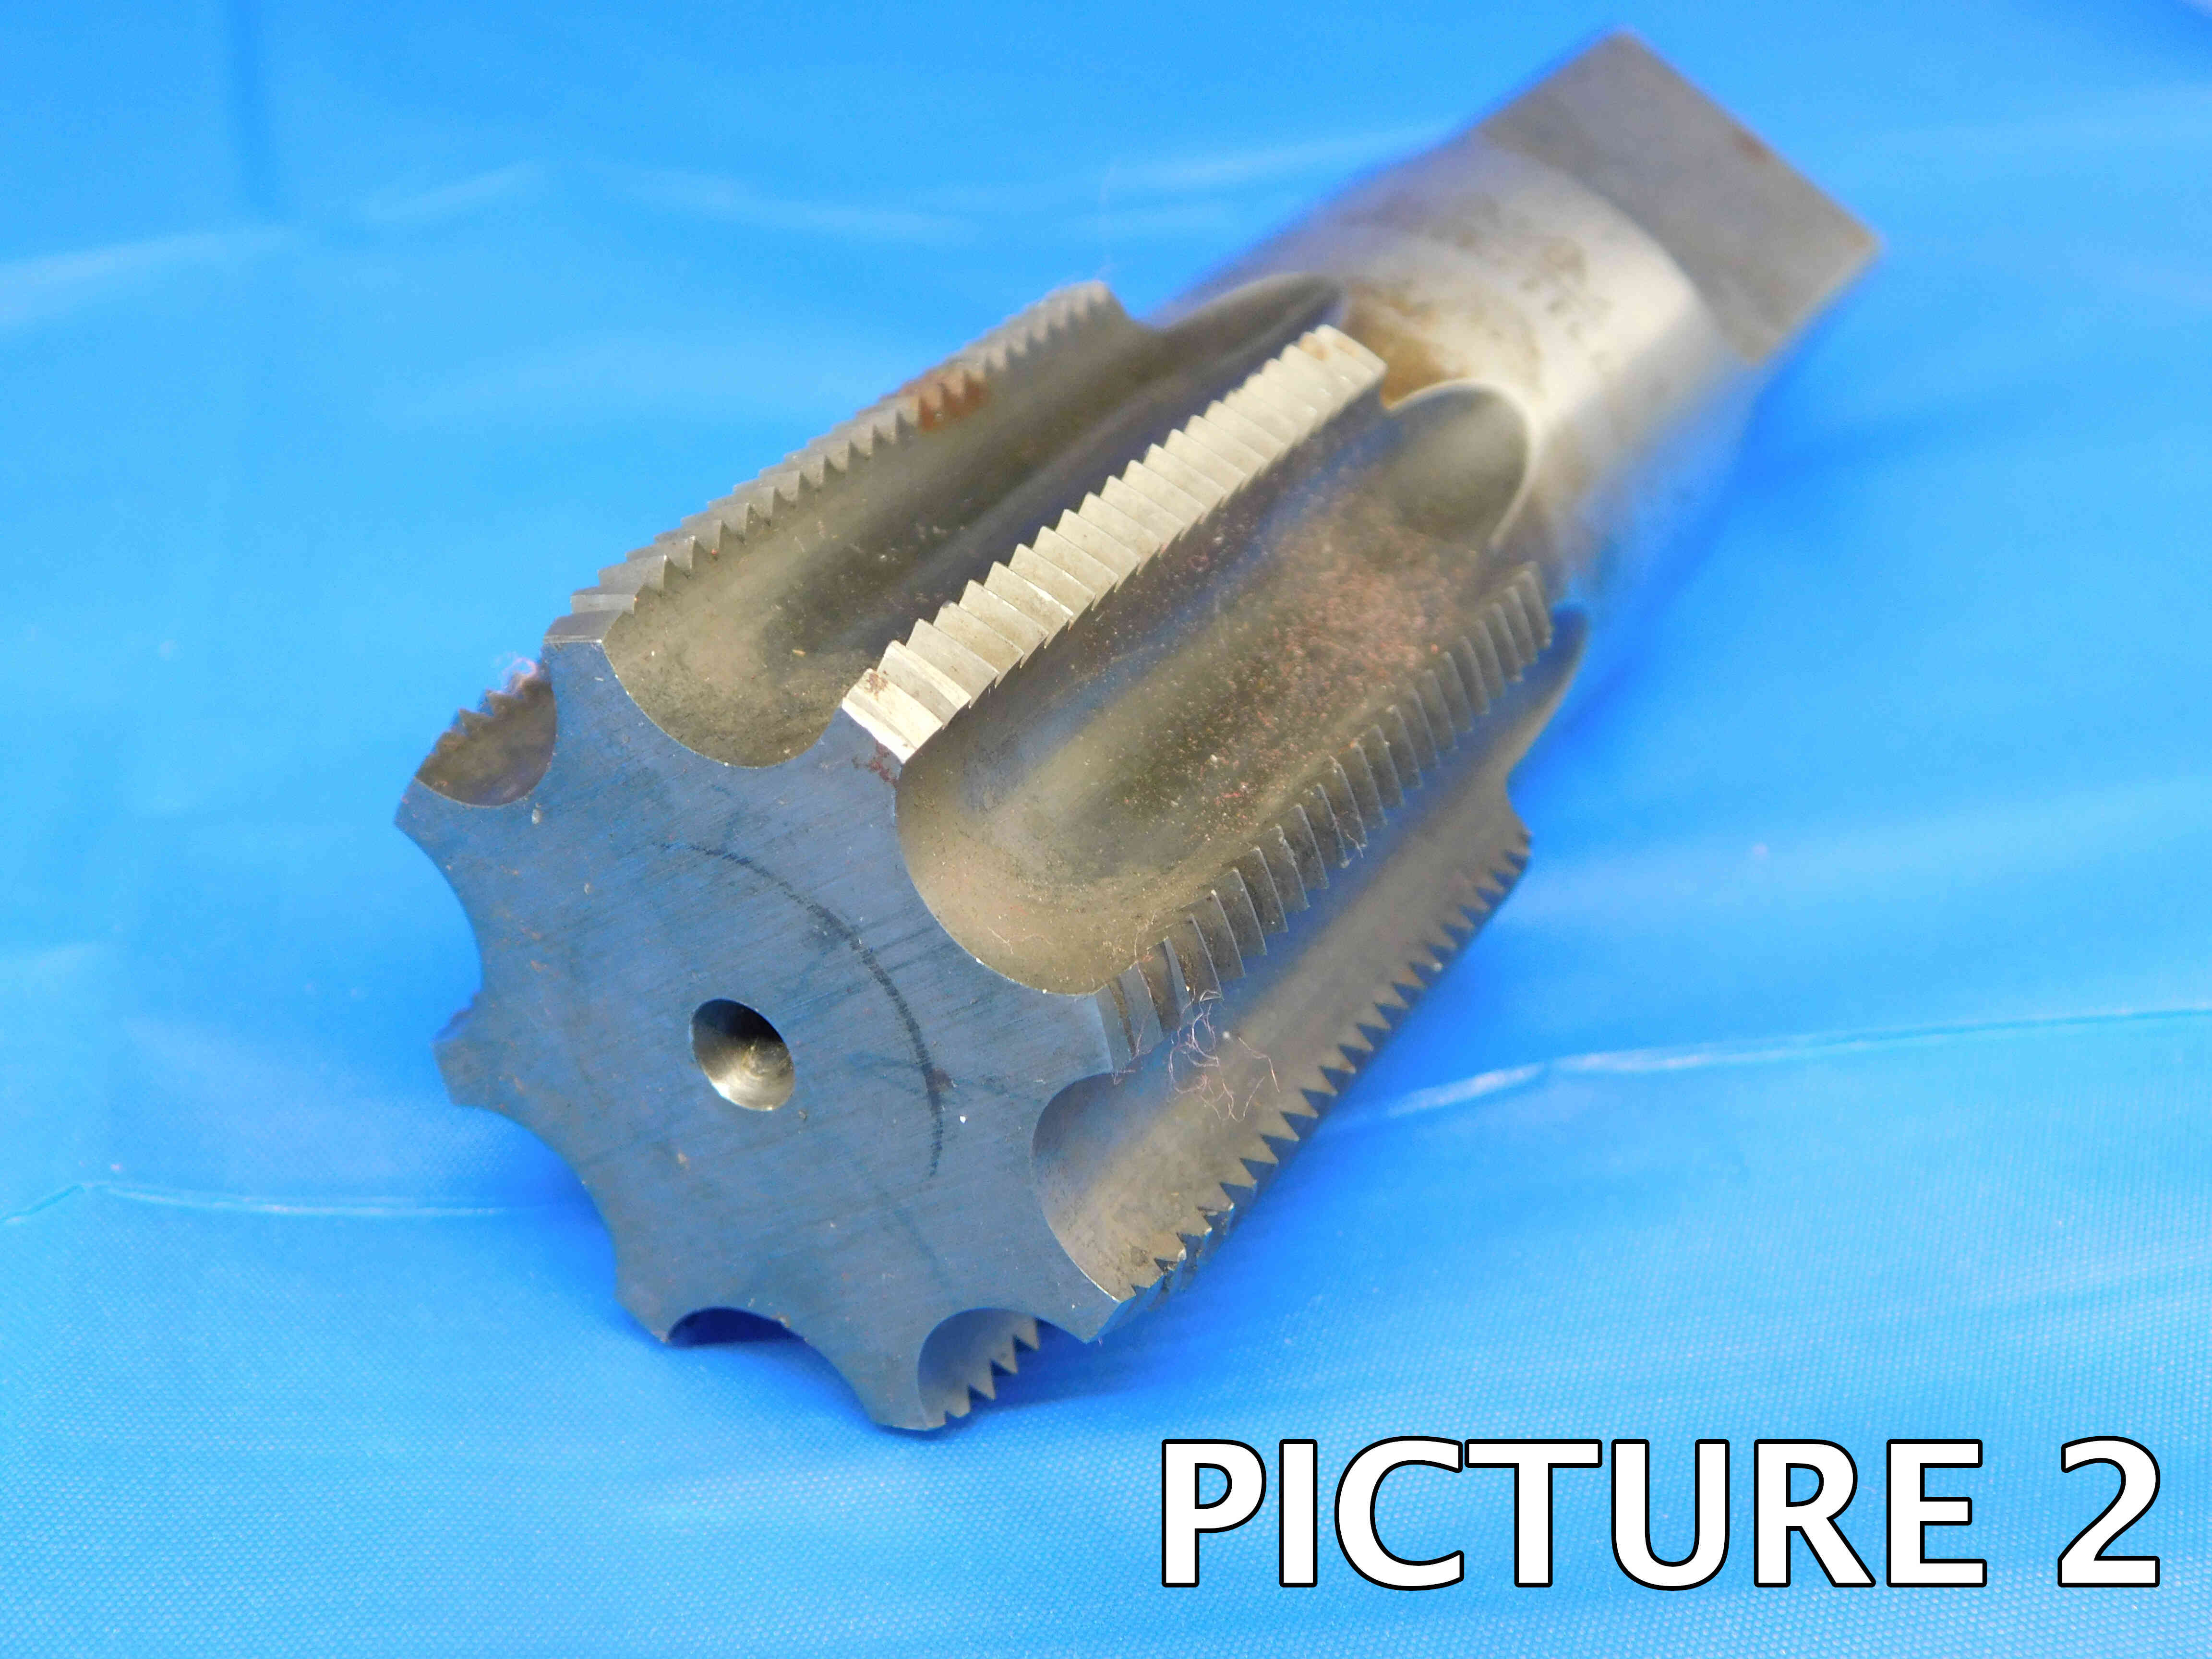
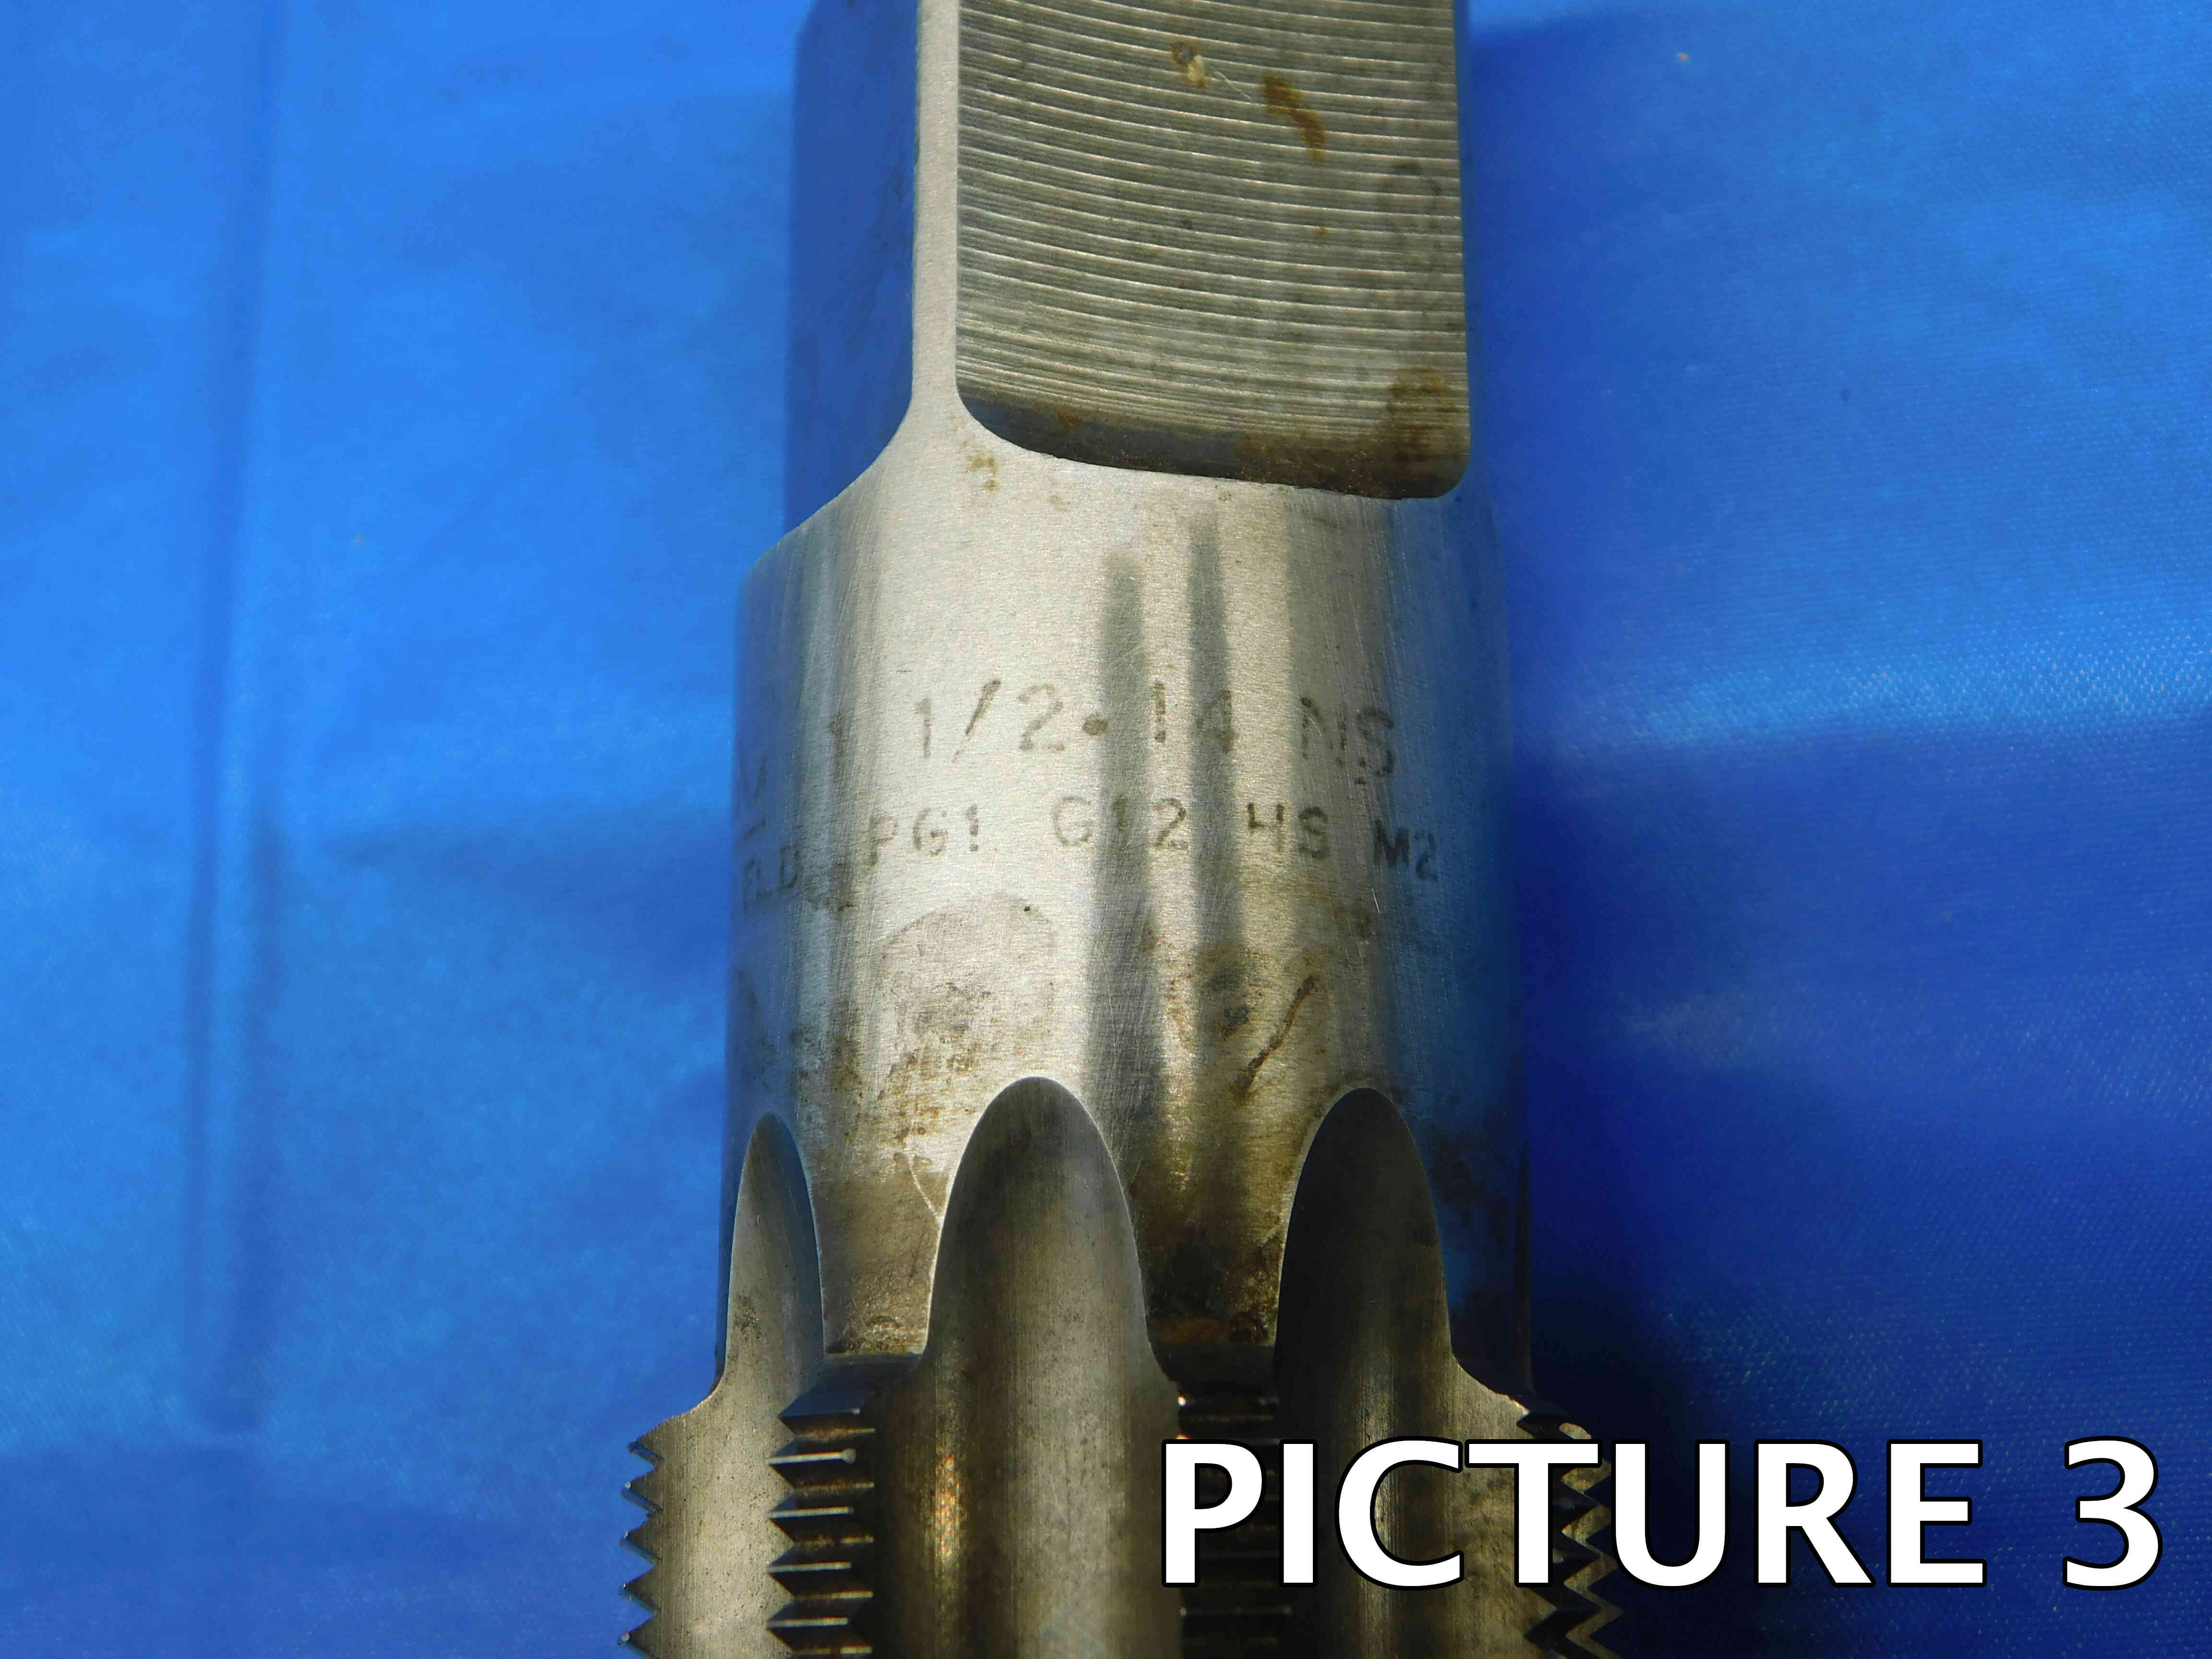
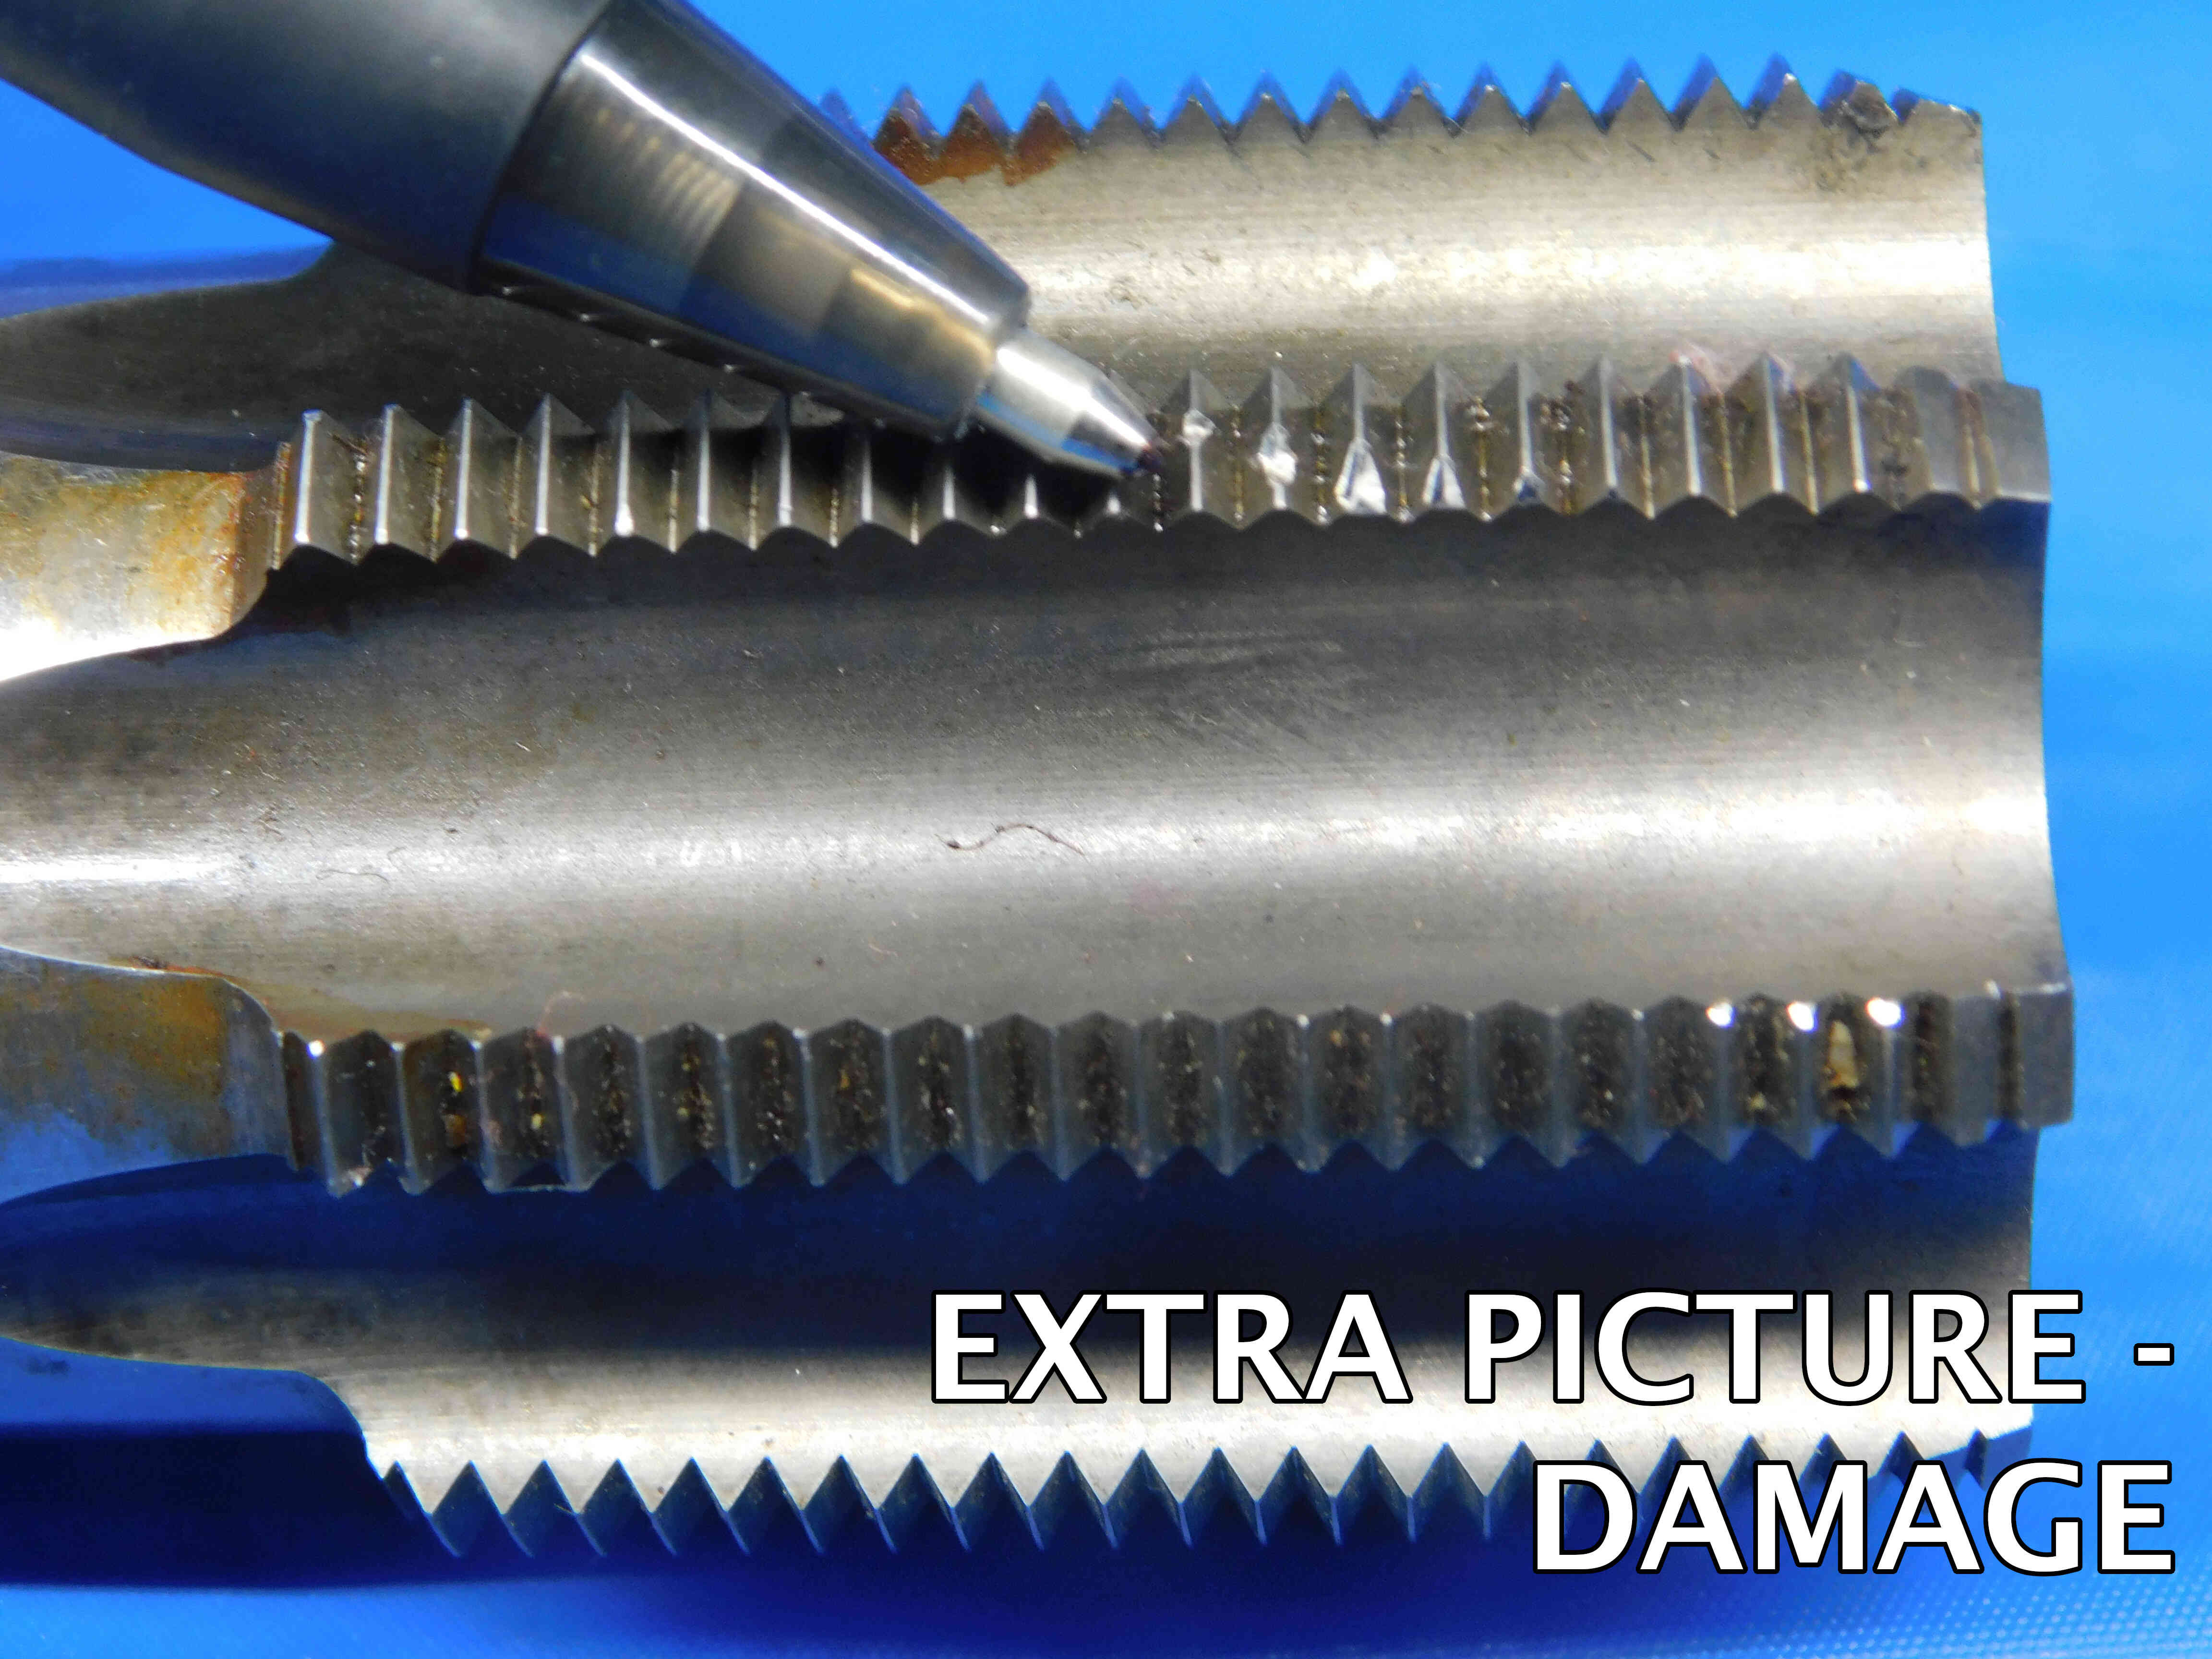
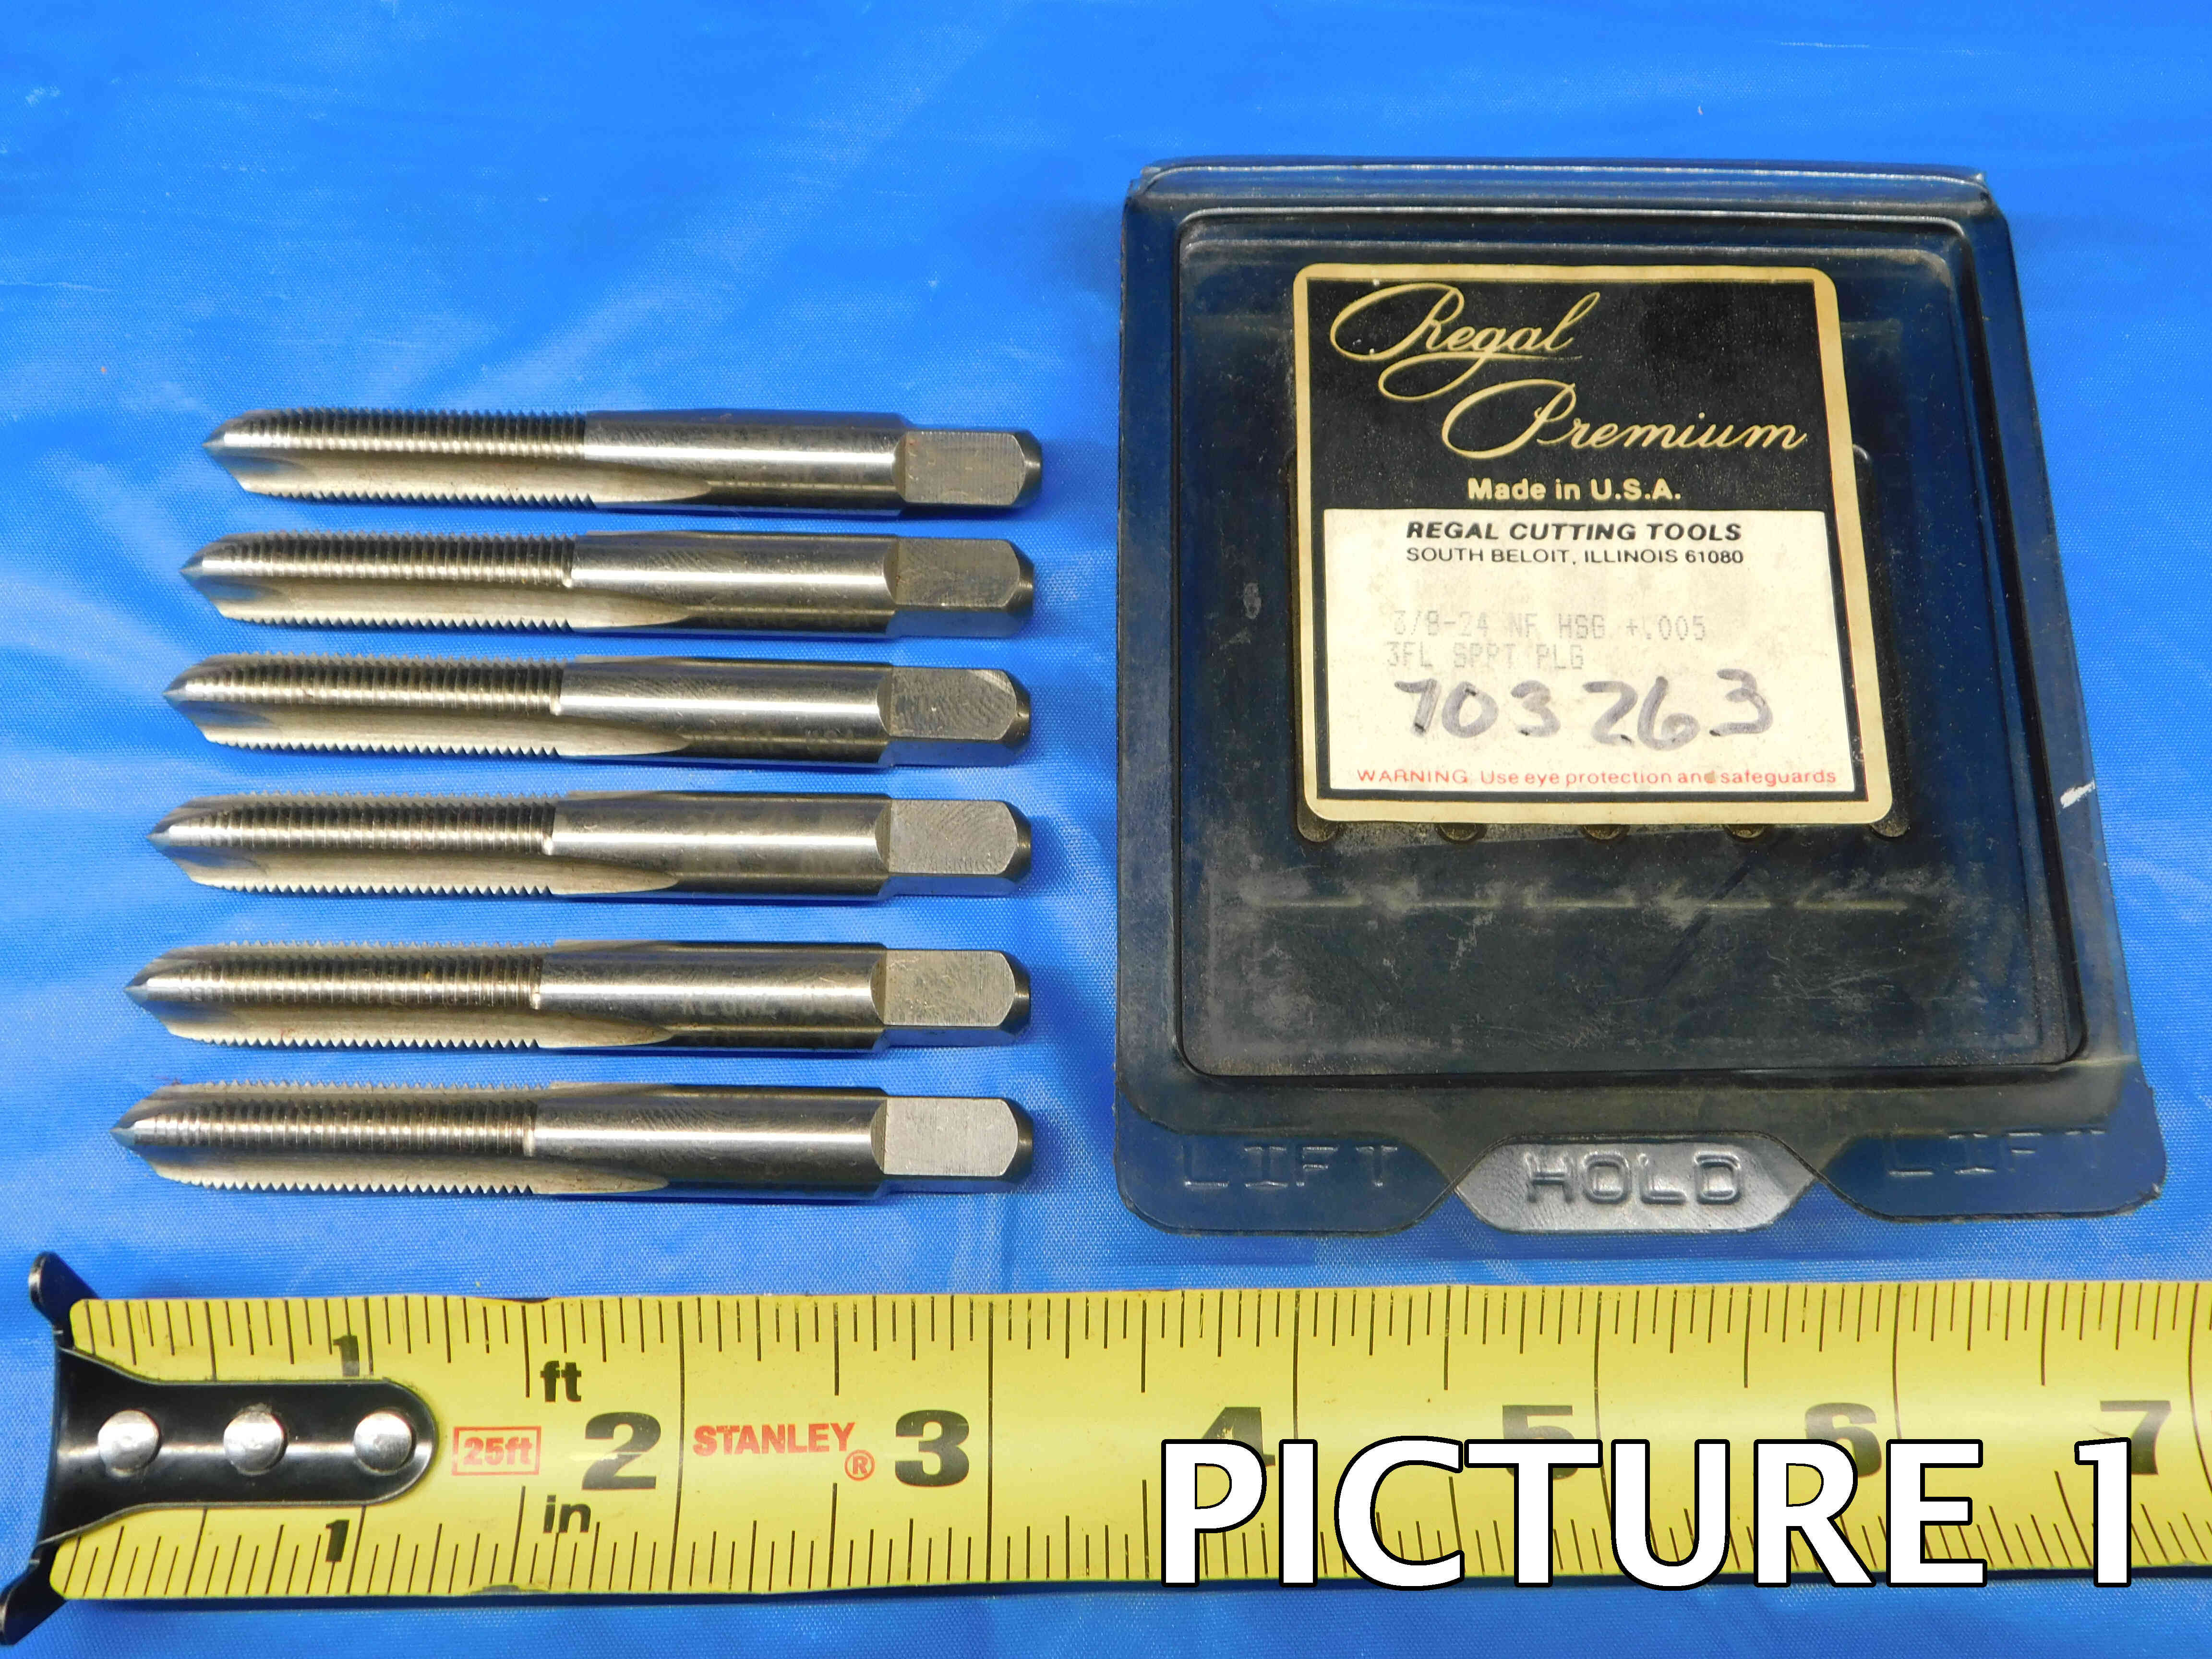
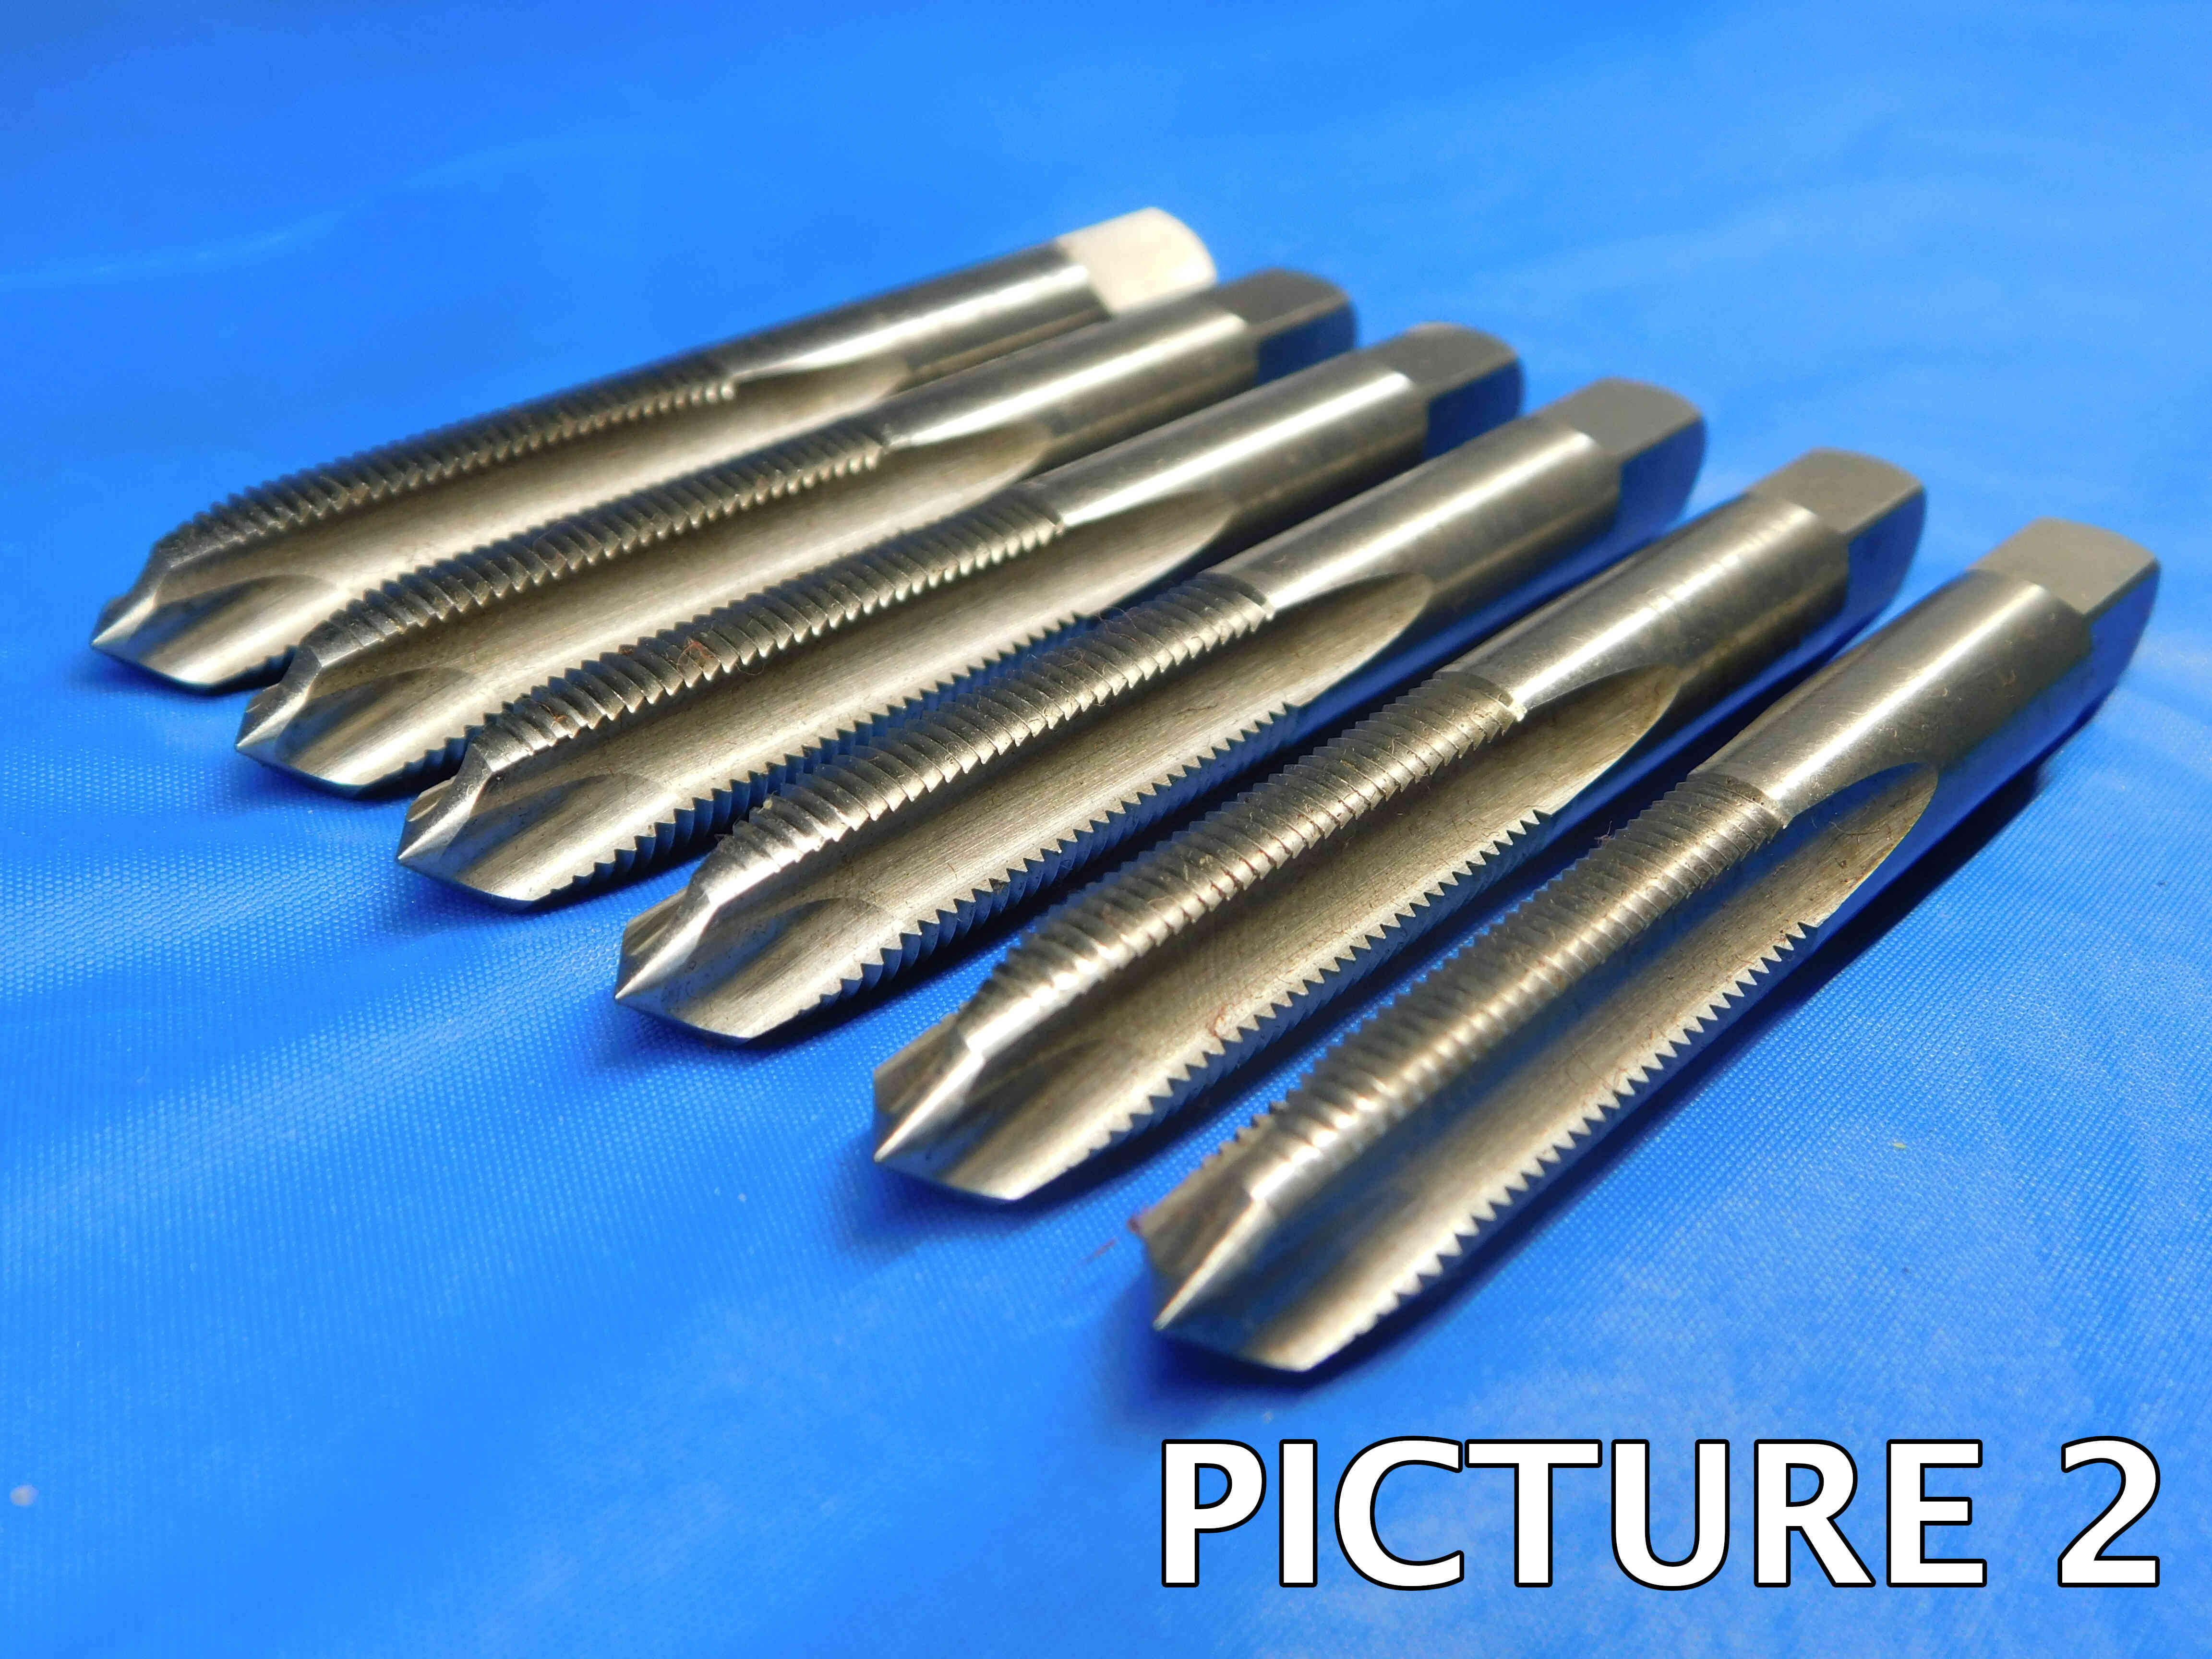
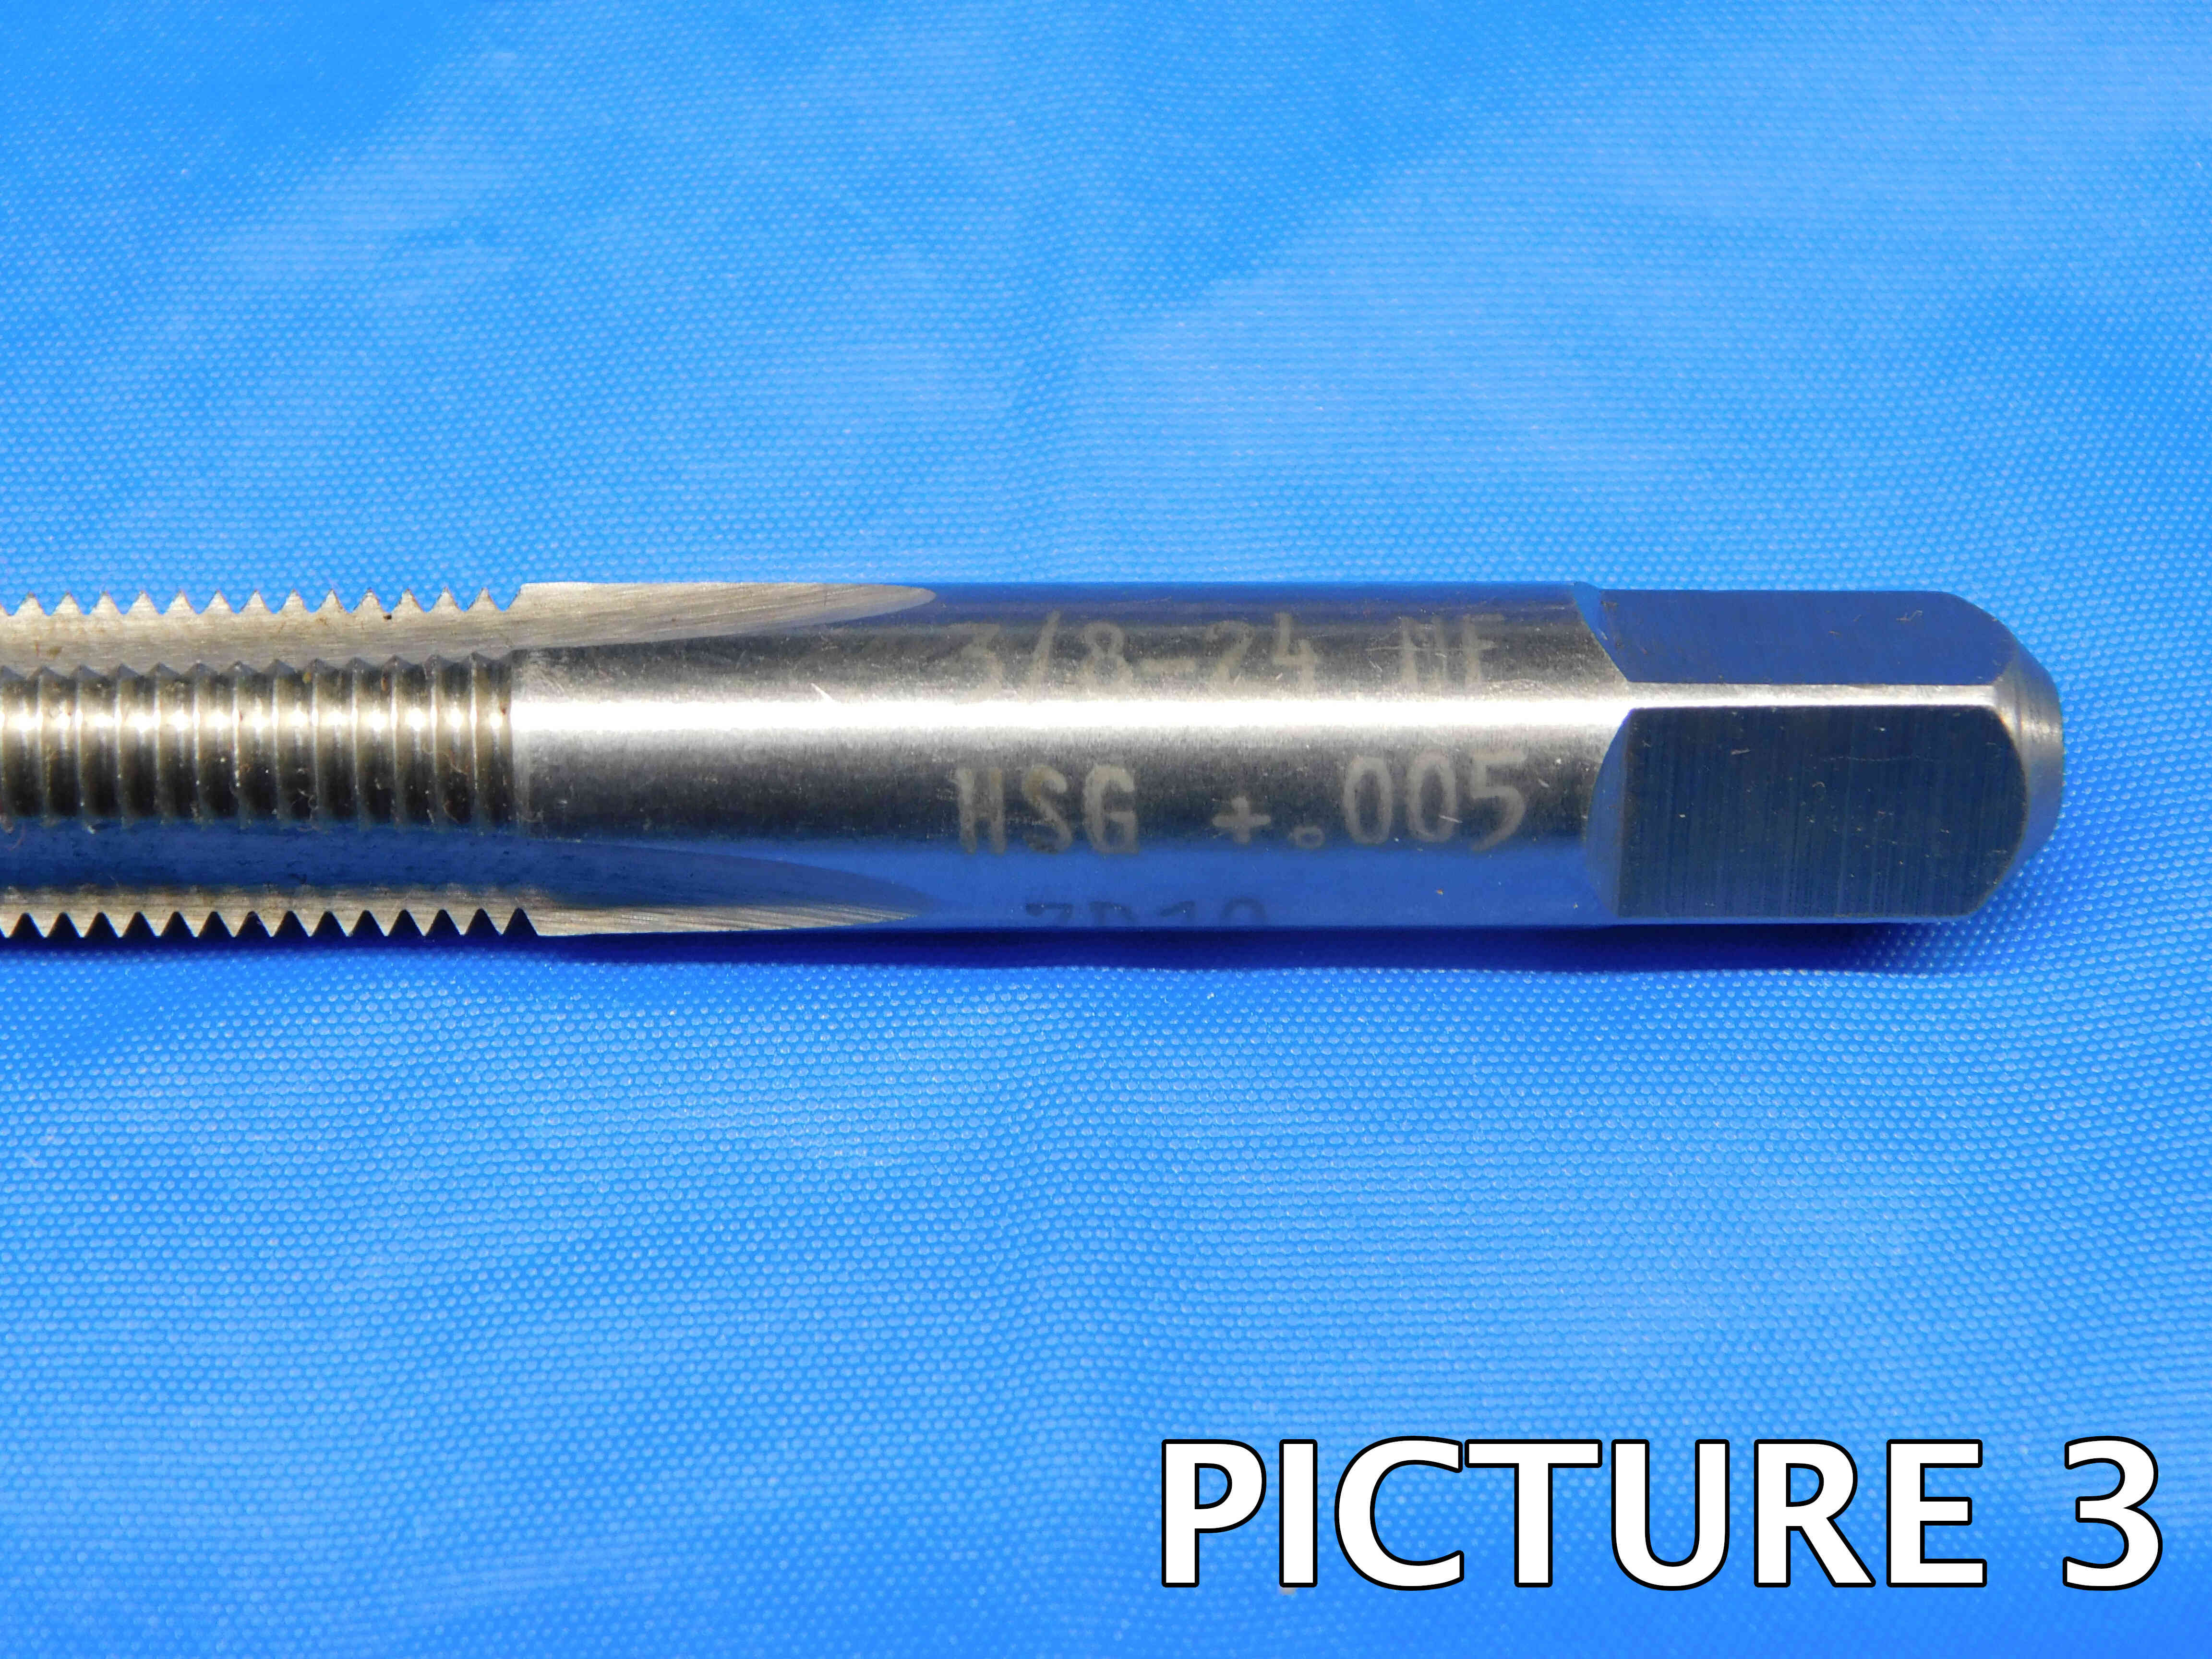
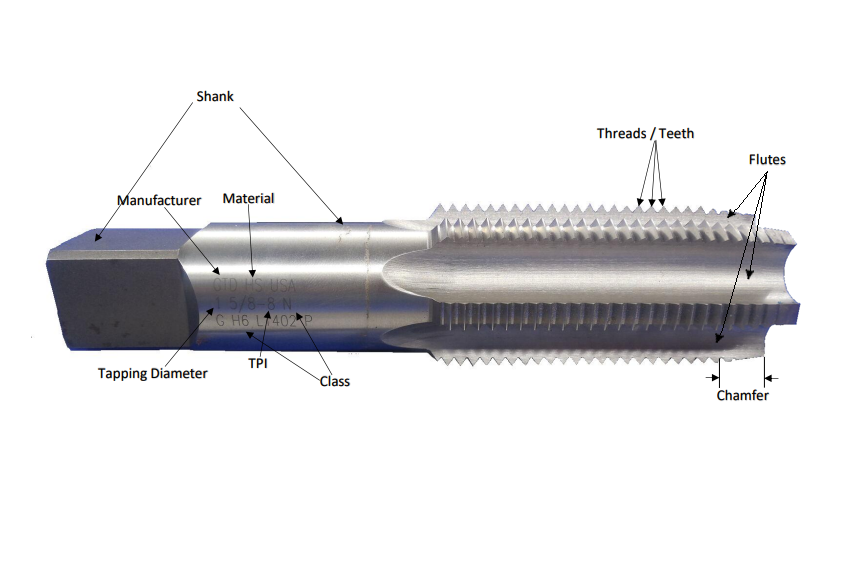
If a tap is labeled, you do not need to take any measurements. The labeling on the tap will tell you the tapping diameter and TPI. The class is also typically labeled, but can be left blank if it is not.
The brand will frequently be labeled on the tap. If the brand is not labeled, click the "Unlabeled" button to the right of the brand cell. Make sure this cell is not left blank, or the listing will not upload properly. Note: Items are often labeled with the country of origin (USA, China, Japan, Poland, etc). This should NOT be entered as the brand, and furthermore should not be included in the listing at all EXCEPT for USA which can be used as a filler.
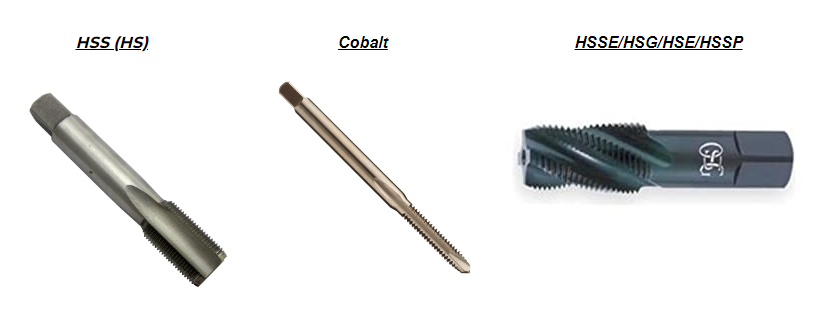
High Speed Steel (HSS) is the most common material used for taps. It is used in many cutting tools for its high wear resistance at higher temperatures.
Cobalt taps are pretty uncommon; they have a dull gold color throughout the entire tap and are slightly heavier than steel. Cobalt will often be denoted in labeling as "M-42", which is an HSS-Cobalt alloy but can simply be described as Cobalt or M-42 Cobalt.
HSSE, HSG, HSE, HSSP are some examples of steel alloys that may appear to have a darker color. Only list a tap as one of these alloys if it is specifically labeled - there are many different ways a tap could be given a darker color so we should not make assumptions about these materials. These darker tinted metals are not to be confused with coatings, as coatings will not be applied to the entire shank.
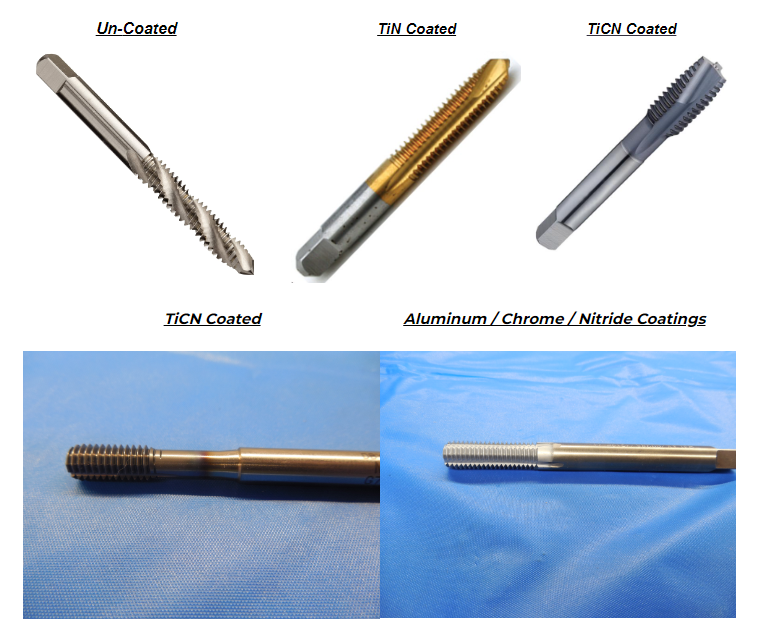
Coated taps will have a distinctive color difference between the cutting threads and the shank, as can be seen in the pictures above.
Some coatings can be difficult to tell apart - leave this cell blank if you are not sure.
TiN (Titanium Nitride) will have a golden color and is used to increase hardness and longevity of a metal.
TiCN (Titanium Carbo-Nitride) has a darker tint similar to carbide and has a higher hardness than TiN. There will be a discoloration that looks like a chemical burn where the TiCN coating stops, seen in the 2nd TiCN example.
Aluminum coatings, chrome and various other nitride coatings such as TiAlN (Titanium Aluminum Nitride), and AlTiN (Aluminum Titanium Nitride) will have a much brighter silver finish.
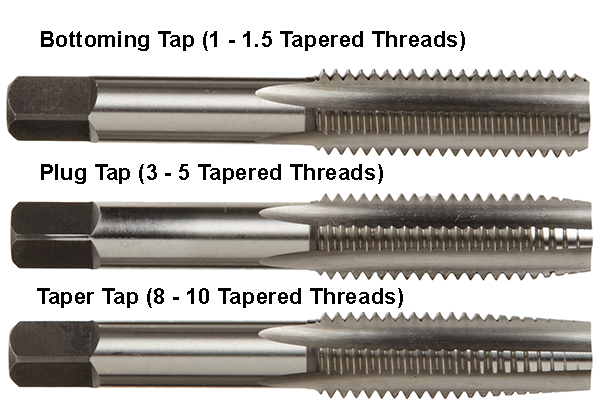
The most common types of taps are Taper Taps, Plug Taps, and Bottoming Taps. They each have a different use and are frequently sold together as a 3-piece set by manufacturers and distributors.
Taper taps have 8-10 tapered threads at the chamfer and is most often used as a starter tap for difficult blind holes. It is typically used in conjunction with a bottoming tap which finishes cutting the threads.
Plug taps have a more gradual taper, covering 3-5 threads at the chamfer. These are great for through-holes, as they are almost as easy as taper taps to start, but also offer a more complete set of threads and don't always requiring a finishing tap.
Bottoming taps will have far less taper at the chamfer, tapering for only 0-2 threads. They get very close to threading the bottom of a blind hole and are best used after a taper or plug tap has been used to cut the initial thread.
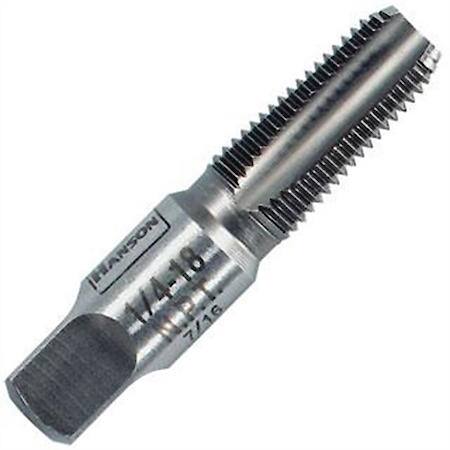
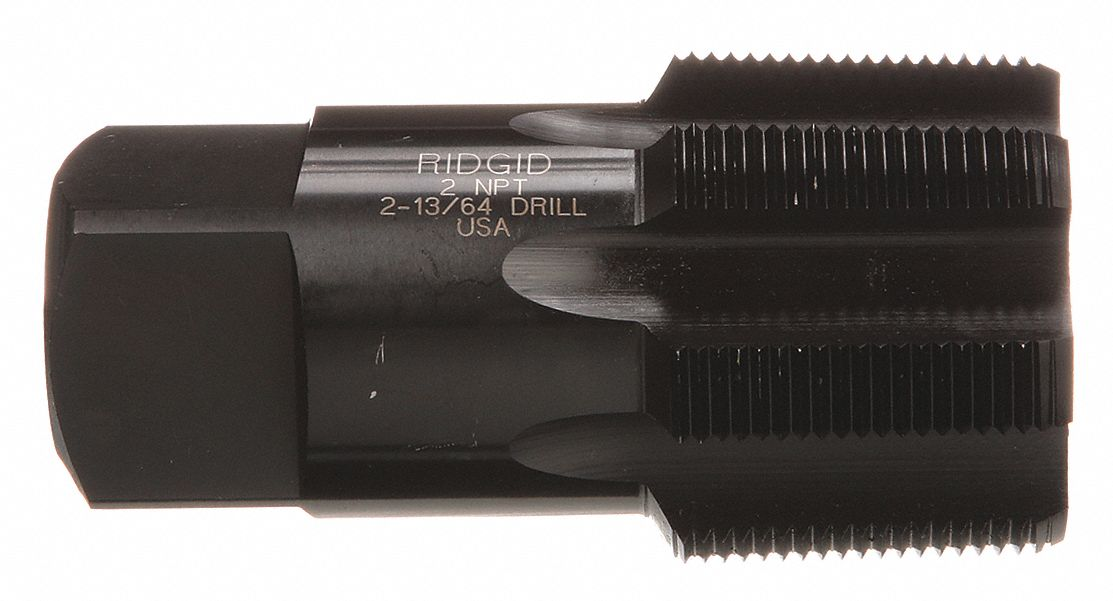
Pipe taps are used to cut specific types of threads used in various pipe fittings. The easiest way to identify a pipe type is by the class, which will always include the letter "P" (for example: NPT, NPSM, BSPP).
Pipe threads can either be straight or tapered, which will typically be denoted by either an "S" or "T" in the class, respectively - for example, NPT and BSPT are tapered threads, and NPSM and BSPP are straight threads.
In addition, pipe threads are always oversize - for example, a 1" pipe tap will have an outer diameter that actually measures around 1.25". If you think a tap may be a pipe tap, measure the O.D. using calipers to confirm that it is oversize - if it is not, it is likely not a pipe tap.

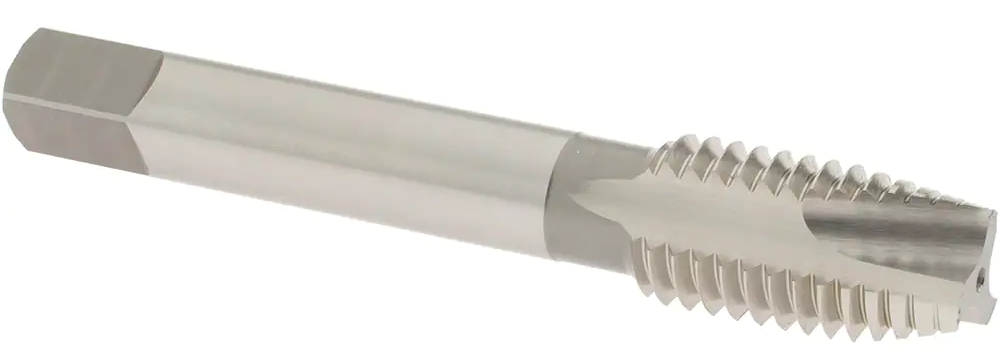
Spiral Point taps have a spiral toward the beginning of the threads, created by the threads reducing in width as they approach the tip. This helps with clearance of material chips when tapping through or blind holes. Spiral point taps can be plug or bottoming and are always straight flute.
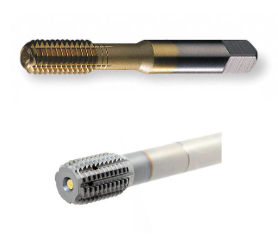
Thread Forming taps will have very little space between flutes and will be much more circular. These taps may still be bottoming, plug, or taper styles as well. They operate by reforming the material they are tapping rather than cutting.
This is typically the first number you will see in the labeling. Metric taps are usually labeled with an M (for example, M16 or M30 meaning 16mm and 30mm) and should be listed that way as well.
You may also encounter number sizes which refer to specific decimal equivalents. The number size should be entered as the tapping diameter with a "#" sign, and the decimal equivalent should be added as filler. Refer to the list of sizes below:
#0 - .060" #5 - .125"
#1 - .073" #6 - .138"
#2 - .086" #8 - .164"
#3 - .099" #10 - .190"
#4 - .112" #12 - .216"
Note: When entering a whole-number inch size, always include the " sign. The " sign should not be included for any size including a fraction or decimal. So, for example: If a tap's diameter is exactly one inch, it should be entered as 1" and not just 1. If the tapping diameter is one and a half inches, it should be entered as 1 1/2 or 1.5 and not 1 1/2" or 1.5".
Also referred to as "Pitch". For imperial (inch) sizes, the pitch is the number of threads/teeth per inch. For metric sizes, the pitch is the number of millimeters between each thread/tooth (but it is still commonly referred to as "TPI").
This is usually the second number in the labeling, and is often separated from the tapping diameter with a hyphen (ex., 3/4 - 16, where 3/4 is the diameter and 16 is the TPI) or, in the case of metric taps, an X (ex., M16 x 1.5, where M16 is the diameter and 1.5 is the TPI).
Pipe taps may occasionally not list the TPI in their labeling. This is because there is only ever one possibility for each diameter size:
NPT / NPTF / NPS Taps:
1/16, 1/8: 27 TPI
1/4, 3/8: 18 TPI
1/2, 3/4: 14 TPI
1", 1 1/4, 1 1/2, 2": 11 1/2 TPI
2 1/2 and above: 8 TPI
BSP / BSPP / BSPT Taps:
1/16, 1/8: 28 TPI
1/4, 3/8: 19 TPI
1/2, 5/8, 3/4, 7/8: 14 TPI
1" and above: 11 TPI
The class is usually the last part of the labeling, and consists of two parts: the thread series and the H-limit. (Note: it is not uncommon for one or both of these to be unlabeled)
The thread series is related to the type of thread and the specific combination of diameter and TPI. Unified (UN) threads are the most common type used in the US, and include several sub-series such as Unified Fine (UNF), Unified Coarse (UNC), Unified Extra Fine (UNEF) and Unified Special (UNS). On taps these are often labeled without the "U", so you will typically see N, NF, NC, NEF, or NS instead. Pipe taps have different series depending on the specific type of pipe fitting they are used for, and should always begin with NPT, NPS, or BSP (the "P" in all of these series stands for "Pipe", which is one of the easiest ways to identify a pipe tap).
The H-limit refers to the tap's tolerance, which is the possible variation in the actual measured size of the completed thread. Some threads, such as those used in aerospace applications, will have a very tight tolerance in order to ensure a very precise fit between parts, while other applications that do not need to be so precise may have a much wider tolerance.
***The following information is not necessary to understand for listing taps, and has been included just for technical reference:
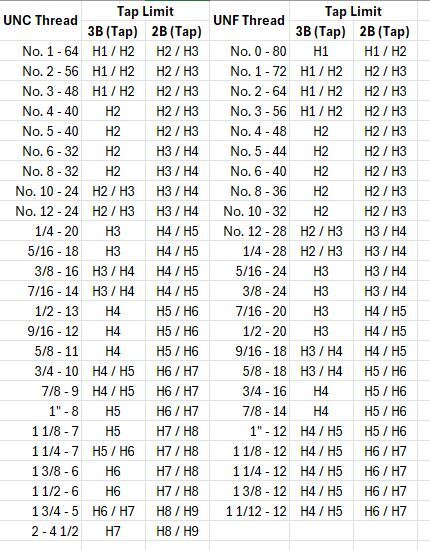
The H-limit corresponds to a tolerance of +.0005" per H number. H1 = +.0005, H2 = +.0010, H3 = +.0015, and so on. There is a direct relationship between H-limits and the 2B / 3B classes seen on thread plug gages, however this relationship scales as the thread diameter increases. The chart below shows the corresponding H-limits for several common thread sizes:
Many taps make threads with special applications. Some may even have more than one specialty - be sure to include any and all applicable specialties (as described below) in this section of the listing.
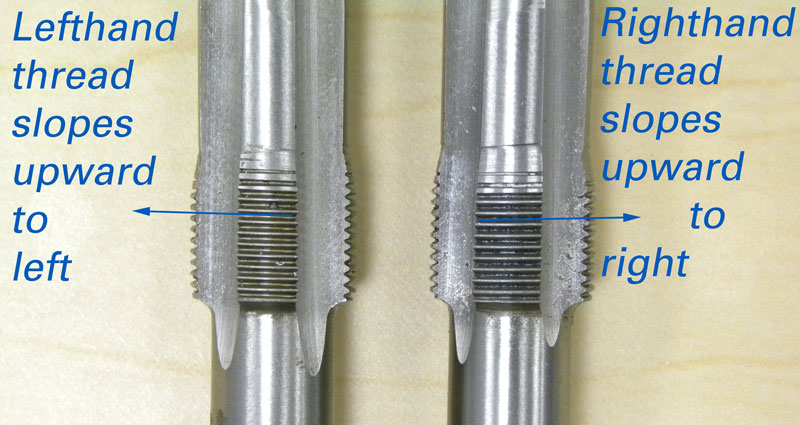
Left hand taps make threads that turn the opposite way from standard right hand. They can be identified usually from the labeling (often with "LH") as well as having the threads go up and to the left as shown in the picture above.
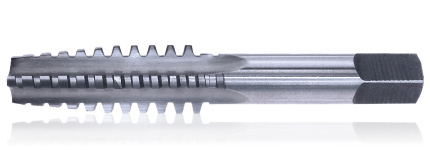
ACME taps have a lower profile angle (29 degrees) and a flat crest, and are primarily used in heavy load work. Acme threads may be referred to as trapezoidal, and are sometimes notated in labeling as "NA". Stub Acme threads are shallower than standard Acme, and can be notated in labeling as "Stub", "SA", or "ST".

Tandem taps are special Acme taps that have an extended chamfer with two sets of chamfered cutting threads which combine the initial roughing cut with a finishing cut in one step.
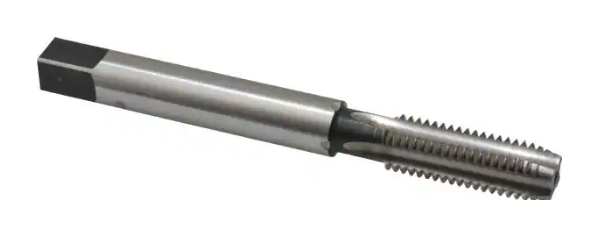
Pulley taps create internal threads in set-screw holes on pulley assemblies. They have a long shank for accessing hard-to-reach holes that a standard tap could not reach. The shank diameter is roughly equal to the thread diameter and acts as an alignment guide as the tap reaches through the pulley hub to access the holes.
Other thread types include Whitworth (55 degree profile angle also notated by "Whit", "BSP", or "G, R, RP" followed by the tapping diameter.), and STI Helicoil (Oversize taps for special screw inserts notated by "STI", "HELICOIL", or "HC").
Some taps will be intentionally Oversize or Undersize which will be noted in the labeling (such as + .005 or - .001).
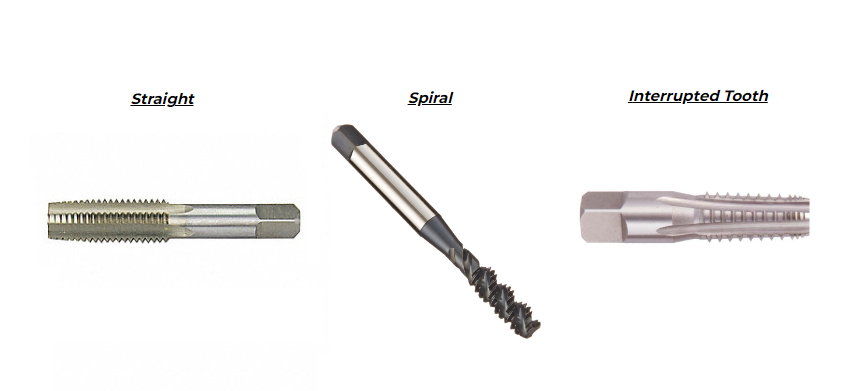
Straight flute is the most common type of flute in tapping. This is your standard type and has a wide range of tapping applications.
Spiral flute taps have a helical angle to the flutes typically between 5 and 45 degrees. The spiral fluting helps to remove or evacuate chips from the hole.
Interrupted tooth taps have every other tooth removed to reduce friction and allow better lubrication. They are most often pipe taps, but can be applied to any tap type.
The "Filler" section is used to add other relevant information to the title which is not covered by the other sections. Fillers can be a good way to increase a listing's visibility - we always want to include as much information as possible that we think a customer might be searching for in order to make sure that our listing is coming up in their search results.
There is not necessarily one right answer when it comes to fillers, and often it will be up to you to decide what should and should not be added as filler. Tap listings frequently have a lot of extra space for fillers - here are some suggestions for what to include:
-"USA" or "USA Made" can be included on any tap made by a US-based manufacturer (you may have to do some research if you are not sure if a brand is from the US)
-"LH" should be added as a filler for any Left Hand tap
-Tolerance classes are sometimes labeled with or without hyphens; if a tap is labeled "H3" for example, it's a good idea to add "H-3" as a filler
-Similarly, customers may search for the size with a hyphen (and no spaces) such as "1/2-13" or "3/4-16" so this can be good to add as filler as well
-Metric taps: if TPI is a round number, add a filler with ".0" (ex., 1 -> 1.0); also, a filler which formats the diameter with "mm" (ex., M10 -> 10mm) can be useful as well
-NPTF Pipe Taps: The "F" in the class refers to "Dryseal" which should be included as a filler
-For particularly long taps, "Extension" or "Extra Reach" should be added as filler along with the tap's OAL
Note: Keep in mind that titles have a maximum limit of 80 characters.
Additional Specifications & Special Condition
The Additional Specifications section should be used for any secondary labeling or additional measurements that do not fit in the other sections of the listing. There is no character limit here so any relevant information that is not already covered should be included (within reason - we don't want to overload the listing with unnecessary information, so ask your trainer if you are not sure whether or not to include something in this section).
The Special Condition section should be used for any special notes about the item's condition such as damage or modification. Try to be specific when describing the condition, and reference pictures that point out the damage / modification if applicable. For example, "A few of the teeth are chipped - see picture #5 for details." General wear and tear does not need to be mentioned, but anything that will affect the tool's usage should be included here.
Once all information is entered, click here for the next steps.
