
Inserts are replaceable cutting materials which are highly popular in the machining world. When an insert becomes worn down, it can be "indexed", meaning it is rotated so that an unused corner of the insert can be used to continue cutting a workpiece, and when all sides have been used up the insert can simply be replaced without having to replace the entire tool. Tools that use inserts are referred to as "Indexable".
The inserts themselves will typically not need to be cleaned, since they are almost always new. If needed, packaging should be cleaned with a rag and a small amount of WD40, making sure not to smudge or remove any labeling.
Click here for info on how to upload pictures
Unlike most other tooling, the way that inserts and their packaging are arranged in pictures will not always be exactly the same. There are several factors that determine how we want to picture inserts - be sure to read through all of the "1st Picture" scenarios below to make sure you are arranging your pictures properly. If you are picturing spade drill inserts, refer to this section, as these inserts do not follow the same rules as other inserts.
***Before Taking Pictures: Check the labeling on each pack to see if it lists the number of inserts. If this number does not match the actual number of inserts we have, use a black marker to black out (ONLY) this part of the labeling. This is important as we do not want to create any confusion about how many inserts the customer will be getting.
1st Picture:
a. If the packaging is factory-sealed: Do NOT break the seal to remove the inserts! Place the package of inserts above a tape measure, which is included to provide scale. Make sure there is sufficient space between the inserts and the tape measure (but no more than 1/4") so that the tape measure is not covering up any part of the inserts. If labeling is visible in this picture, orient the package so that it is readable (i.e., right-side up) if possible. Once this picture has been taken, skip picture 2 and go straight to picture 3.
Refer to the example below:

b. If the packaging is not factory-sealed:
i. If there is labeling on the bottom of the packaging: A tape measure at the bottom of the picture is used to show scale. Remove all inserts from the packaging and arrange them next to the packaging in a variety of angles such as in the examples below, making sure that at least one of the inserts is laying flat so that the full shape of the insert can be seen clearly. Make sure there is sufficient space between the inserts and the tape measure (but no more than 1/4") so that the tape measure is not covering up any part of the inserts. The packaging should be oriented so that the labeling is visible and readable (i.e., right-side up) and the packaging's cover should be included in the picture as well. If there is labeling on the side of the packaging, you may need to stand the packaging upright so that it will be oriented correctly. If the inserts are held in a removable plastic sleeve like in the 2nd picture below, and there are more than 5 inserts, you do not need to remove all of them from the packaging. Just arrange 5 of the inserts at various angles and leave the rest in the plastic sleeve.
Refer to the examples below:


ii. If there is not labeling on the bottom of the packaging:
1. If there are 5 or fewer inserts: A tape measure at the bottom of the picture is used to show scale. Remove all inserts from the packaging and arrange them next to the packaging in a variety of angles such as in the example below, making sure that at least one of the inserts is laying flat so that the full shape of the insert can be seen clearly. Make sure there is sufficient space between the inserts and the tape measure (but no more than 1/4") so that the tape measure is not covering up any part of the inserts. Any labeling on the packaging should be visible and readable (i.e., right-side up) and the packaging's cover should be included in this picture as well.
Refer to the examples below:


2. If there are 6 or more inserts: A tape measure at the bottom of the picture is used to show scale. Remove 5 of the inserts from the packaging and arrange them next to the packaging in a variety of angles such as in the example pictures below, making sure that at least one of the inserts is laying flat so that the full shape of the insert can be seen clearly. Make sure there is sufficient space between the inserts and the tape measure (but no more than 1/4") so that the tape measure is not covering up any part of the inserts. The remaining inserts should be left in the packing but must all be visible in the shot. The cover should be removed from the packaging but included in the picture, with any labeling visible and readable (i.e., right-side up).
Refer to the examples below:


The remaining pictures will be the same regardless of how the first picture was arranged:
2nd Picture: Close-up shot of the inserts from a different angle. The tape measure does not need to be visible in this picture. Skip this picture if the packaging is factory-sealed.
3rd Picture: Close-up shot of the labeling.
Additional Pictures: If you are listing used inserts (which is very uncommon), include a 4th picture showing a close-up of the worn-down side(s) of the used insert(s). If you think an additional picture is needed for any other reason, contact your trainer to confirm if it is necessary.
Refer to the pictures below some for examples of what the full set of insert pictures will look like:


***Note that in this final example, Picture 2 has been skipped because the packaging is sealed
Picture 1:
If you have packaging: This will be largely the same as other inserts' first picture. Remove the inserts from the packaging and place both the inserts & packaging above a tape measure, with the inserts oriented at a three-quarters angle and the packaging oriented so that the labeling is right-side up.
If there is no packaging: A three-quarters angle of the insert(s), taken from a high enough angle that most of the cutting edge is clearly visible. The tape measure should not be included in this picture.
Picture 2: A top-down picture of the inserts laying flat above a tape measure. The purpose of this picture is to clearly show the size of the inserts. Packaging does not need to be included in this picture.
Picture 3: Stand the insert(s) upright and take a top-down shot of the cutting edge. Unlike other insert types, spade drill inserts are often sold used, so it is very important that the condition of the cutting edges are clearly shown.
Picture 4: A close-up shot of the labeling. This can be either the packaging or the insert itself if it is labeled. If there is no labeling, or if it is too worn/faded to be visible in a picture, skip this picture.
Additional Pictures: Any damage or significant wear, especially to the cutting edge / tip, must be pictured. Use a pen to point to the damaged area. If you believe additional pictures are needed for any other reason, contact your trainer to confirm if they are necessary.
Refer to the examples below:


Brand
The brand will almost always be labeled on the insert packaging. If the brand is not labeled, click the "Unlabeled" button to the right of the brand cell. Make sure this cell is not left blank, or the listing will not upload properly. Note: Items are often labeled with the country of origin (USA, China, Japan, Poland, etc). This should NOT be entered as the brand, and furthermore should not be included in the listing at all EXCEPT for USA which can be used as a filler.
Carbide


Carbide Inserts make up over 90% of all inserts (if not 95%) and are widely used across all insert styles. Carbide is about twice as heavy as steel, having a dark gray and almost black appearance when uncoated. Carbide is popular for its wear resistance and toughness, as well as its ability to be manufactured into many shapes. Inserts should be assumed carbide unless weight or labeling suggests otherwise. The one exception to this is spade drill inserts, which are frequently High Speed Steel or Cobalt.
Cermet


Cermet inserts are made up of both ceramic and metallic materials and will weigh less than carbide, but more than ceramic inserts. They may be colored similarly to carbide and more often uncoated. Brands to look out for are Kyocera & Sumitomo who are well known for making inserts of this material.
Ceramic


Ceramic inserts are made up of only non metallic materials and will weigh the least of any material. They may be nearly any color, but are most often brighter than carbide, and nearly always uncoated. Brands to look out for are Kyocera & Sumitomo who are well known for making inserts of this material.
High Speed Steel (HSS)


HSS Inserts will be about 1/2 the weight of carbide and are less resistant to wear. They will be a much lighter color and are far less common than carbide inserts. This material will likely be labeled on the insert packaging, and should not otherwise be assumed.
There are several different types of coatings that are added to inserts in order to increase wear resistance and other factors. Some coatings can be difficult to tell apart, so leave this cell blank if you are not sure. Some of the most common coatings are described below:
TiN (Titanium Nitride)


TiN is the most common coating, and can be used for many applications. It increases wear and deformation resistance and will have an easily identifiable golden color.
TiCN (Titanium Carbonitride)


TiCN coatings are even more wear resistant than TiN. They can be hard to differentiate from uncoated carbide, but they may have a shinier silver look to them, and TiCN will often be noted on the labeling as it is not very common.
There are other coating options that are even less common, such as TiAlN (Titanium Aluminum Nitride) and various oxide coatings, which may be identified from labeling.
Inserts come in many shapes & sizes and are used for a wide variety of applications. The most common type, turning inserts, will often be labeled in the form of 4 letters followed by 3 or 6 numbers. Some examples of common turning inserts are: CNMG 432, VNMG 331, SCMT 160408. This describes most of the inserts properties. Insert labeling will not always be in this format however, and there are many letters & numbers that will need evaluated for their importance.
The images below are examples of where Size / Labeling may be found on a pack of inserts. As you can see, many inserts have two separate ways of describing the insert (such as TNMG 160408 & TNMG 332 in the second picture) which are essentially imperial and metric versions of the same thing. Both are important and must be included in the listing when present. You can either put both sizes in the "Size / Labeling" cell, or put one in this cell and the other in the "Filler" section. For more information about insert labeling and what each letter / number actually means, refer to this FAQ page: Identifying Inserts


The grade of an insert helps determine which material it was designed to cut. Insert grades are often printed directly on the inserts themselves, as well as found on the case typically following the Size / Labeling (refer to the images in the section above for examples). Different manufacturers have their own grade classifications which may be a combination of letters and numbers, or in some cases just numbers. Some major insert brands are listed below along with their common grades, which should help you start to recognize grades in insert labeling:
Kennametal: Grades usually start with "K" or "KC", such as: KC850, KC810, K68
Iscar: Grades usually start with "IC", such as: IC20, IC908, IC8150
Seco: Grades usually start with "TP", "T", or "CP", such as: TP200, TP300, TP22, CP200, T25M
Sandvik: Grades are usually numbers only, such as: 435, 2025, 3215, 4025
Ingersoll: Grades usually start with "IN", such as: IN2005, IN2030, IN40P
There are several different types of inserts which are used for different purposes. The most common types are described in the sections below. If you are not 100% sure what type an insert is, leave this cell blank.


As previously mentioned, turning inserts are the most common and will have some of the simplest shapes such as squares, triangles, and diamonds. If your Size / Labeling is in the 4 letters & 3 numbers format there is a very high chance that the insert is turning. Because they are so common, the "Type" section should be left blank for turning inserts, since this will be assumed from the labeling.


Another very common insert type, and often the insert of choice for indexable end mills and face mills, milling inserts tend to have an upward slope toward the cutting edge, and may otherwise look quite similar to turning inserts. How these inserts are named has similarities to turning inserts, but are not exactly the same. Because they are so common, the "Type" section should be left blank for milling inserts, since this will be assumed from the labeling.


Threading inserts are designed to make threads (such as those on nuts and bolts) and will nearly always have a 60 degree cutting edge shaped as a V as this is the standard thread in the US, although other thread forms such as ACME may appear to have a more flattened cutting edge. The first two inserts pictured above, which are roughly triangular in shape, are referred to as "Laydown" threading inserts, while the third insert above is referred to as a "Top Notch" style insert. There are other styles of threading inserts as well, such as the thread mill insert shown in the fourth picture.


Grooving inserts have a similar appearance to threading inserts, but with a flat cutting edge instead of coming to a point. Like threading inserts, they can come in "Laydown" (1st picture) and "Top Notch" (2nd picture) styles, as well as others.


Spade drilling inserts look much more unique compared to other insert types. They are far larger than most inserts, only have cutting edges on one side, and will often come in 1-2 piece packs. They are often made from non-carbide materials such as HSS or Cobalt, and unlike other insert types we will sometimes list them even if they are not new.
Most spade drill inserts will come to a point like the first two pictured above, but there are also Flat Bottom spade drill inserts (3rd picture above) and Round Bottom or Ball Nose spade drill inserts (4th picture above).
The way spade drill inserts are labeled and categorized also differs from most other inserts. For one, spade drill inserts typically do not have a grade. Also, spade drill inserts will have a Series that they belong to which determines the spade drill holders they can be used in. The series should always be included in the listing along with the cutting diameter, which can be measured with calipers if it is not labeled. ***Always measure to confirm the cutting diameter on a used spade drill insert, as it may have been sharpened / reground which will cause it to be smaller than the labeling indicates***
The Series will typically be labeled, but if not it can be determined by measuring the thickness of the insert and counting the number of screw holes, and comparing to the chart below:

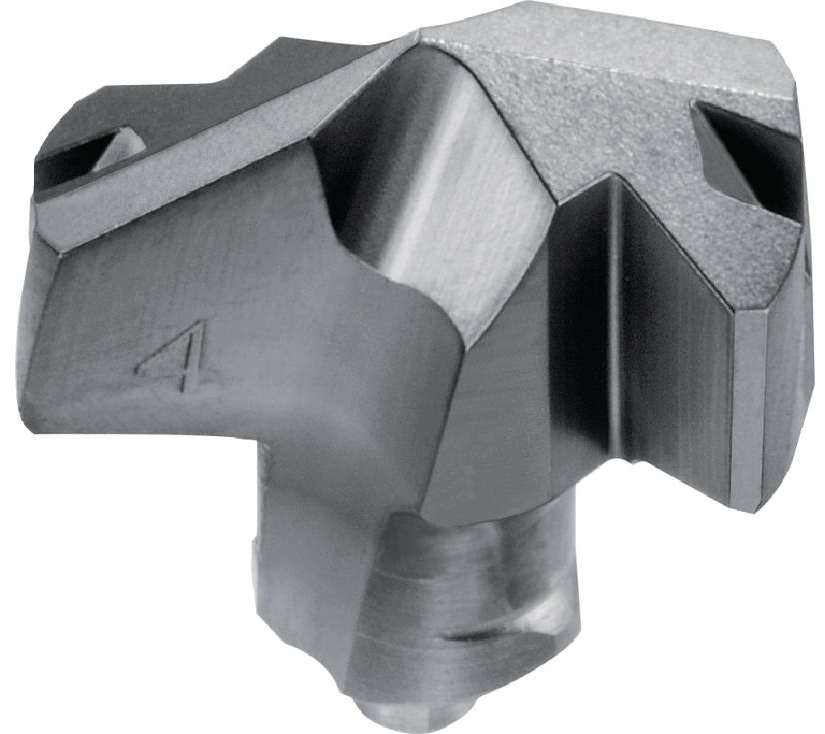
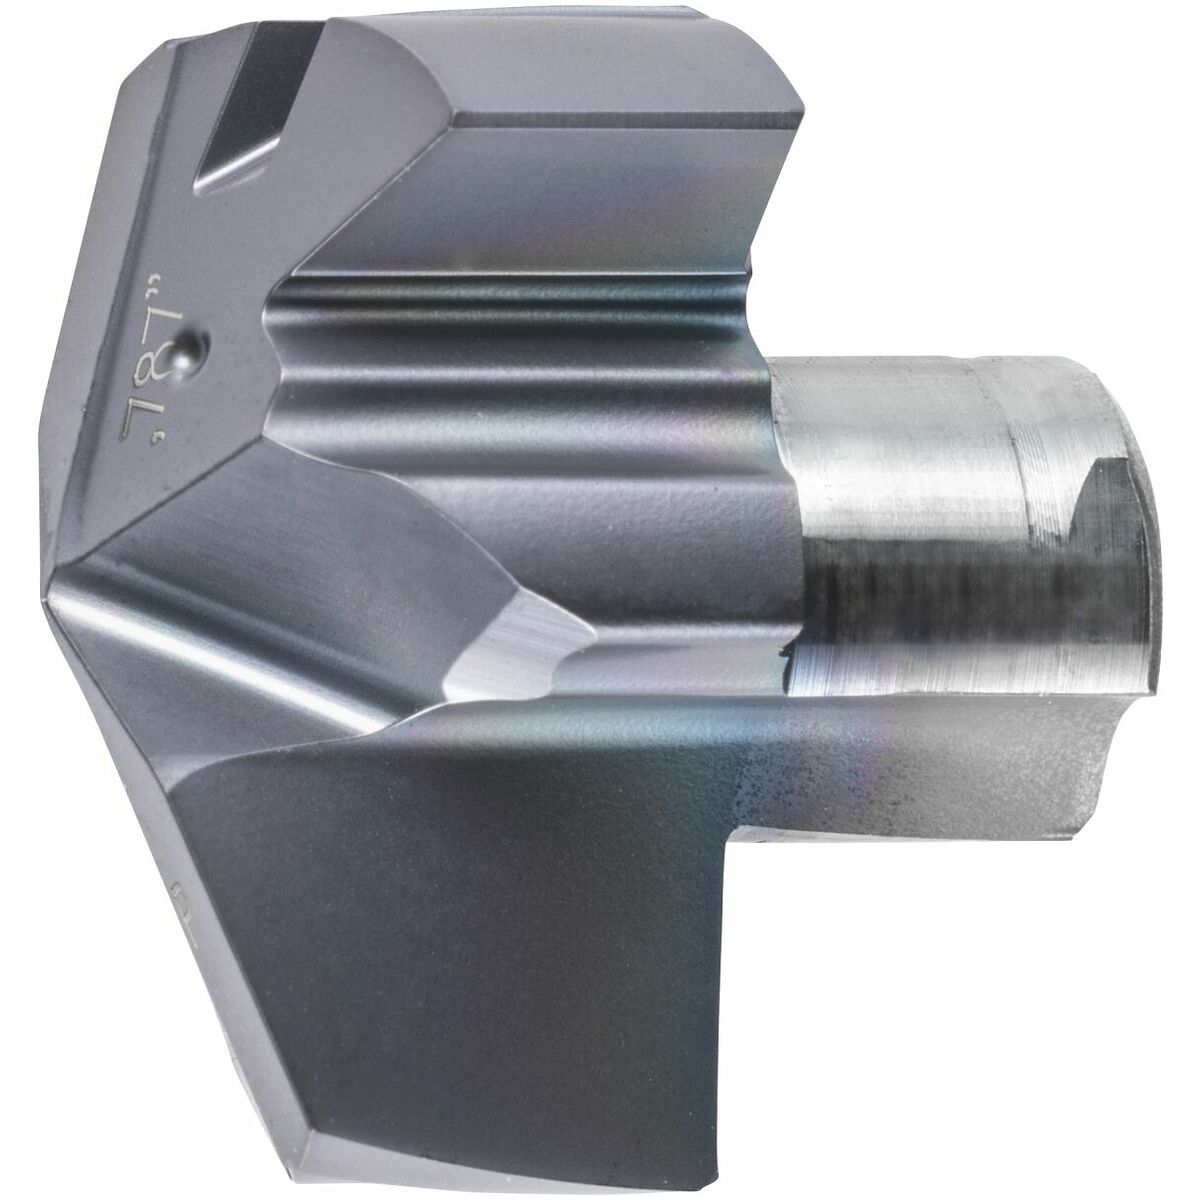
Inserts for replaceable-tip drills such as Iscar's "Chamdrill" series will appear similar to spade drill inserts, but with more rounded sides and a small shank at the bottom. Like spade drill inserts, the cutting diameter should be included in the listing (either as part of Size / Labeling or in the "Filler" section). This diameter will often be labeled in both inches and millimeters, such as in the image below. This is also reflected in the two different part numbers shown on the packaging:
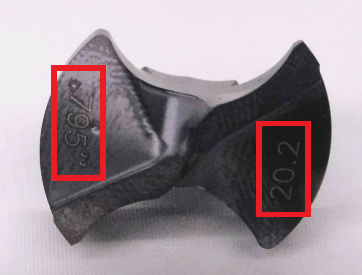
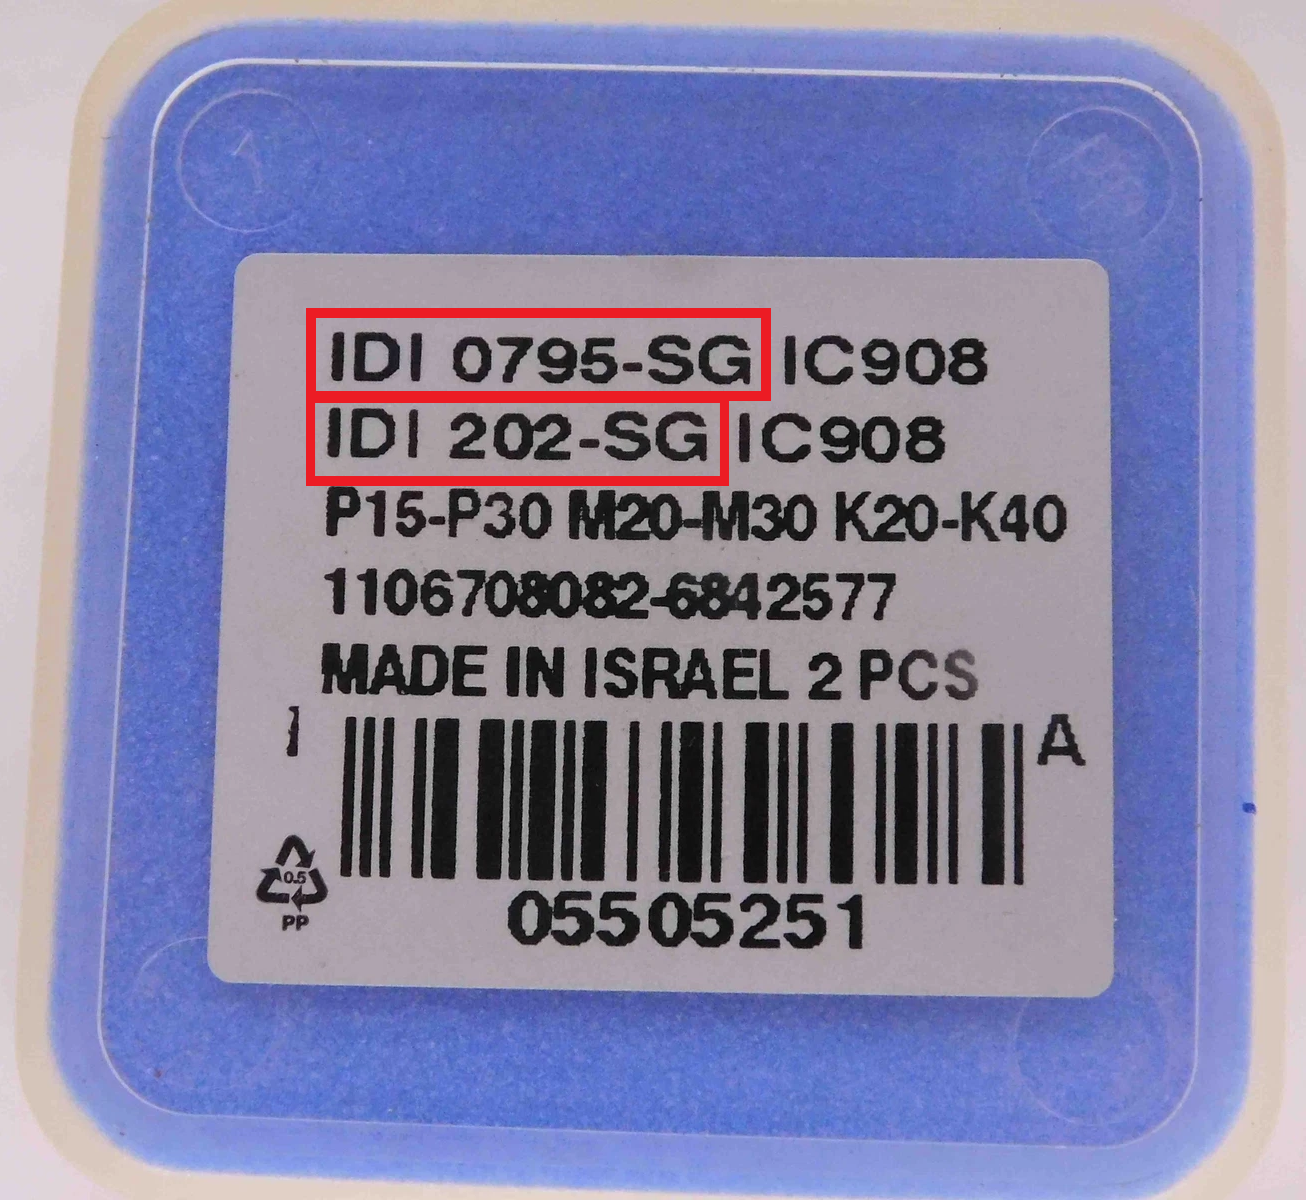
In these cases, both part numbers and both the inch and mm diameters should be included in the listing in order to maximize searchability.


Some indexable tools, such as turning tool holders and some boring bars, use seats or shims which the insert sits on top of. They are almost always uncoated carbide and are often thinner than inserts and have larger screw holes. The part numbers will typically look different from normal turning insert labeling as well. Shims can sometimes be difficult to distinguish from inserts, so if you are not sure you may need to research the part number online.
Seats / Shims can be listed the same way as inserts (they use somewhat similar labeling schemes and will usually have a grade), but the title should be edited to say "Insert Seats / Shims" instead of just "Inserts" (and the "Type" will be left blank for these).
The "Filler" section is used to add other relevant information to the title which is not covered by the other sections. Fillers can be a good way to increase a listing's visibility - we always want to include as much information as possible that we think a customer might be searching for in order to make sure that our listing is coming up in their search results.
There is not necessarily one right answer when it comes to fillers, and often it will be up to you to decide what should and should not be added as filler. Insert listings often have extra space for fillers - here are some suggestions for what to include:
-Any secondary branding / product names such as "Top Notch", "Kenloc", "Snap-Tap", etc.
-Because there are so many different ways insert labeling can be formatted, adding labeling fillers with / without spaces can be very helpful. For example: if labeling was entered as "CNMG432" (no space), use "CMNG 432" (with space) as a filler. Metric labeling will sometimes put spaces between each number (ex., TNMG 16 04 08) so that can be an option as well
-"USA" or "USA Made" can be added for any US manufacturer - you may need to quickly research a brand if you are not sure since this will not always be specifically labeled
-Threading & grooving inserts may have additional size information such as the thread size or radius which should always be included in filler
-Inserts which are still in sealed packaging can be described with "Factory Pack" or "Factory Sealed" in the filler
Note: Keep in mind that titles have a maximum limit of 80 characters.
Unlike other tooling categories, inserts will be set to New by default. Because of this, it is very important you check all inserts to make sure they are actually new. If you receive any inserts that appear to be used, contact your trainer immediately to determine if the used inserts should be included in the listing or if they should be scrapped out.
*Spade drill inserts are the exception as these will often be sold used (especially larger sizes). Make sure to change the condition to "Used" for any listing that includes any amount of used inserts.
Additional Specifications & Special Condition
The Additional Specifications section should be used for any secondary labeling or additional measurements that do not fit in the other sections of the listing. There is no character limit here so any relevant information that is not already covered should be included (within reason - we don't want to overload the listing with unnecessary information, so ask your trainer if you are not sure whether or not to include something in this section).
The Special Condition section is rarely needed for inserts, but should be used for any special notes about the item's condition such as damage or modification. Try to be specific when describing the condition, and reference pictures that point out the damage / modification if applicable. For example, "One of the inserts appears to be used on one edge - see picture #4 for details." General wear and tear does not need to be mentioned, but anything that will affect the tool's usage should be included here.
Once all information is entered, click here for the next steps.